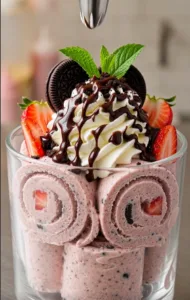
Strawberry Oreo Rolled Ice Cream combines fresh strawberries, creamy vanilla ice cream base, and crunchy Oreo cookies into one fun dessert. The mixture is blended until smooth, spread into a thin layer on a frozen ice cream plate, and scraped into beautiful spirals.
This recipe makes about 2–3 servings and is perfect for homemade dessert videos, parties, or a fun weekend treat.
Ingredients
For the ice cream base, you’ll need 1 cup (240 ml) heavy whipping cream, ½ cup (120 ml) whole milk, 2 tablespoons sweetened condensed milk, 1 teaspoon vanilla extract, 6 fresh strawberries, and 4 Oreo cookies. You can also add 1 tablespoon of sugar if you prefer a sweeter ice cream.
For topping, prepare whipped cream, 2–3 fresh strawberries, extra Oreo cookies or Oreo crumbs, chocolate syrup, and a few mint leaves if desired.
You’ll also need a blender, a rolled ice cream machine or frozen stainless-steel tray, two metal ice cream spatulas, tongs, and serving cups.
Step 1: Chill the Rolled Ice Cream Plate
Turn on your rolled ice cream machine and allow the metal surface to become extremely cold. Depending on your machine, this usually takes around 5–15 minutes.
The surface needs to be fully frozen before adding the ice cream mixture. If it isn’t cold enough, the mixture will stay soft instead of forming clean rolls.
Step 2: Prepare the Strawberries and Oreos
Wash the strawberries thoroughly and remove the green stems. Pat them dry and cut them into halves or smaller pieces.
Break the Oreo cookies into several pieces. You don’t need to crush them completely because the blender will break them down later.
Reserve a few strawberries and some Oreo crumbs for decorating the finished ice cream.
Step 3: Add Heavy Cream
Pour 1 cup (240 ml) of cold heavy whipping cream into the blender.
Using chilled cream helps the ice cream mixture freeze faster and creates a richer, creamier texture.
Step 4: Add Whole Milk
Pour in ½ cup (120 ml) of whole milk.
The milk helps thin the heavy cream slightly so the mixture can spread easily into a thin layer on the frozen plate.
Step 5: Add Condensed Milk
Add 2 tablespoons of sweetened condensed milk.
Condensed milk gives the rolled ice cream sweetness while also making the final texture softer and creamier.
For a sweeter dessert, you can increase it to about 3 tablespoons.
Step 6: Add Vanilla
Pour in 1 teaspoon of vanilla extract.
Vanilla adds a subtle sweetness and helps balance the flavors of the strawberries, cream, and chocolate cookies.
Step 7: Add the Strawberries
Add the 6 prepared strawberries to the blender.
Fresh strawberries give the ice cream its beautiful pale-pink color and naturally fruity flavor.
Make sure the strawberries are reasonably dry before blending so you don’t add too much extra water to the mixture.
Step 8: Add the Oreos
Drop 4 Oreo cookies into the blender.
You can leave the cream filling inside the cookies. Once blended, the Oreos create tiny dark chocolate specks throughout the pink strawberry ice cream.
Step 9: Blend the Ice Cream Base
Close the blender lid securely and blend for approximately 10–20 seconds on medium speed.
Blend only until the mixture becomes smooth and creamy.
The finished mixture should be pale pink, pourable, and dotted with tiny Oreo pieces. Avoid over-blending because whipping the heavy cream for too long can make the mixture too thick.
Step 10: Pour Onto the Frozen Plate
Once your rolled ice cream plate is fully chilled, pour a moderate amount of the mixture into the center.
Avoid adding too much at once. A very thick layer takes longer to freeze and is much harder to roll.
Step 11: Spread Into a Thin Layer
Working quickly, use two stainless-steel spatulas to spread the mixture across the frozen surface.
Push the mixture outward from the center until you create a thin rectangular layer approximately 2–3 mm thick.
Try to keep the thickness consistent. An even layer produces much cleaner ice cream rolls.
Step 12: Let the Ice Cream Freeze
Allow the thin layer to freeze for approximately 30–60 seconds, depending on the temperature of your machine.
You’ll know it’s ready when the glossy surface becomes more matte and the edges feel completely firm.
Step 13: Divide Into Strips
Use the edge of your metal spatula to lightly mark the frozen ice cream into approximately 5–6 equal strips.
Making equal strips helps produce rolls that are similar in size.
Step 14: Roll the Ice Cream
Place the metal spatula against one edge of the frozen ice cream.
Hold the scraper at approximately a 45-degree angle and push it firmly and steadily across the frozen layer.
As you push forward, the ice cream should naturally curl into a tight spiral.
Repeat with the remaining strips.
If the ice cream breaks into pieces instead of rolling, allow it to freeze for a few more seconds. If it remains soft and sticks to the plate, the surface may not be cold enough.
Step 15: Arrange the Rolls
Use metal tongs to carefully lift each roll.
Stand approximately 5–6 rolls vertically inside a chilled serving cup.
Place the rolls close together so they support one another and maintain their spiral shape.
Step 16: Add Whipped Cream
Pipe a generous swirl of whipped cream over the top of the ice cream rolls.
Keep the swirl relatively small so the beautiful rolled texture remains visible.
Step 17: Decorate
Finish the dessert with fresh strawberry halves, crushed Oreo crumbs, a whole Oreo cookie, and a drizzle of chocolate syrup.
Add a small mint leaf if you want an extra pop of color.
Serve immediately.
Tips for Perfect Rolled Ice Cream
The most important factor is temperature. Your frozen plate needs to be extremely cold before you begin. Also, keep your heavy cream, milk, and strawberries refrigerated until you’re ready to blend them.
Spread the ice cream mixture as thinly and evenly as possible. A thick layer may freeze unevenly and break during rolling.
Work quickly once the mixture touches the cold plate. It begins freezing immediately, so spreading it too slowly can create uneven sections.
When rolling, keep firm pressure on the scraper and push in one smooth motion. This is what creates tight, attractive spirals.
How to Make Rolled Ice Cream Without a Machine
If you don’t have a rolled ice cream machine, use a flat stainless-steel baking tray.
Freeze the empty tray for at least 4–6 hours, preferably overnight.
Pour a thin layer of the prepared ice cream mixture onto the frozen tray and spread it evenly. Return the tray to the freezer for around 2–3 hours, or until completely firm.
Remove the tray and quickly scrape the frozen mixture into rolls using a sturdy metal spatula.
The results may not be quite as perfect as with a professional cold plate, but the method still works well at home.
Flavor Variations
For Chocolate Oreo Rolled Ice Cream, leave out the strawberries and add 2 tablespoons of cocoa powder.
For Matcha Oreo Rolled Ice Cream, leave out the strawberries and blend in 1–2 teaspoons of matcha powder.
For Mango Rolled Ice Cream, replace the strawberries with about ½ cup of ripe mango.
For Strawberry Cheesecake Rolled Ice Cream, add about 2 ounces (60 g) of softened cream cheese to the blender.
For Biscoff Rolled Ice Cream, replace the Oreos with Biscoff cookies and add 1 tablespoon of Biscoff spread.
Storage
Rolled ice cream is best eaten immediately after making it because this is when the texture is softest and the rolls look their best.
If necessary, transfer the finished rolls to an airtight container and keep them frozen. For the best texture, enjoy them within 1–2 days.
Final Result
The finished Strawberry Oreo Rolled Ice Cream should have beautiful pale-pink spirals dotted with tiny Oreo pieces. The texture is creamy and rich, while fresh strawberries add a bright fruity flavor and Oreo cookies provide a delicious chocolate crunch.
Top everything with fluffy whipped cream, juicy strawberries, Oreo crumbs, and glossy chocolate syrup for a homemade dessert that looks just as impressive as something from a rolled ice cream shop. 🍓🍪🍨