This Kiwi Blueberry Ice Cream is creamy, fruity, refreshing, and incredibly easy to make at home. You don’t need an ice cream maker—just a blender, a freezer-safe container, and a freezer.
Fresh kiwi gives the ice cream a bright tropical flavor, while juicy blueberries add natural sweetness and a beautiful fruity color.
Yield: 4–6 servings
Prep Time: 15 minutes
Freezing Time: 6–8 hours
Ingredients
For the Ice Cream
- 2 ripe kiwis, peeled and chopped
- 1 cup (240 ml) heavy whipping cream
- ½ cup (120 ml) whole milk
- 3 tbsp sweetened condensed milk
- ½ cup fresh blueberries
- 1 tbsp honey
- 1 tsp vanilla extract
For Topping
- Fresh kiwi slices
- Fresh blueberries
- Whipped cream, optional
- Honey, optional
- Fresh mint leaves, optional
Equipment
- Blender
- Spatula
- Freezer-safe glass container with a lid
- Ice cream scoop
- Serving bowls
Step 1 – Prepare the Kiwi
Peel 2 ripe kiwis and cut them into small chunks.
Choose ripe, slightly soft kiwis for the best flavor. Ripe kiwi is naturally sweeter and blends more easily into the ice cream mixture.
Set aside a few thin kiwi slices if you’d like to use them for decoration.
Step 2 – Prepare the Blueberries
Wash ½ cup of fresh blueberries and pat them completely dry.
Set aside a small handful for decorating the finished ice cream.
Using dry fruit helps prevent unnecessary water from entering the ice cream mixture.
Step 3 – Add the Kiwi to the Blender
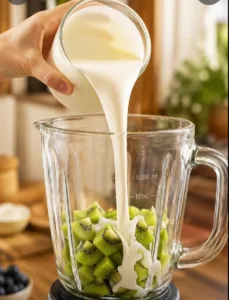
Place the chopped kiwi pieces into the blender.
The kiwi provides the fresh, tangy fruit flavor and gives the ice cream a beautiful natural color.
Step 4 – Add Heavy Whipping Cream
Pour 1 cup (240 ml) heavy whipping cream into the blender.
For the creamiest texture, use heavy cream straight from the refrigerator.
Step 5 – Add Whole Milk
Pour in ½ cup (120 ml) whole milk.
Whole milk helps create a smooth, scoopable consistency without making the mixture too heavy.
Step 6 – Add Condensed Milk
Add 3 tablespoons of sweetened condensed milk.
This adds sweetness and helps keep the frozen dessert softer.
If your fruit is already very sweet, you can reduce it to 2 tablespoons.
Step 7 – Add Honey and Vanilla
Drizzle in 1 tablespoon of honey, followed by 1 teaspoon of vanilla extract.
Honey adds sweetness and complements the tart kiwi, while vanilla gives the creamy base a softer, more rounded flavor.
Step 8 – Add the Blueberries
Add ½ cup fresh blueberries to the blender.
For a prettier finished color, you can reserve some blueberries and fold them in later instead of blending all of them completely.
Step 9 – Blend Until Creamy
Secure the blender lid.
Blend for approximately 20–30 seconds, or just until the ingredients become smooth and creamy.
Avoid blending kiwi for an unnecessarily long time. Kiwi seeds can become more noticeable when heavily processed.
The finished mixture should be thick, creamy, and beautifully speckled with fruit.
Step 10 – Pour Into a Container
Pour the blended mixture into a shallow freezer-safe glass container.
Use a spatula to gently smooth the surface.
A wide, shallow container helps the ice cream freeze more evenly and makes scooping easier later.
Step 11 – Decorate the Surface
Arrange a few thin kiwi slices and fresh blueberries over the top.
You can also lightly swirl a few crushed blueberries through the surface with a skewer for a beautiful purple-and-green marbled effect.
Don’t overmix—you want the blueberry swirls to remain visible.
Step 12 – Freeze the Ice Cream
Cover the container tightly with a lid.
Place it in the freezer for approximately 6–8 hours, or preferably overnight, until completely firm.
For the best texture, avoid repeatedly opening the container during freezing.
Step 13 – Let It Soften
Remove the container from the freezer about 5–10 minutes before serving.
Allowing it to soften slightly makes it much easier to create smooth, round scoops.
Step 14 – Scoop
Dip an ice cream scoop into warm water, then wipe it dry.
Press it firmly into the ice cream and pull it smoothly toward you.
Place 2–3 scoops into each serving bowl.
Step 15 – Decorate and Serve
Top the ice cream with fresh kiwi slices and blueberries.
For an extra-special presentation, add a small swirl of whipped cream, a light drizzle of honey, and a fresh mint leaf.
Serve immediately.
Tips for the Best Kiwi Blueberry Ice Cream
Use ripe, flavorful fruit because the flavor becomes slightly less intense once frozen.
Keep the heavy cream and milk cold before blending, and make sure your freezer container is tightly covered to reduce ice crystal formation.
Because fresh kiwi contains enzymes that can interact with dairy over time, it’s best to blend briefly and freeze the mixture soon after preparing it, rather than letting the blended mixture sit in the refrigerator for hours.
For an even stronger blueberry flavor, lightly crush some extra blueberries and swirl them through the mixture immediately before freezing.
Easy Flavor Variations
Kiwi Strawberry Ice Cream: Replace the blueberries with fresh strawberries.
Kiwi Mango Ice Cream: Replace the blueberries with ripe mango for a tropical version.
Blueberry Cheesecake Ice Cream: Add about 2 oz (60 g) softened cream cheese before blending.
Kiwi Coconut Ice Cream: Replace the whole milk with coconut milk for a more tropical flavor.
Blueberry Vanilla Ice Cream: Leave out the kiwi and increase the blueberries to about 1 cup.
Storage
Keep the ice cream in a tightly sealed freezer-safe container.
For the best flavor and texture, enjoy it within about 1–2 weeks.
If the ice cream becomes very firm, simply let it rest at room temperature for 5–10 minutes before scooping.
Final Result
The finished Kiwi Blueberry Ice Cream is creamy and refreshing, with a fruity balance of sweet blueberries and tangy kiwi. Fresh kiwi slices and blueberries on top make the dessert colorful and especially eye-catching.
And you don’t need an ice cream machine: blend, pour, freeze, scoop, and enjoy! 🥝🫐🍨