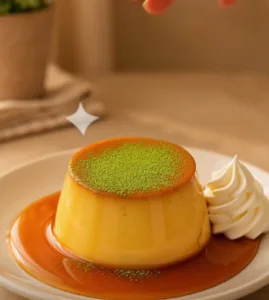
If you love matcha and creamy custard desserts, this Matcha Flan combines the best of both worlds: a smooth green tea custard with a glossy layer of golden caramel.
The texture is soft, silky, creamy, and gently jiggly, while the matcha adds a slightly earthy flavor that balances the sweetness of the caramel beautifully.
The best part is the unmolding moment—flip the ramekin onto a plate and let the golden caramel flow down the sides of the matcha flan. 💚
Yield: 5–6 individual flans
Prep time: 20 minutes
Bake time: 35–45 minutes
Chilling time: At least 4 hours
🛒 Ingredients
For the Caramel
- ½ cup (100 g) granulated sugar
- 2 tbsp water
For the Matcha Flan
- 3 large eggs
- 2 additional egg yolks
- 1½ cups (360 ml) whole milk
- ½ cup (120 ml) heavy cream
- ⅓ cup (100 g) sweetened condensed milk
- 2 tsp high-quality matcha powder
- 1 tsp vanilla extract
- Small pinch of salt, optional
For Decorating
- Matcha powder
- Whipped cream, optional
- Fresh berries, optional
Equipment
You will need:
- 5–6 small ramekins
- Blender
- Fine-mesh sieve
- Small saucepan
- Deep baking tray
- Hot water for the water bath
- Thin knife
- Serving plates
Step 1 – Prepare the Ramekins
Place 5–6 small ramekins on your work surface.
You don’t need to grease them. The caramel at the bottom will help the flan release after chilling.
Place the ramekins close to your stove because once the caramel is ready, you’ll need to pour it fairly quickly.
Step 2 – Make the Golden Caramel
Add ½ cup granulated sugar and 2 tablespoons water to a small saucepan.
Place over medium heat.
Allow the sugar to dissolve and begin bubbling. Avoid aggressively stirring it with a spoon because this can encourage crystallization.
Instead, gently swirl the saucepan when necessary.
Continue cooking until the sugar develops a beautiful deep golden-amber color.
Watch it carefully toward the end—the difference between golden caramel and burnt caramel can be only a few seconds.
Step 3 – Pour the Caramel Into the Ramekins
Immediately divide the hot caramel between the ramekins.
Carefully tilt each ramekin so the caramel forms a thin layer across the bottom.
Set them aside while you prepare the matcha custard.
The caramel may harden as it cools. That’s completely normal. It will melt again while the flan cooks.
Step 4 – Add the Eggs to the Blender
Add:
- 3 whole eggs
- 2 additional egg yolks
to your blender.
The extra egg yolks are important because they give the flan a richer, smoother, more custard-like texture.
Step 5 – Add the Milk and Cream
Pour in:
1½ cups (360 ml) whole milk
followed by:
½ cup (120 ml) heavy cream
Using both milk and heavy cream creates a balance between a traditional custard texture and a richer, creamier finish.
Step 6 – Add the Condensed Milk
Pour in:
⅓ cup (100 g) sweetened condensed milk
Condensed milk provides sweetness while also adding richness and body to the custard.
Because the caramel is already sweet, you don’t need a huge amount.
Step 7 – Add the Matcha
Sift 2 teaspoons of high-quality matcha powder directly into the mixture.
Sifting is important because matcha powder tends to form small clumps.
For the best color and flavor, use good-quality culinary or latte-grade matcha.
The custard should have a beautiful natural matcha green color, rather than an artificial neon green.
Step 8 – Add Vanilla
Add 1 teaspoon vanilla extract.
You can also add a tiny pinch of salt to help balance the sweetness.
Vanilla shouldn’t overpower the matcha—it simply gives the custard a softer, more rounded flavor.
Step 9 – Blend Gently
Close the blender and blend on low speed for approximately 10–15 seconds, just until everything is combined.
This step is important:
Do not blend aggressively.
Too much blending incorporates air into the custard and can create lots of bubbles, which may result in small holes inside the finished flan.
For that signature silky texture, we want as little air as possible.
Step 10 – Strain the Matcha Custard
Pour the mixture through a fine-mesh sieve into a large measuring jug or bowl.
This removes any remaining matcha clumps, egg strands, or foam.
If you see bubbles on the surface, gently skim them away with a spoon.
This extra step makes a noticeable difference in the final texture.
Step 11 – Fill the Ramekins
Slowly pour the matcha custard over the hardened caramel in each ramekin.
Fill each ramekin approximately ¾ full, leaving a little room at the top.
Pour gently to avoid creating additional bubbles.
If bubbles appear, pop them with a toothpick or skim them away.
Step 12 – Prepare the Water Bath
Preheat your oven to 325°F (160°C).
Arrange the filled ramekins inside a deep baking tray.
Carefully pour hot water into the baking tray around the ramekins until the water reaches approximately halfway up their sides.
Do not pour water directly into the custard.
Why use a water bath?
The hot water creates gentle, even heat around the ramekins.
Without it, the edges of the flan can overcook before the center sets, resulting in a firmer, rubbery, or bubbly texture.
A water bath helps produce that beautiful smooth and creamy custard texture.
Step 13 – Bake the Matcha Flan
Carefully transfer the entire water-bath tray into the oven.
Bake at 325°F (160°C) for approximately 35–45 minutes.
The exact cooking time will depend on the size and depth of your ramekins.
The flans are ready when the edges are set but the center still has a gentle jiggle when you carefully move the ramekin.
Do not bake until completely rigid.
The residual heat will continue setting the custard as it cools.
Step 14 – Cool the Flans
Carefully remove the baking tray from the oven.
Take the ramekins out of the hot water bath and place them on a cooling rack.
Allow them to cool to approximately room temperature.
Don’t attempt to unmold them while they’re still hot.
Step 15 – Chill
Cover each ramekin and refrigerate for at least 4 hours.
For the best texture and flavor, refrigerate them overnight.
Chilling allows the custard to completely set while giving the caramel time to transform into a delicious sauce underneath.
Step 16 – Unmold the Matcha Flan
Now comes the satisfying part. 🍮
Take one chilled ramekin from the refrigerator.
Run a thin knife carefully around the inside edge of the ramekin.
Place a serving plate upside down over the ramekin.
Hold the plate and ramekin firmly together, then flip them over in one confident movement.
Wait for a second and slowly lift the ramekin.
The matcha flan should slide onto the plate while the golden caramel flows over the top and naturally runs down the sides.
Step 17 – Decorate
For a simple Japanese café-style presentation, lightly dust the top with a tiny amount of matcha powder.
You can also add:
- A small swirl of whipped cream
- Fresh strawberries
- Raspberries
- Mint leaves
Keep the decoration minimal so the glossy caramel and green matcha flan remain the stars of the dessert.
Step 18 – The Texture Test 🍵🥄
Use a small dessert spoon to gently cut into the flan.
A properly cooked matcha flan should jiggle softly and offer almost no resistance to the spoon.
Lift one spoonful and look at the inside.
You want a texture that is:
Silky → smooth → creamy → dense but tender → almost completely free of holes.
The golden caramel should lightly coat each spoonful.
That’s the perfect matcha flan.
⭐ Tips for Perfect Matcha Flan
Don’t over-blend the eggs. Excessive air creates bubbles and holes inside the custard.
Always sift the matcha. This prevents unpleasant green clumps.
Strain the finished custard. It’s one of the easiest ways to achieve a restaurant-style smooth texture.
Don’t skip the water bath. Gentle heat is essential for delicate custard.
Don’t overbake. Remove the flan while the center still jiggles slightly.
Chill thoroughly before unmolding. Four hours is the minimum, but overnight is even better.
🍵 Matcha Flavor Variations
Matcha Coconut Flan
Replace part of the whole milk with full-fat coconut milk for a tropical matcha flavor.
Matcha White Chocolate Flan
Melt a small amount of white chocolate into the warm milk before combining it with the other ingredients.
Strawberry Matcha Flan
Serve the finished flan with sliced strawberries. The sweet-tart berries pair beautifully with earthy matcha.
Extra Matcha Flan
Increase the matcha slightly if you prefer a stronger tea flavor, but avoid adding too much because excessive matcha can make the custard noticeably bitter.
❄️ How to Store Matcha Flan
Keep the flans covered in their ramekins in the refrigerator.
They are best enjoyed within 2–3 days.
For the prettiest presentation, leave them inside the ramekins and unmold each flan immediately before serving.
💚 Final Result
A great Matcha Flan should have three things: a beautiful natural green color, a delicate creamy jiggle, and plenty of glossy golden caramel.
Once you cut into it, the interior should be silky and custard-like rather than airy, cakey, or full of holes.
The slightly earthy matcha balances the sweet caramel beautifully, giving you an elegant Japanese-inspired dessert that’s surprisingly simple to make at home.
Blend → caramel → water bath → chill → flip → enjoy. 🍵🍮✨