Transforming Yard Runoff: Create a Beautiful & Functional Creek Bed Garden
Are you tired of seeing muddy trenches eroding your lawn every time a good rainstorm passes through? That troublesome downspout runoff doesn’t have to be an eyesore or a source of soil erosion any longer. Imagine transforming those problematic wet areas into one of the prettiest, most peaceful spots in your garden! With a little planning and effort, you can turn a drainage challenge into a stunning landscape feature that not only protects your soil but also enhances the natural beauty and sustainability of your home’s exterior. This guide will walk you through the steps to create your own beautiful and functional dry creek bed, ensuring both practical drainage and captivating aesthetics.
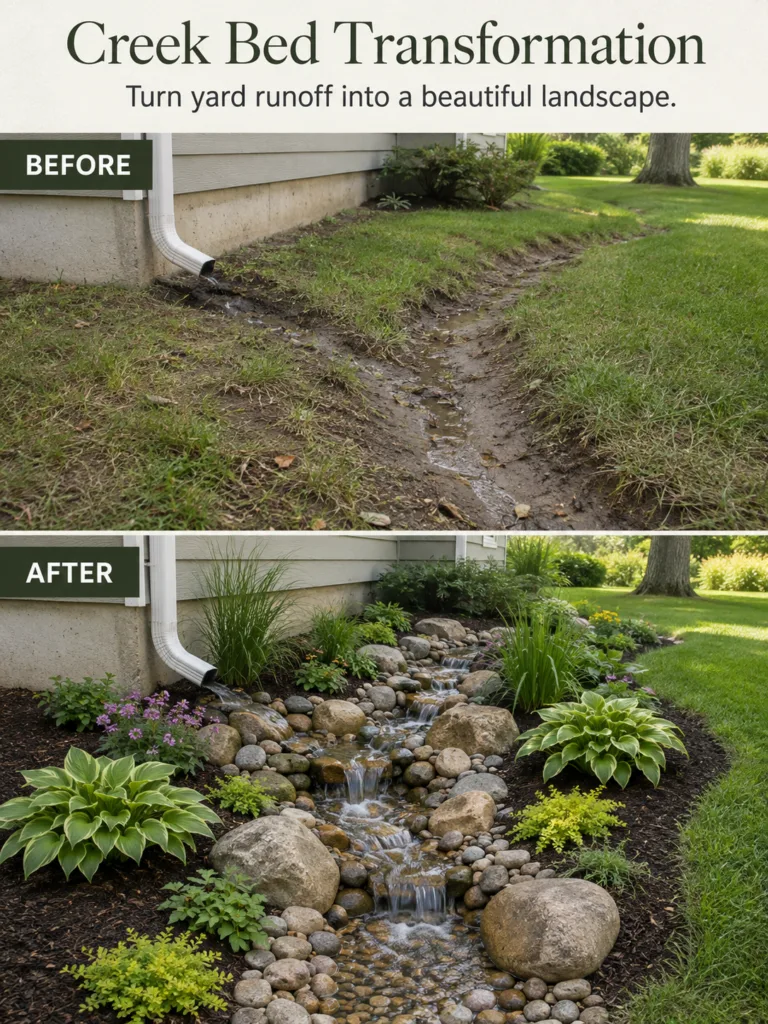
The Magic of a Dry Creek Bed: Turning Problem into Paradise
A dry creek bed, sometimes called a rain garden swale, is much more than just a decorative feature. It’s an intelligent landscape solution designed to manage rainwater runoff from impervious surfaces like your roof, driveway, or patio. Instead of allowing water to scour channels into your lawn or overwhelm planting beds, a creek bed guides the water safely through your landscape. As water flows, it slows down, allowing sediment to settle and giving plants time to absorb excess moisture. This process helps prevent erosion, replenishes groundwater, and can even filter pollutants before water enters storm drains.
Beyond its practical benefits, a well-designed dry creek bed adds immense aesthetic value. It mimics a natural stream, providing visual interest, texture, and a sense of movement even when dry. When it rains, it becomes a temporary, bubbling waterway, offering a dynamic and captivating display.
Planning Your Creek Bed Transformation
Successful creek bed creation begins with thoughtful planning. Don’t rush this crucial first phase!
Assess Your Drainage Needs
Start by observing. During a heavy rain, watch where water flows from your downspout. Where does it naturally accumulate? Where does it cause erosion? This observation helps you determine the most effective path for your creek bed. Consider the volume of water you need to manage and how far it needs to travel. The goal is to direct water away from your home’s foundation and other sensitive areas, guiding it to a suitable discharge point, perhaps a storm drain, a larger rain garden, or a less problematic part of your yard.
Design and Layout
A creek bed should look natural, even when dry. Sketch out a curved, organic path rather than a straight line. Vary the width of your bed to create visual interest – wider in some spots, narrower in others. A typical width might range from 18 inches to several feet, depending on the scale of your yard and the volume of water. The depth should be sufficient to contain peak flows, often 6 to 12 inches deep, with a gentle slope of at least 1-2% (a drop of 1-2 feet over 100 feet) to ensure water moves effectively without stagnating.
Material Selection
The beauty of a creek bed largely depends on your choice of materials:
- Stones and Pebbles: Use a variety of sizes, from small river pebbles for the bed to larger, more decorative stones (6-12 inches) for the banks and accents. Mixing sizes creates a natural, layered look. Choose stones that complement your home’s exterior and existing landscape features.
- Edging: Consider using larger rocks, landscape timbers, or even a subtle trench edge to define the boundaries of your creek bed and separate it from your lawn or other planting areas.
- Underlayment: A heavy-duty landscape fabric beneath the stones is essential. It prevents weeds from growing up through your creek bed and stops the stones from sinking into the soil over time.
Step-by-Step Construction Guide
Once your plan is solid, it’s time to get hands-on!
Prepare the Site
Mark your designed path using spray paint or a garden hose. Dig a trench to your determined depth and width, ensuring the gentle slope is maintained. You can use a string line and a level to check your grade as you dig. Remove any large roots or debris. Compact the soil at the bottom of the trench slightly.
Lay the Foundation
Unroll a sturdy landscape fabric over the entire excavated trench, extending it slightly up the banks. Overlap seams by at least 6 inches if you’re using multiple pieces. Secure the fabric with landscape staples. This barrier is crucial for weed suppression and maintaining the integrity of your creek bed.
Place the Rocks
Begin by placing your largest, most distinctive rocks along the banks and at key turns in your creek bed. These act as anchor stones and provide visual structure. Next, fill the bottom of the trench with a layer of medium-sized river rocks. Finally, pour in smaller pebbles and gravel, spreading them evenly to fill gaps and create a smooth, natural-looking bed. Distribute stones to create a varied texture, allowing some to be partially submerged and others to sit higher, mimicking a natural stream bed.
Add Edging and Mulch
If you’re using a specific edging material, install it now. Outside the rock-lined creek bed, consider adding a layer of dark brown mulch (like shredded bark or wood chips) to further define the area, suppress weeds in adjacent planting zones, and retain soil moisture for your plants. This also creates a clean, finished look, contrasting beautifully with the natural stones.
Choosing Plants for Your Creek Bed Garden
Plants are vital for integrating your creek bed into the landscape, softening its edges, and providing ecological benefits. Choose plants that can tolerate both occasional standing water and dry spells.
Highlighted Plants from the Transformation:
The image showcases several excellent choices:
Hosta (Hosta spp.)
Known for their lush foliage and shade tolerance, Hostas are a fantastic choice for the banks of a creek bed, especially if your drainage area is partially shaded. Many cultivars offer variegated leaves, adding bright splashes of color.
- Hardiness: USDA Zones 3-9
- Plant type: Perennial
- Exposure: Part shade to full shade (some varieties tolerate more sun with adequate moisture)
- Height: 1 to 3 feet, depending on cultivar
- Spread: 1 to 4 feet, depending on cultivar
- Care Tip: Ensure good soil drainage, especially when not actively channeling water. Watch for slugs and snails, which can be deterred with organic baits or hand-picking.
Ornamental Grasses (e.g., Miscanthus, Panicum, Carex)
Upright ornamental grasses provide height, texture, and movement. They are typically drought-tolerant once established but can handle periodic moisture, making them ideal for the transitions zones of a creek bed. Their architectural form adds winter interest.
- Hardiness: USDA Zones 4-9 (varies significantly by species)
- Plant type: Perennial grass
- Exposure: Full sun to part sun
- Height: 3 to 8 feet (e.g., Miscanthus sinensis ‘Gracillimus’ or Switchgrass ‘Shenandoah’)
- Spread: 2 to 5 feet
- Care Tip: Cut back foliage to about 6 inches in late winter or early spring before new growth appears. This keeps them tidy and vigorous.
Creeping Groundcovers (e.g., Sedum, Lysimachia, Ajuga)
These low-growing plants are excellent for weaving between larger stones, spilling over the banks, and holding soil in place. They add fine texture and often offer seasonal flowers. Varieties like Creeping Jenny (Lysimachia nummularia ‘Aurea’) with its bright yellow-green foliage, or various low-growing sedums, are often used.
- Hardiness: Varies greatly by species (e.g., Sedum Zones 3-9, Lysimachia Zones 4-9, Ajuga Zones 3-10)
- Plant type: Perennial groundcover
- Exposure: Full sun to part shade (check specific plant needs)
- Height: 2 to 6 inches
- Spread: Spreading, often indefinitely
- Care Tip: Choose vigorous varieties that can handle both wet periods and dry conditions. Provide good initial watering until established, then they are often quite resilient.
Essential Care and Maintenance
Like any garden feature, a creek bed requires some ongoing attention to remain beautiful and functional:
- Weed Control: The landscape fabric helps, but occasional weeds may sprout. Hand-pull them promptly.
- Debris Removal: Clear fallen leaves, twigs, and other debris from the bed regularly to prevent blockages and maintain water flow.
- Check for Blockages: After heavy rains, ensure water is flowing freely and not pooling in unexpected areas. Adjust stones if necessary.
- Plant Care: Follow specific plant care needs for watering (especially during dry spells for new plants), pruning, and pest management. For hostas, watch for slug damage.
Common Pitfalls and How to Avoid Them
Avoid these common mistakes to ensure your creek bed thrives:
- Insufficient Slope: Without a gentle grade, water will sit and stagnate instead of flowing. Use a level during excavation.
- Too Few or Too Small Rocks: A sparse collection of small pebbles looks unnatural and can be easily displaced by rushing water. Invest in a good mix of sizes, including larger anchor stones.
- Skipping Landscape Fabric: This leads to weeds, sinking stones, and a muddy mess over time. It’s a non-negotiable step.
- Choosing Inappropriate Plants: Selecting plants that can’t tolerate both wet feet and dry periods will lead to plant failure. Opt for adaptable species.
- Ignoring Maintenance: A creek bed isn’t