Remember those classic crispy wafer biscuits that brought so much joy in childhood? Now, you can easily recreate that wholesome goodness right in your kitchen with simple ingredients. These homemade wafer biscuits are perfect for a snack, a delightful dessert, or a charming treat to share. Dive into these easy-to-follow recipes and rediscover the simple pleasure of fresh, crispy wafers, made just the way you like them.
Quick Overview
- Main topic: Homemade Wafer Biscuits
- Best for: Snacks, desserts, meal prep, family baking
- Number of recipes: 7
- Prep style: Easy baking, quick cooking
- Reader benefit: Enjoy classic, fresh, and customizable crispy treats
Recipe 1: Classic Homemade Wafer Biscuits
Start with the beloved original recipe for light, crispy wafers, perfect on their own or filled with your favorite spread.

Servings: 10-12 wafers
Prep time: 15 minutes
Cook / chill / rest time: 2-3 minutes per wafer (approx. 20-30 minutes total)
Ingredients:
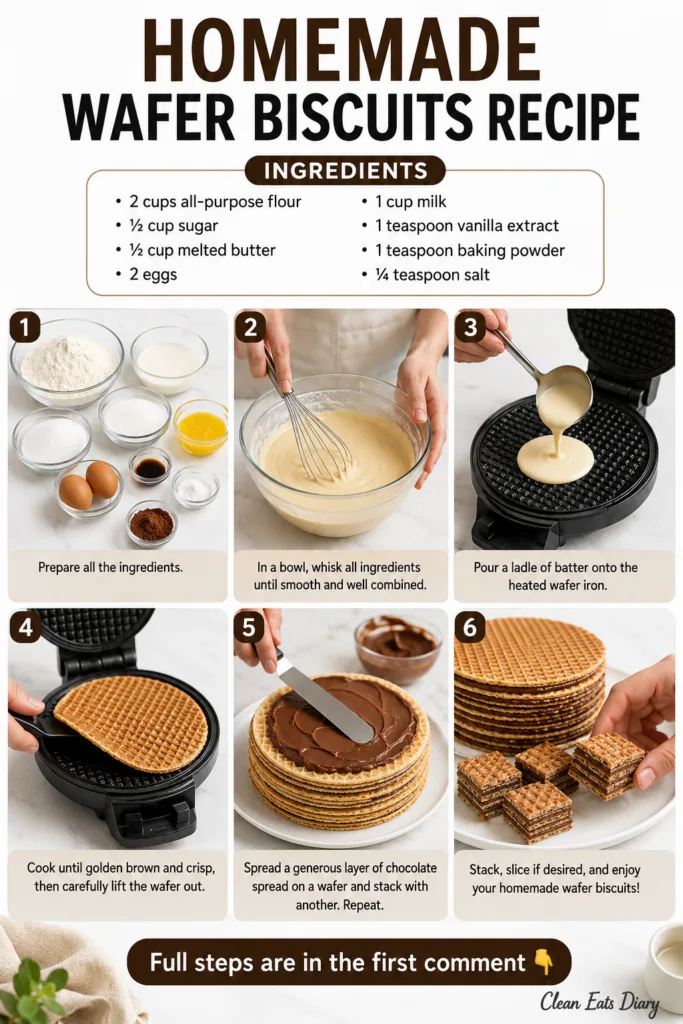
- 2 cups all-purpose flour
- ½ cup sugar
- ½ cup melted unsalted butter
- 2 large eggs
- 1 cup milk
- 1 teaspoon vanilla extract
- 1 teaspoon baking powder
- ¼ teaspoon salt
- Chocolate spread (optional, for filling)
Instructions:
- In a large mixing bowl, whisk together the all-purpose flour, sugar, baking powder, and salt until well combined.
- In a separate medium bowl, combine the melted butter, eggs, milk, and vanilla extract. Whisk until smooth.
- Gradually add the wet ingredients to the dry mixture, whisking continuously until a smooth batter forms. Ensure there are no lumps.
- Heat your wafer iron according to the manufacturer’s instructions. Once hot, lightly grease it if necessary.
- Pour approximately ¼ to ⅓ cup of batter onto the hot iron, spreading it evenly. Close the iron.
- Cook for 2-3 minutes, or until the wafer is golden brown and crispy. Cooking time may vary based on your wafer iron.
- Carefully remove the cooked wafer from the iron using a non-stick spatula or tongs. Place it on a wire rack to cool completely.
- Repeat with the remaining batter. Once cooled, you can spread chocolate spread or any other desired filling between two wafers to create delicious sandwiches.
Storage / Serving / Usage Note: Store cooled wafers in an airtight container at room temperature for up to 3 days. For best crispness, enjoy them fresh. They pair wonderfully with a cup of tea or coffee.
Recipe 2: Rich Chocolate Wafer Biscuits
Infuse your wafers with a decadent chocolate flavor, perfect for chocolate lovers!

Servings: 10-12 wafers
Prep time: 15 minutes
Cook / chill / rest time: 2-3 minutes per wafer
Ingredients:
- 1¾ cups all-purpose flour
- ¼ cup unsweetened cocoa powder
- ½ cup sugar (or ¾ cup for sweeter)
- ½ cup melted unsalted butter
- 2 large eggs
- 1 cup milk
- 1 teaspoon vanilla extract
- 1 teaspoon baking powder
- ¼ teaspoon salt
Instructions:
- In a large mixing bowl, whisk together the all-purpose flour, cocoa powder, sugar, baking powder, and salt.
- In a separate medium bowl, combine the melted butter, eggs, milk, and vanilla extract. Whisk until smooth.
- Gradually add the wet ingredients to the dry mixture, whisking until a smooth, dark chocolate batter forms.
- Heat and lightly grease your wafer iron. Pour batter onto the hot iron and cook until golden brown (a darker hue due to cocoa) and crispy.
- Remove wafers carefully and cool on a wire rack. Serve plain or filled with a chocolate ganache or cream cheese frosting.
Storage / Serving / Usage Note: These wafers are fantastic with a scoop of vanilla ice cream or a drizzle of caramel sauce.
Recipe 3: Zesty Lemon Wafers
Add a bright and refreshing twist with fresh lemon zest and a hint of lemon extract.

Servings: 10-12 wafers
Prep time: 20 minutes
Cook / chill / rest time: 2-3 minutes per wafer
Ingredients:
- 2 cups all-purpose flour
- ½ cup sugar
- ½ cup melted unsalted butter
- 2 large eggs
- 1 cup milk
- 1 teaspoon vanilla extract
- 1 teaspoon baking powder
- ¼ teaspoon salt
- 2 tablespoons fresh lemon zest
- ½ teaspoon lemon extract (optional, for intensified flavor)
Instructions:
- In a large bowl, whisk together the flour, sugar, baking powder, and salt. Add the lemon zest and mix well.
- In a separate bowl, combine the melted butter, eggs, milk, vanilla extract, and lemon extract (if using).
- Add the wet ingredients to the dry mixture and whisk until a smooth batter forms.
- Cook the wafers in a heated and lightly greased wafer iron until golden and crispy.
- Cool on a wire rack. These are delightful with a light lemon glaze or berry compote.
Storage / Serving / Usage Note: For an extra lemony treat, dust with powdered sugar mixed with a little dried lemon peel.
Recipe 4: Warming Cinnamon Spice Wafers
Embrace cozy flavors with a touch of cinnamon and nutmeg in your crispy wafers.

Servings: 10-12 wafers
Prep time: 15 minutes
Cook / chill / rest time: 2-3 minutes per wafer
Ingredients:
- 2 cups all-purpose flour
- ½ cup sugar
- ½ cup melted unsalted butter
- 2 large eggs
- 1 cup milk
- 1 teaspoon vanilla extract
- 1 teaspoon baking powder
- ¼ teaspoon salt
- 1½ teaspoons ground cinnamon
- ¼ teaspoon ground nutmeg
Instructions:
- In a large bowl, whisk together the flour, sugar, baking powder, salt, ground cinnamon, and ground nutmeg.
- In a separate bowl, combine the melted butter, eggs, milk, and vanilla extract.
- Add the wet ingredients to the dry mixture and whisk until smooth.
- Cook the wafers in a heated and lightly greased wafer iron until golden brown and crispy.
- Cool on a wire rack. Serve with a dusting of cinnamon sugar or a dollop of whipped cream.
Storage / Serving / Usage Note: These wafers are particularly comforting on a cool evening with a warm beverage.
Recipe 5: Delicate Coconut Wafers
For a tropical escape, add shredded coconut to your wafer batter for a delightful texture and flavor.

Servings: 10-12 wafers
Prep time: 15 minutes
Cook / chill / rest time: 3-4 minutes per wafer
Ingredients:
- 2 cups all-purpose flour
- ½ cup sugar
- ½ cup melted unsalted butter
- 2 large eggs
- 1 cup milk
- 1 teaspoon vanilla extract
- 1 teaspoon baking powder
- ¼ teaspoon salt
- ½ cup shredded unsweetened coconut
Instructions:
- In a large bowl, whisk together the flour, sugar, baking powder, and salt. Stir in the shredded coconut.
- In a separate bowl, combine the melted butter, eggs, milk, and vanilla extract.
- Add the wet ingredients to the dry mixture and whisk until just combined. Overmixing can make the wafers tough.
- Cook the wafers in a heated and lightly greased wafer iron. The cooking time might be slightly longer (3-4 minutes) to achieve crispness due to the coconut.
- Cool on a wire rack. These are delicious plain, or with a simple lime glaze.
Storage / Serving / Usage Note: Toast a little extra coconut to sprinkle over the finished wafers for added crunch and flavor.
Recipe 6: Vanilla Orange Wafers
Combine the classic warmth of vanilla with the bright, aromatic notes of orange for a refreshing wafer.
Servings: 10-12 wafers
Prep time: 15 minutes
Cook / chill / rest time: 2-3 minutes per wafer
Ingredients:
- 2 cups all-purpose flour
- ½ cup sugar
- ½ cup melted unsalted butter
- 2 large eggs
- 1 cup milk
- 1 teaspoon vanilla extract
- 1 teaspoon baking powder
- ¼ teaspoon salt
- 1 tablespoon orange zest
Instructions:
- In a large bowl, whisk together the flour, sugar, baking powder, salt, and orange zest.
- In a separate bowl, combine the melted butter, eggs, milk, and vanilla extract.
- Add the wet ingredients to the dry mixture and whisk until a smooth batter forms.
- Heat and lightly grease your wafer iron. Pour batter and cook until golden brown and crispy.
- Remove wafers carefully and cool on a wire rack. A light orange glaze made with powdered sugar and orange juice would be a wonderful addition.
Storage / Serving / Usage Note: These wafers are particularly good for breakfast or brunch, accompanying fresh fruit.
Recipe 7: Gluten-Free Almond Wafers
A wholesome gluten-free option that doesn’t compromise on the crispy texture or delightful flavor, made with almond flour.

Servings: 10-12 wafers
Prep time: 20 minutes
Cook / chill / rest time: 3-4 minutes per wafer
Ingredients:
- 1 cup almond flour
- ¾ cup gluten-free all-purpose flour blend (containing xanthan gum)
- ½ cup sugar
- ½ cup melted unsalted butter
- 2 large eggs
- 1 cup unsweetened almond milk (or regular milk)
- 1 teaspoon vanilla extract
- 1 teaspoon baking powder
- ¼ teaspoon salt
Instructions:
- In a large bowl, whisk together the almond flour, gluten-free flour blend, sugar, baking powder, and salt.
- In a separate bowl, combine the melted butter, eggs, almond milk, and vanilla extract.
- Add the wet ingredients to the dry mixture and whisk until a smooth batter forms. The batter might be slightly thicker than the traditional recipe.
- Heat and lightly grease your wafer iron. Pour batter and cook until golden brown and crispy, which might take an extra minute or so compared to traditional flour wafers.
- Remove wafers carefully and cool on a wire rack. Handle gently as gluten-free wafers can be more delicate.
Storage / Serving / Usage Note: These are a great option for those with gluten sensitivities. Pair with fresh berries or sugar-free jams.
Simple Tips for Best Results
- Don’t Overmix: Whisk the batter until just smooth to avoid tough wafers, especially for the gluten-free version.
- Preheat Properly: Ensure your wafer iron is fully preheated before pouring the batter for even cooking and crispness.
- Grease Lightly (If Needed): Even non-stick irons benefit from a very light greasing, especially for the first few wafers.
- Cool on a Rack: Always cool wafers on a wire rack to prevent them from becoming soggy.
- Experiment with Fillings: Beyond chocolate spread, try hazelnut spread, fruit preserves, lemon curd, or even a light whipped cream.
- Adjust Sweetness: Feel free to slightly increase or decrease sugar based on your preference.
FAQ
Can I make these wafers without a special wafer iron?
While a wafer iron provides the classic thin, crispy texture and pattern, you might be able to use a pizzelle iron or even a thin waffle maker for a similar, though not identical, result. The key is a very thin batter and high heat.
How do I keep my homemade wafers crispy?
To maintain crispness, ensure wafers are completely cooled before storing. Store them in an airtight container at room temperature. Avoid refrigerating, as humidity can make them soft. If they lose crispness, you can briefly reheat them in a dry pan or toaster oven.
Can I prepare the batter in advance?
Yes, you can prepare the batter a few hours in advance and store it in the refrigerator. Whisk it gently before using, as it might thicken slightly. For best results, it’s often better to make the batter fresh.
Final Thoughts
Bringing back childhood memories through the simple act of baking homemade wafer biscuits is a truly rewarding experience. These versatile and delicious treats are a testament to how simple ingredients can create something extraordinary. Whether you stick to the classic recipe or explore the exciting variations, these crispy wafers are sure to become a beloved staple in your home. Enjoy the process, savor the flavors, and make new memories with every delightful bite!
MEDICAL DISCLAIMER: The information provided in this article is for general informational purposes only and does not constitute medical advice. Always consult with a qualified healthcare professional before making any decisions about your health or diet, especially if you have allergies, medical conditions, or are pregnant.