Are you tired of daily watering chores, especially during scorching summer days? Do your container plants frequently wilt, leaving you wondering if you’re watering too much or too little? Imagine a garden where your plants draw water precisely when they need it, staying perfectly hydrated for days or even weeks on end. This isn’t a gardening dream; it’s the magic of a simple DIY self-watering container system.
By harnessing the power of capillary action, these ingenious setups provide a steady, consistent moisture supply to your potted herbs, flowers, and vegetables. This not only frees up your time but also promotes healthier, more vigorous plant growth by avoiding the feast-or-famine cycle of manual watering. Get ready to transform your container garden into a thriving, low-maintenance oasis!
Understanding the Wicking Principle
The core of any self-watering container system lies in a principle called ‘wicking’ or capillary action. This is the same force that allows a paper towel to soak up spilled water or a candle wick to draw up molten wax. In a self-watering planter, a wicking material – typically a rope or fabric strip – connects a water reservoir below the plant’s soil. The wick draws water upwards into the soil, keeping it consistently moist, but not waterlogged. Plants then absorb this moisture as needed through their roots.
This method prevents the common pitfalls of overhead watering, such as inconsistent moisture, nutrient leaching, and fungal issues caused by wet foliage. It also encourages deeper root development as plants reach towards the constant moisture source.
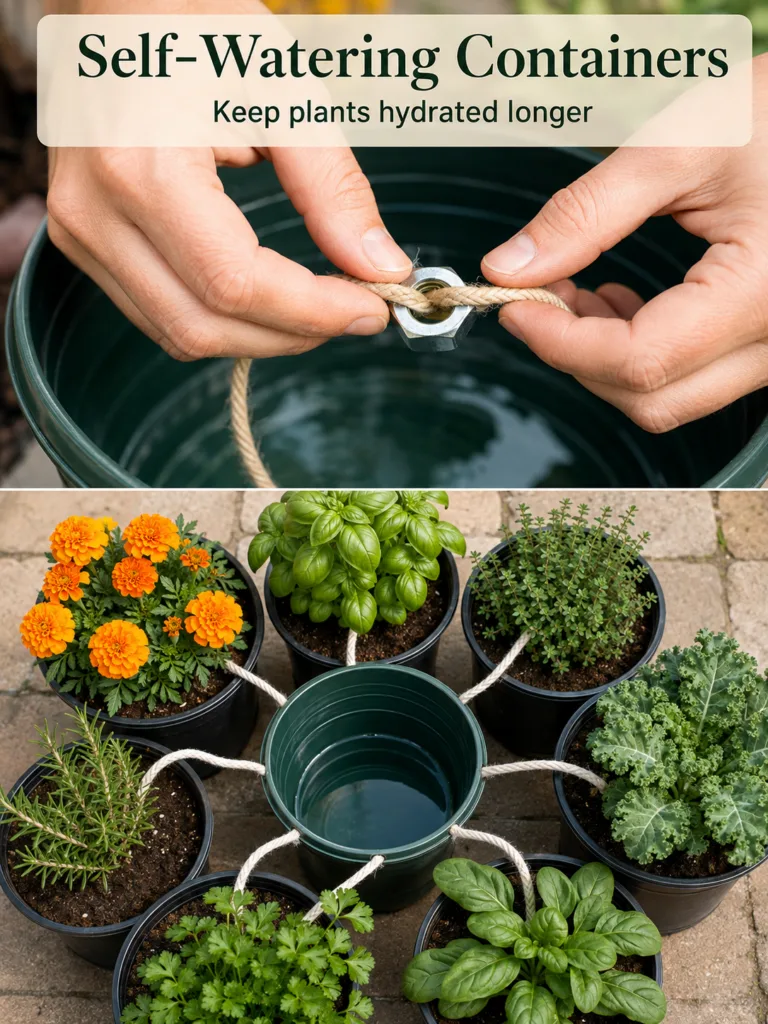
Building Your DIY Self-Watering System
Creating your own wicking system is straightforward and uses readily available materials. Here’s how you can set up a central reservoir system that hydrates multiple pots, just like the one shown:
Materials You’ll Need:
- Central Water Reservoir: A large, sturdy container like a 5-gallon bucket (dark green or opaque is best to prevent algae).
- Plant Pots: Individual pots with drainage holes at the bottom (black plastic pots are commonly used).
- Wicking Material: Natural fiber ropes (cotton, nylon, or felt strips) are excellent choices. White rope is visible in our example.
- Weight for Wicks (Optional but Recommended): A metal hex nut or small stone to keep the wick submerged in the reservoir.
- Potting Mix: A high-quality, lightweight potting mix, preferably one designed for containers.
- Plants: Your chosen herbs, vegetables, or flowers.
Step-by-Step Assembly:
- Prepare the Reservoir: Clean your central bucket thoroughly. Fill it with water about halfway or two-thirds.
- Prepare the Wicks: Cut your wicking ropes to a length that will comfortably reach from the bottom of your plant pots down into the water reservoir.
- Weight the Wicks: Thread one end of each rope through a metal hex nut or tie it to a small stone. This will ensure the wick stays submerged in the water reservoir, preventing air pockets that can break the capillary action.
- Insert Wicks into Pots: Thread the unweighted end of each rope up through the drainage hole of a plant pot. Allow a few inches of the rope to extend into the pot, where it will be surrounded by soil.
- Arrange Your System: Place your central reservoir in its desired location. Arrange your plant pots in a circle around the reservoir, ensuring the weighted ends of the wicks from each pot can reach and sit at the bottom of the reservoir, fully submerged in the water.
- Add Soil and Plants: Fill each pot with your chosen potting mix, ensuring the wicking rope is well-integrated with the soil. Plant your herbs, vegetables, or flowers as you normally would, gently firming the soil around the base.
- Initial Watering: Water each plant from the top initially until water begins to drip out of the drainage holes. This helps establish moisture contact between the soil and the wick. Ensure the reservoir is full.
Plants That Thrive in Self-Watering Containers
Many plants benefit from the consistent moisture provided by a wicking system. The key is choosing plants that appreciate steady hydration rather than those that prefer periods of drying out. Here are some excellent choices, including those featured in our example:
1. Marigolds (Tagetes spp.)
- Hardiness: Annual (USDA Zones 2-11)
- Plant type: Annual flower
- Exposure: Full sun (at least 6 hours)
- Height: 6-36 inches (15-90 cm)
- Spread: 6-24 inches (15-60 cm)
- Marigolds are cheerful, low-maintenance flowers that love consistent moisture and full sun. They’re excellent for continuous blooms and can deter some garden pests.
- Care Tip: Deadhead spent blooms regularly to encourage more flowers throughout the season.
2. Basil (Ocimum basilicum)
- Hardiness: Tender Annual (USDA Zones 2-11, grown as annual)
- Plant type: Herb
- Exposure: Full sun to partial shade
- Height: 12-36 inches (30-90 cm)
- Spread: 8-18 inches (20-45 cm)
- Basil is a heat-loving herb that bolts (goes to seed) quickly if it dries out. A self-watering system is perfect for keeping its leaves lush and flavorful.
- Care Tip: Pinch off flower buds as they form to extend the harvesting period and promote bushier growth.
3. Thyme (Thymus vulgaris)
- Hardiness: Perennial (USDA Zones 5-9)
- Plant type: Herb, sub-shrub
- Exposure: Full sun
- Height: 6-12 inches (15-30 cm)
- Spread: 6-18 inches (15-45 cm)
- While thyme prefers well-drained soil and can tolerate some dryness, consistent moisture from a wicking system can help it thrive, especially in hot climates. Ensure the potting mix remains light and airy.
- Care Tip: Trim back after flowering to maintain a compact shape and encourage new growth.
4. Kale (Brassica oleracea var. sabellica)
- Hardiness: Biennial, often grown as Annual (USDA Zones 7-10 as perennial, 2-6 as annual)
- Plant type: Leafy green vegetable
- Exposure: Full sun to partial shade
- Height: 12-24 inches (30-60 cm)
- Spread: 12-18 inches (30-45 cm)
- Kale appreciates consistent moisture to produce tender, flavorful leaves. It’s a robust leafy green that performs well in containers.
- Care Tip: Harvest outer leaves as needed, working your way inward, to ensure continuous production.
5. Swiss Chard (Beta vulgaris subsp. vulgaris, Cicla Group)
- Hardiness: Biennial, often grown as Annual (USDA Zones 2-11)
- Plant type: Leafy green vegetable
- Exposure: Full sun to partial shade
- Height: 12-24 inches (30-60 cm)
- Spread: 12-18 inches (30-45 cm)
- Similar to kale, Swiss chard thrives with consistent moisture, preventing it from becoming tough or bitter. Its vibrant stems add beauty to the edible garden.
- Care Tip: Harvest older, outer leaves first, leaving the inner leaves to continue growing.
6. Parsley (Petroselinum crispum)
- Hardiness: Biennial, often grown as Annual (USDA Zones 2-11)
- Plant type: Herb
- Exposure: Full sun to partial shade
- Height: 8-18 inches (20-45 cm)
- Spread: 6-12 inches (15-30 cm)
- Parsley needs consistently moist soil to produce its best flavor and foliage. Self-watering systems are ideal for this thirsty herb.
- Care Tip: Regularly snip off outer stems close to the base to encourage new growth and maintain a fresh supply.
7. Rosemary (Salvia rosmarinus)
- Hardiness: Perennial (USDA Zones 7-10)
- Plant type: Herb, evergreen shrub
- Exposure: Full sun
- Height: 24-72 inches (60-180 cm)
- Spread: 24-48 inches (60-120 cm)
- Rosemary generally prefers drier conditions and excellent drainage. While it can work in a wicking system, it’s crucial to use a very porous, fast-draining potting mix and ensure the pot has ample aeration to prevent root rot. It’s more forgiving if allowed to dry out slightly between reservoir refills.
- Care Tip: Prune after flowering to encourage bushiness and harvest sprigs as needed.
Optimizing Your Self-Watering Container Garden
To ensure the best results with your DIY wicking system, keep these tips in mind:
Choosing the Right Potting Mix
A good potting mix is crucial. Avoid heavy garden soil, which can compact and inhibit wicking. Opt for a lightweight, well-aerated potting mix with perlite or vermiculite to improve drainage and prevent it from getting waterlogged, even with constant moisture. The wick needs to make good contact with the soil to draw water efficiently.
Monitoring the Reservoir
The beauty of a self-watering system is less frequent watering, but you still need to monitor your reservoir. Check the water level every few days, especially during hot, windy weather, and refill it before it runs dry. A dry reservoir means your plants are no longer self-watering.
Nutrient Management
With constant watering from below, nutrients can sometimes leach out of the soil more quickly or accumulate salts. Consider using a slow-release granular fertilizer mixed into your potting soil at planting time, or provide occasional liquid fertilizer at half strength when refilling the reservoir, especially for heavy feeders like leafy greens. Flush the soil from the top with plain water once a month to prevent salt buildup.
Placement and Sun Exposure
Just like any container garden, ensure your self-watering system is placed where your plants will receive adequate sunlight. Most of the edible plants and flowers shown will thrive in full sun (6+ hours of direct sunlight daily).
Common Mistakes to Avoid
Even with an efficient self-watering system, a few common errors can hinder your success:
- Overcrowding Pots: While it’s tempting to plant many things in one pot, too many plants in a single container will compete for nutrients and space, leading to stunted growth. One or two plants per pot, depending on their mature size, is usually best. For example, planting both parsley and rosemary in a small pot might lead to competition.
- Using Garden Soil: As mentioned, heavy garden soil can clog wicks and become waterlogged, leading to root rot. Always use a proper, lightweight potting mix.
- Forgetting to Refill: The system is only