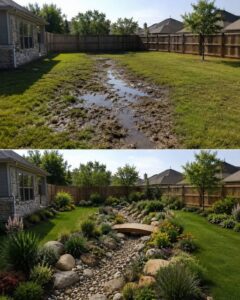
Are you tired of unsightly muddy spots and persistent erosion in your yard, especially after a heavy rain? These problem areas often feel like a constant battle, turning lush green spaces into mucky messes. But what if you could transform that challenge into a stunning, sustainable landscape feature that not only solves your drainage issues but also adds incredible charm and ecological value to your property?
Enter the dry creek garden: a clever, natural solution that mimics the appearance of a natural stream bed, designed to channel stormwater runoff away from your home or garden while simultaneously creating a captivating focal point. It’s more than just a drainage ditch; it’s an artful blend of geology and horticulture, turning a soggy problem into a beautiful, functional asset. Let’s explore how you can build your own.
The Art and Science of a Dry Creek Garden
A dry creek garden, also known as a dry streambed or a French drain, is essentially a trench filled with rocks, gravel, and sometimes sand, designed to direct water flow. During dry periods, it serves as an attractive landscape element, looking like a natural, dried-up stream. When it rains, it efficiently collects and moves excess water, preventing erosion, reducing pooling, and often recharging groundwater.
This smart gardening trick isn’t just about aesthetics; it’s a practical approach to water management. It reduces the strain on storm drains, filters pollutants as water percolates through the layers, and can even create microclimates that benefit certain plant species. It’s an excellent example of working with nature, not against it, to solve common landscape dilemmas.
Designing Your Dry Creek Dream
Before you dig, thoughtful planning is key. Consider your yard’s natural contours and where water naturally collects or flows during a rainstorm. The goal is to create a path that follows the lowest points, guiding water efficiently.
Mapping the Flow
- Observe Water Movement: Spend time watching your yard during heavy rain. Where does water accumulate? Which direction does it flow? Use flags or spray paint to mark these natural pathways.
- Determine the Route: Sketch out your desired creek path. It should have a gentle slope (at least 1–2% or a 1-foot drop over 50 feet) to ensure water flows consistently without stagnation or excessive speed. A meandering, naturalistic curve is often more aesthetically pleasing than a straight line.
- Size and Depth: The width and depth depend on the volume of water you need to manage. A common starting point is a width of 18–36 inches and a depth of 6–12 inches, but adjust this based on your specific runoff needs.
Material Selection
Choosing the right materials is crucial for both function and beauty.
- Base Layer: Use landscape fabric beneath the rocks to prevent weeds and keep the soil from mixing with the gravel, which could impede drainage over time.
- Rocks and Boulders: A mix of sizes and shapes creates a natural look. Larger, smoother stones (6–18 inches) define the banks and center, while smaller river stones and pea gravel fill the gaps. Source local stones if possible to integrate the garden more naturally into your regional landscape. Avoid overly angular or jagged rocks, as they can look unnatural.
- Gravel: Pea gravel or crushed stone (½–1 inch) makes up the majority of the streambed. It helps with drainage and creates the sound of flowing water during a downpour.
Step-by-Step Construction Guide
Building a dry creek garden is a rewarding project that can often be completed over a weekend with a helper.
1. Mark and Excavate
Use rope or spray paint to clearly outline your creek’s path. Begin excavating, following your planned depth and width. Ensure the bottom of the trench has a consistent, gentle slope. Compact the soil at the bottom firmly to provide a stable base.
2. Lay Landscape Fabric
Line the entire excavated trench with heavy-duty landscape fabric, overlapping edges by at least 6 inches to prevent weeds and erosion of the underlying soil. Secure the fabric with landscape staples.
3. Place Larger Rocks
Start by placing your largest boulders along the banks, partially embedding them into the soil for stability and a natural look. Arrange them irregularly, mimicking how rocks would naturally settle in a stream. These larger stones help define the channel and slow down water flow.
4. Add Smaller Stones and Gravel
Fill the streambed with a mix of medium-sized river stones, followed by smaller gravel or pea stone. Distribute them evenly, ensuring they cover the landscape fabric completely. Vary the sizes and shapes to create visual interest and a natural texture. You can create small