Are you looking to give your wooden furniture or decor pieces a fresh, unique look without spending a fortune on specialty finishes? Sometimes the most unexpected ingredients can yield the most striking results. This DIY wood finish, using common household items like coffee and glue, offers a fantastic way to create a rustic, aged, or distressed aesthetic that’s both budget-friendly and surprisingly beautiful.
It’s perfect for adding character to old pieces or giving new wood a charming, worn-in feel. If you’re ready to explore a creative approach to wood finishing, this simple method might be exactly what you need.
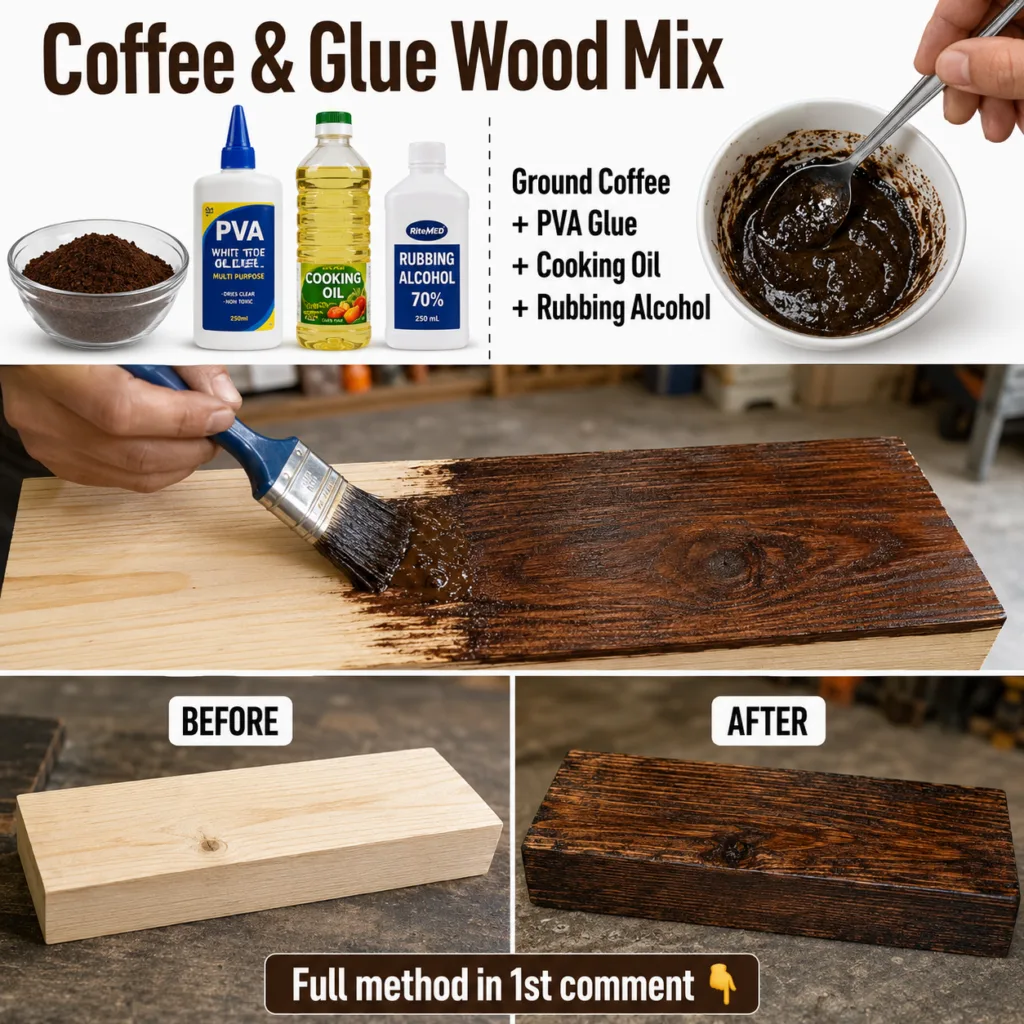
What You’ll Need
Gathering these items is usually easy, as many are already in your pantry or craft supplies:
Ingredients:
- 2 tablespoons coffee grounds (used, dry grounds work well for texture and color)
- 1 tablespoon PVA glue (standard white craft glue)
- 1 tablespoon cooking oil (such as vegetable, olive, or mineral oil)
- 2 teaspoons rubbing alcohol (isopropyl alcohol)
Tools:
- Small mixing bowl or container
- Spoon or stirring stick
- Brush or clean cloth for application
- Sandpaper (optional, for prep or between coats)
Why This DIY Can Be Useful
This unusual combination of ingredients works together to create a distinctive finish:
- Coffee Grounds: These provide natural pigmentation, giving your wood a warm, earthy brown tone. The fine particles also add a subtle texture that can enhance a rustic look.
- PVA Glue: As a binder, the glue helps the coffee grounds adhere firmly to the wood surface, creating a protective layer and a somewhat matte, durable finish.
- Cooking Oil: The oil penetrates the wood slightly, helping to nourish it and provide a smoother consistency to the mixture. It can also impart a very subtle sheen.
- Rubbing Alcohol: Alcohol helps to thin the mixture for easier application and promotes faster drying. It can also help the coffee pigments penetrate the wood fibers slightly.
How to Make It
Mixing this finish is quick and straightforward:
- In your small mixing bowl, combine the 2 tablespoons of coffee grounds and 1 tablespoon of PVA glue. Stir them together thoroughly until you have a thick, somewhat clumpy paste.
- Next, add the 1 tablespoon of cooking oil to the mixture. Continue stirring until the oil is fully incorporated. The mixture should start to become a bit smoother.
- Finally, add the 2 teaspoons of rubbing alcohol. Mix everything together until you achieve a consistent, spreadable paste. If the mixture feels too thick, you can add another small splash of alcohol, a tiny bit at a time, until you reach your desired consistency.
How to Use It
Before applying the finish, ensure your wood piece is clean and free of dust or old finishes. Lightly sanding the surface can help the mixture adhere better.
- Using a brush or a clean cloth, apply a thin, even layer of the coffee and glue mixture to your wood surface. Work in the direction of the wood grain.
- Allow the first coat to dry completely. Drying time can vary depending on humidity and thickness, but usually takes several hours.
- Once dry, you can apply a second coat if you desire a darker or more opaque finish. You might also choose to very lightly sand the dried first coat with fine-grit sandpaper for a smoother feel before applying the next.
- Continue applying thin coats until you achieve your desired look. Each layer will build upon the previous one, deepening the color and texture.
- After the final coat has dried, you can leave it as is for a rustic, matte look, or apply a clear topcoat sealant (like a polycrylic or wax) for added protection and a slightly different sheen.
What to Expect
This DIY finish creates a unique, earthy, and often textured look. You should expect a result that leans towards a rustic, aged, or slightly distressed appearance, rather than a perfectly smooth, glossy factory finish. The color will be a rich, warm brown, and the coffee grounds may provide a subtle granular texture, adding to its handmade charm. Results can vary based on the type of wood and how many coats you apply, so embrace the individuality of each piece you finish.
Helpful Tips
- Test First: Always test the mixture on an inconspicuous area of your wood or a scrap piece of similar wood before applying it to your main project. This helps you understand how the finish will look and behave.
- Vary Texture: For a coarser, more visibly textured finish, you can use slightly coarser coffee grounds. For a smoother finish, use finely ground coffee.
- Clean Up: Clean your brush or cloth immediately after use with warm water before the glue dries.
- Seal for Durability: For items that will see regular handling or moisture, applying a clear protective sealant (like a water-based polycrylic or clear wax) over the dried coffee-glue finish is highly recommended.
Important Notes / Safety
- Ventilation: While rubbing alcohol evaporates quickly, it’s best to work in a well-ventilated area.
- Patch Test: Always test on an inconspicuous spot or scrap wood first to ensure you like the color and texture on your specific wood type.
- Not Food Safe: This finish is not recommended for surfaces that come into direct contact with food.
- Storage: Store any leftover mixture in an airtight container. Its shelf life may vary, so check for consistency before reusing.