Are you dreaming of a thriving vegetable garden but intimidated by digging, weeding, and poor soil? What if we told you there’s a revolutionary method that lets you grow bountiful harvests with minimal fuss, even in small spaces? Welcome to the wonderful world of straw bale gardening!
Straw bale gardening is a fantastic no-dig solution that transforms straw bales into fertile growing mediums. It’s perfect for beginners, those with limited mobility, or anyone looking for an innovative, sustainable way to grow their own food. At Garden – L. Quyên, we love sharing gardening methods that make your life easier and your garden greener, and straw bale gardening is definitely one of them!
What Exactly is Straw Bale Gardening?
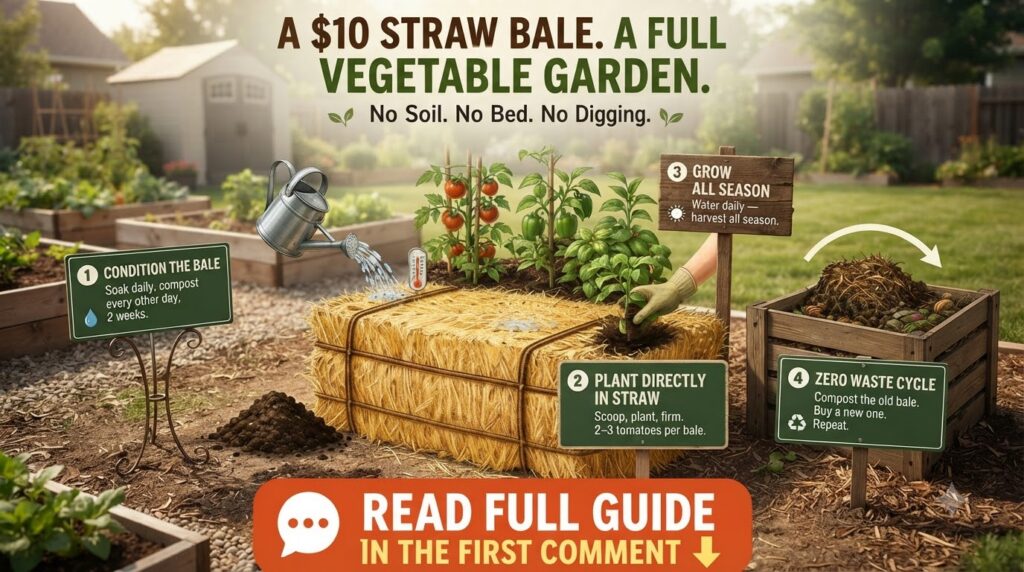
In essence, straw bale gardening involves growing plants directly in conditioned straw bales instead of in traditional soil. The bales act as raised beds, and as the straw decomposes, it creates a nutrient-rich environment for your plants. It’s a method that bypasses common soil issues, reduces weed growth, and often leads to earlier harvests due to the internal heat generated during decomposition.
Why Choose Straw Bale Gardening?
- No Digging Required: Say goodbye to back-breaking tilling and soil preparation!
- Fewer Weeds: Straw bales naturally suppress weed growth, saving you countless hours of weeding.
- Improved Drainage: Excellent for areas with heavy clay soil or poor drainage.
- Warmer Root Zone: The decomposition process generates heat, giving your plants a head start, especially in cooler climates.
- Accessibility: The elevated bales make gardening more comfortable for those with limited mobility.
- Space-Saving: Ideal for patios, balconies, or small yards where traditional garden beds aren’t feasible.
- Organic and Sustainable: At the end of the season, the spent bales can be composted, returning nutrients to your garden.
Easy Steps to Your Own Bountiful Straw Bale Garden
Step 1: Selecting and Conditioning Your Bales
This is the most crucial step! Conditioning transforms sterile straw into a vibrant growing medium.
Choose the Right Bales:
- Straw, Not Hay: Always choose straw (dried stalks after grain is removed) over hay (dried grasses and legumes). Hay contains seeds that will sprout into weeds.
- Organic (If Possible): Look for bales free from herbicides.
- Placement: Position your bales where they will receive at least 6-8 hours of direct sunlight. Ensure they are placed on a level surface, as they will become very heavy when wet.
The Conditioning Process (About 10-14 Days):
- Days 1-3: Wetting the Bales: Water the bales thoroughly every day until they are completely saturated. You’ll see water running out the bottom.
- Days 4-6: Adding Nitrogen: Apply a nitrogen-rich fertilizer (organic options include blood meal, composted chicken manure, or an organic granular fertilizer high in nitrogen). Sprinkle it on top and water it in thoroughly. The nitrogen kickstarts decomposition.
- Days 7-9: Reducing Nitrogen (Optional): If using synthetic fertilizer, you might switch to half the amount or an all-purpose fertilizer. If using organic, continue as before or slightly reduce. Keep watering thoroughly.
- Days 10-14: Resting Period: The bales should now be heating up internally as decomposition begins. Check the internal temperature; it should cool down to below 100°F (38°C) before planting. Keep the bales moist.
Step 2: Planting Directly in Straw
Once your bales are conditioned and cooled, they’re ready for planting!
- Creating Planting Pockets: Use a trowel or your hands to create small pockets or trenches on the top of the bale where you want to plant your seedlings or seeds.
- Adding a Layer of Potting Mix: For best results, add a 2-3 inch layer of good quality organic potting mix into these pockets. This provides a stable environment for young roots.
- Planting: Transplant your seedlings directly into these pockets, just as you would in a regular garden bed. For seeds, follow packet directions, covering them with the potting mix.
- Watering: Water immediately after planting to help the plants settle in.
Step 3: Care and Maintenance for a Bountiful Harvest
- Watering: Straw bales dry out faster than traditional garden beds, especially in warm weather. Check daily and water frequently, ensuring the bales remain consistently moist but not waterlogged.
- Fertilizing: While the bales provide some nutrients as they decompose, you’ll likely need to supplement with a balanced liquid organic fertilizer every 2-3 weeks, especially for heavy feeders like tomatoes and peppers.
- Pest Control: Monitor your plants for pests and use organic pest control methods if necessary. The raised nature of the bales can sometimes deter ground-dwelling pests.
- Plant Support: Taller plants like tomatoes, cucumbers, and beans will need support. You can stake them directly into the bale or use trellises around the bales.
Step 4: The Zero-Waste Cycle: What to Do After Harvest
One of the most appealing aspects of straw bale gardening is its sustainability.
- Composting: At the end of the growing season, your spent straw bales will be a rich, decomposed organic material. They are excellent for adding to your compost pile, enriching your traditional garden beds, or using as mulch around trees and shrubs.
- Soil Enrichment: The decomposed straw is full of beneficial microbes and nutrients, turning into fantastic compost that will improve your soil’s structure and fertility for future gardening endeavors.
Tips for Success in Your Straw Bale Garden
- Start Small: If you’re new to this, begin with 2-4 bales to get a feel for the process.
- Choose the Right Plants: Most vegetables, herbs, and even some flowers thrive in straw bales. Tomatoes, peppers, cucumbers, squash, potatoes, and leafy greens are excellent choices.
- Monitor pH: While usually not an issue, if you have concerns, a simple soil test kit can help you monitor the pH of your bales once conditioned.
- Stay Consistent: Especially with watering and initial conditioning, consistency is key to success.
Straw bale gardening offers a rewarding and enjoyable way to grow your own fresh produce without the typical challenges of traditional gardening. It’s an empowering method that truly embodies the spirit of sustainable living and homegrown goodness.
Ready to try your hand at straw bale gardening? Share your experiences and questions in the comments below! We’d love to hear about your garden journey.