Most people toss their vegetable scraps without a second thought, not realizing they’re throwing away a hidden garden. Imagine having a continuous supply of fresh greens, herbs, and even some roots, all from the parts you usually discard. It’s not magic, but a simple, sustainable trick that transforms kitchen waste into new life.
This guide will show you exactly how to turn those seemingly useless remnants into a thriving, edible resource right on your windowsill. Forget complex gardening; this is about effortless cultivation that can save you money and bring fresh flavor to your meals.
The Simple Secret of Kitchen Scraps
Regrowing vegetables from scraps is essentially propagating plants from their leftover bases. Many common vegetables retain the ability to sprout new growth from their root ends or parts of their stem, given the right conditions – usually just water and sunlight. It’s a fantastic way to reduce food waste, teach kids about plants, and enjoy ultra-fresh produce without a trip to the store.
What You’ll Need
- Vegetable Scraps: Bases of lettuce, celery, scallions, bok choy, carrot tops, ginger root, garlic cloves, onion bases.
- Small Containers: Glass jars, shallow bowls, or even plastic containers – clear ones work best for observing root growth.
- Fresh Water: Tap water is usually fine; change it regularly.
- Sunny Spot: A windowsill or a bright kitchen counter.
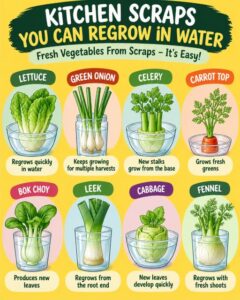
General Method: The Water Regrowth Basic
While each vegetable has its nuances, the core process for water-based regrowing is straightforward:
- Prepare Your Scrap: Cut the appropriate part of the vegetable (detailed below).
- Place in Water: Submerge only the very bottom of the scrap in about 1-2 inches of water. Ensure the top part is exposed to air.
- Find a Sunny Spot: Place your container on a windowsill or any bright area.
- Change Water Daily: This is crucial to prevent mold and ensure oxygen for new roots.
- Observe Growth: You’ll soon see roots forming and new shoots emerging from the top.
- Consider Transferring (Optional): Some prefer to grow directly in water, while others transfer to soil once roots are established.
8 Everyday Veggies You Can Regrow
1. Romaine Lettuce
- Scrap: The white core of the head, about 1-2 inches tall.
- Method: Place cut side up in a shallow bowl with about an inch of water. New leaves will sprout from the center.
2. Celery
- Scrap: The base of the stalk, about 1-2 inches thick.
- Method: Place cut side up in a shallow bowl or jar with an inch of water. Small leaves will appear, and eventually, new stalks.
3. Scallions (Green Onions)
- Scrap: The white root ends, about 1 inch long.
- Method: Place upright in a small glass with roots submerged in water. These are incredibly fast-growing; you’ll see new green shoots in days!
4. Bok Choy
- Scrap: The firm white base, about 1-2 inches tall.
- Method: Similar to lettuce and celery, place cut side up in shallow water. New leaves will emerge from the center.
5. Carrot Tops (for Greens)
- Scrap: The top 1-2 inches of a carrot, including the leafy end.
- Method: Place cut side down in shallow water. You won’t regrow a new carrot root, but you’ll get edible, fern-like greens that are great for salads or garnishes.
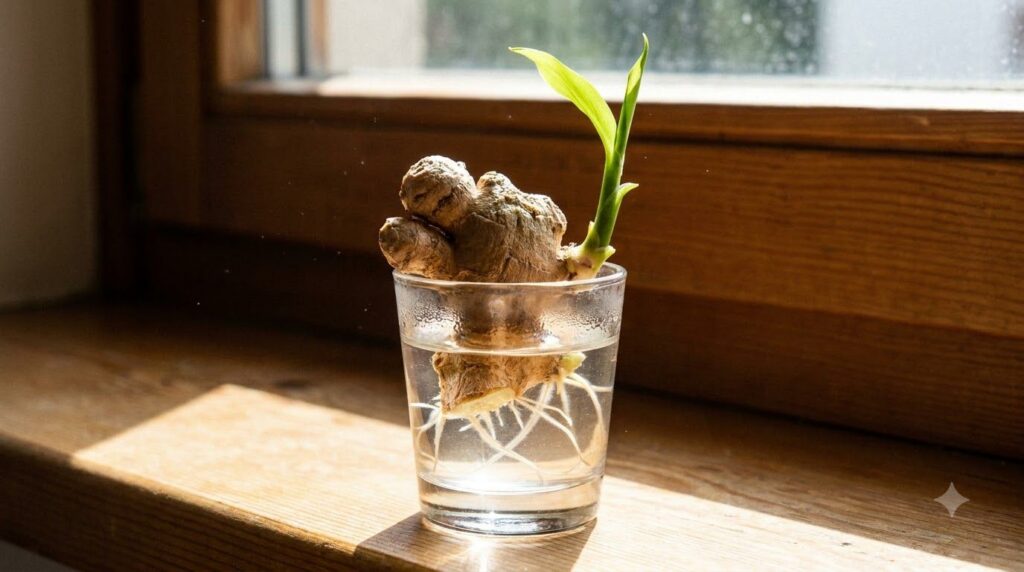
6. Ginger
- Scrap: A piece of ginger root with at least one ‘eye’ or bud.
- Method: Submerge half of the ginger piece in water, ensuring the bud faces upwards. Once roots and shoots appear, you can transfer to soil for a larger plant.
7. Garlic
- Scrap: An individual garlic clove, or a whole head if you want many shoots.
- Method: Place a clove root-side down in a small container with just enough water to cover the bottom. New green shoots will sprout, perfect for chopping into dishes like chives.
8. Onions (Bulb)
- Scrap: The root end of an onion, about an inch thick.
- Method: Place root-side down in a shallow glass with water just covering the roots. You’ll get green onion shoots, similar to scallions, but not a new bulb.
When to Harvest and How to Use Your Regrown Greens
Harvest your regrown greens when they reach a usable size, typically a few inches tall. For leafy greens like lettuce or bok choy, you can snip off outer leaves and allow the inner ones to continue growing. For scallions or garlic greens, simply snip what you need from the top; they will regrow multiple times.
Use them as you would fresh store-bought versions: in salads, stir-fries, sandwiches, soups, or as a garnish. The flavor will be incredibly fresh!
Quick Tip: Choosing the Best Scraps
Always opt for healthy, firm, and organic (if possible) vegetable bases. Avoid any scraps that show signs of mold, rot, or excessive wilting. The healthier the original plant part, the higher your chances of successful regrowth.
Common Mistakes to Avoid
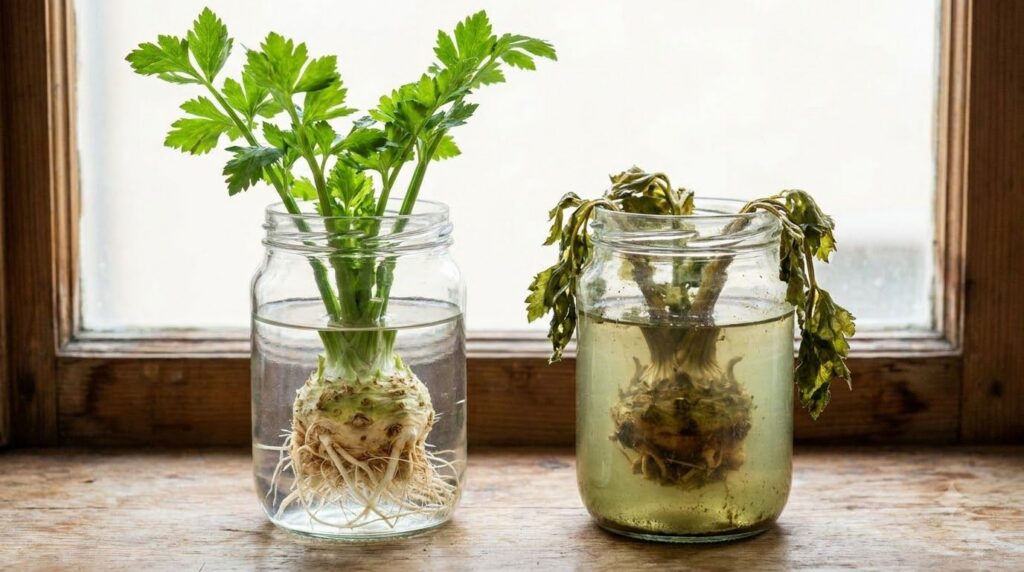
- Not Changing Water Daily: Stagnant water quickly leads to mold, bacterial growth, and root rot.
- Submerging Too Much: Only the very bottom (root end) needs to be in water; too much submergence can cause the top to rot.
- Lack of Sunlight: While water is key, sunlight provides the energy for photosynthesis and new growth.
- Expecting Full-Sized Veggies: Most regrown scraps will yield greens or smaller versions, not full, mature vegetables like their original counterparts.
- Using Sprayed Produce: Non-organic produce might have residual pesticides that inhibit growth or are simply unhealthy.
Storage Secrets for Your Regrown Harvest
Once harvested, treat your regrown greens like any other fresh produce. Wash them gently and store them in an airtight container in the refrigerator. For leafy greens, wrapping them in a damp paper towel before placing them in the container can help maintain freshness for a few days. Scallion and garlic greens can also be chopped and frozen for longer storage, though they are best fresh.
A Quick Comparison: Easy vs. Rewarding
| Vegetable | Ease of Regrowth | Typical Yield | Best Use |
|---|---|---|---|
| Scallions | Very Easy | Fast, continuous green shoots | Garnish, salads, stir-fries |
| Lettuce/Bok Choy | Easy | Several harvests of inner leaves | Salads, sandwiches |
| Celery | Medium | New stalks (smaller) | Soups, stews, snacks |
| Carrot Tops | Easy | Edible greens | Garnish, pesto, salads |
| Garlic | Medium | Green shoots (garlic scapes) | Flavoring, garnish |
| Onions | Medium | Green shoots | Flavoring, garnish |
| Ginger | Medium-Hard (for full root) | Initial shoots, can grow larger root in soil | Culinary uses, tea |
Important Cautions
While regrowing vegetables is generally safe, always ensure your initial scraps are free from visible pests or disease. If you are sensitive to certain plants, be aware that the regrown versions will have the same properties. Use organic scraps when possible to avoid any potential lingering chemicals from conventional farming.
Quick Summary: Your Regrowing Cheat Sheet
- Best Preparation: Water-based method in clear containers.
- Best Use-Case: Fresh greens and garnishes for various dishes.
- Storage: Refrigerate harvested greens in an airtight container.
- When to Use: When leaves/shoots are a few inches tall, snip as needed.
- What to Avoid: Stagnant water, rotting scraps, expecting full-sized root vegetables.
Frequently Asked Questions (FAQ)
Q: Can I use fresh or dried scraps?
A: You must use fresh scraps; dried scraps will not regrow.
Q: How long does it take to see growth?
A: Scallions can show growth in 1-2 days. Others like lettuce or celery may take a week or more to show significant new leaves.
Q: How long can I keep regrowing them in water?
A: You can often get multiple harvests, especially from scallions. For leafy greens, you might get 2-3 harvests before the plant’s energy is depleted. Transferring to soil can extend their life.
Q: Do I need to fertilize the water?
A: No, for initial regrowth, the plant uses stored energy. If you transfer to soil, then regular plant fertilizer will be beneficial.
Q: Can I refrigerate the scraps before regrowing?
A: It’s best to start regrowing immediately after cutting for the freshest results and highest success rate.
Q: What part of the vegetable is best for regrowing?
A: Generally, the root end or the base of the plant where growth originates. Specifics vary by vegetable as detailed above.
Q: Can I reuse the water?
A: No, you should change the water daily to provide fresh oxygen and prevent bacterial growth.
Q: When should I avoid it?
A: Avoid regrowing if the scrap shows any signs of rot, mold, or disease, as this will likely lead to failure and can spread unwanted pathogens.
Final Thoughts
Regrowing vegetables from kitchen scraps is a rewarding, budget-friendly, and eco-conscious practice that adds a touch of green to your home. It’s a simple act that yields fresh produce and a surprising amount of satisfaction. Give it a try – you might be amazed at what your kitchen scraps can do!
You may also like: DIY Herbal Salve Recipe: Soothe Your Skin Naturally
Read more: Growing Herbs Indoors: A Beginner’s Guide to a Fresh Supply

