There’s something incredibly satisfying about harvesting food you’ve grown yourself, and potatoes are a fantastic place to start for any aspiring gardener. Not only are they versatile in the kitchen, but growing them can be a fun and rewarding experience, even for beginners. Here at Garden – L. Quyên, we believe in making gardening accessible and enjoyable for everyone. Let’s dig into the simple steps to grow your own delicious potatoes!
Why Grow Your Own Potatoes?
Beyond the undeniable freshness, growing your own potatoes offers several benefits:
- Freshness and Flavor: Homegrown potatoes often boast a richer, earthier flavor compared to store-bought varieties.
- Cost-Effective: A small investment in seed potatoes can yield a bountiful harvest, saving you money in the long run.
- Educational Fun: It’s a wonderful project for families, teaching children about where food comes from.
- Satisfaction: There’s immense pride in cooking with ingredients you’ve nurtured from the ground up.
- Control: You decide what goes into your soil, ensuring organic practices if you choose.
Easy Guide to Planting Potatoes for Beginners
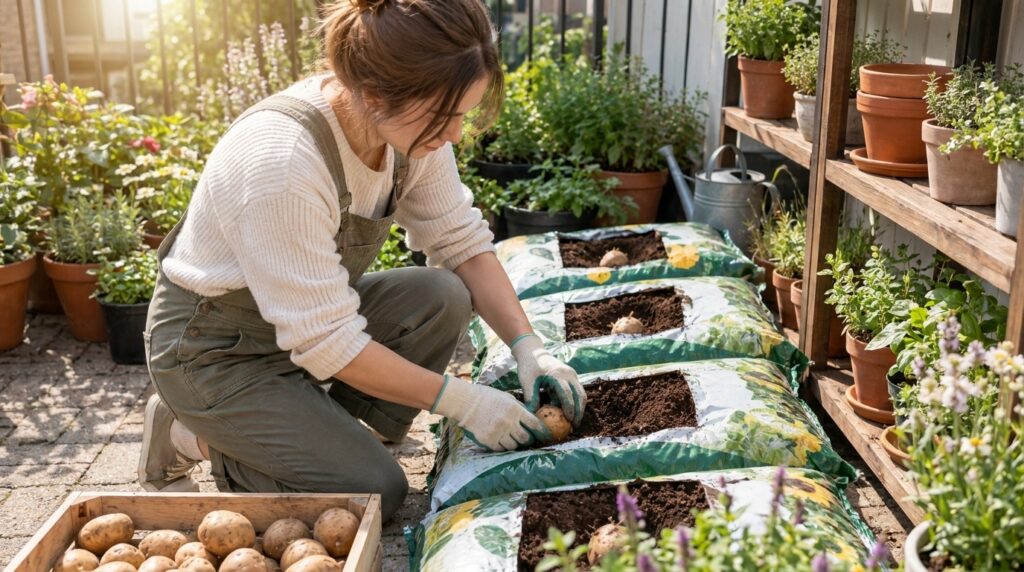
You don’t need a huge garden plot to grow potatoes. They thrive in various settings, including raised beds, containers, and even grow bags. Here’s how to get started:
What You’ll Need:
- Seed Potatoes: These are not your average supermarket potatoes. Seed potatoes are certified disease-free and specifically grown for planting. You can find them at local nurseries or online.
- Growing Container: Grow bags, large pots (at least 15 gallons), or a designated garden bed.
- Well-Draining Soil Mix: A mix of compost and garden soil works well. Potatoes prefer slightly acidic soil.
- Shovel or Trowel: For digging and planting.
- Watering Can or Hose: For consistent moisture.
Step-by-Step Planting Process:
1. Chitting Your Seed Potatoes (Optional but Recommended)
This is the process of encouraging sprouts to form on your seed potatoes before planting. It can lead to an earlier and larger harvest.
- Place your seed potatoes in a single layer in an egg carton or tray in a cool, bright spot (not direct sunlight).
- After 2-4 weeks, you’ll see short, stout sprouts (chits) forming.
2. Preparing Your Container or Garden Bed
- Containers: Fill your grow bag or pot with about 6-8 inches of well-draining soil mix.
- Garden Bed: Dig a trench about 6 inches deep.
3. Planting Your Seed Potatoes
- Cut larger seed potatoes into chunks, ensuring each piece has at least 1-2 ‘eyes’ (sprouts). Let the cut pieces dry for a day or two to form a protective skin, which helps prevent rot.
- Place the potato pieces (or whole smaller seed potatoes) cut-side down (or sprout-side up) about 10-12 inches apart in your container or trench.
- Cover with about 4-6 inches of soil.
- Water gently but thoroughly.
4. Hilling Your Potatoes
As your potato plants grow, you’ll need to ‘hill’ them. This means adding more soil around the stems.
- Once the green shoots are about 6-8 inches tall, add another 4-6 inches of soil around them, leaving only the top few inches of foliage exposed.
- Repeat this process every time the plants grow another 6-8 inches, until the container or trench is full. This encourages more potatoes to form along the buried stem.
Caring for Your Potato Plants
- Watering: Potatoes need consistent moisture, especially when the plants are flowering and forming tubers. Aim for about 1-2 inches of water per week, either from rain or irrigation. Avoid overwatering, which can lead to rot.
- Sunlight: Ensure your potato plants receive at least 6-8 hours of direct sunlight per day.
- Pest and Disease Control: Keep an eye out for common pests like potato beetles. Regular inspection can help you catch and address issues early, often with organic solutions.
- Fertilizing: If your soil is rich in compost, additional fertilizer might not be necessary. If needed, use a balanced organic fertilizer according to package directions.
Harvesting Your Potatoes
Depending on the variety, potatoes are usually ready for harvest 70-120 days after planting. You’ll know they’re ready when the foliage begins to yellow and die back. For ‘new potatoes,’ you can gently dig around the base of the plant once flowers appear to harvest a few early spuds, being careful not to disturb the main plant too much.
Once the foliage has completely died back, wait about two weeks before carefully digging up your potatoes. Gently brush off excess soil and let them cure in a cool, dark, well-ventilated area for a week or two before storing.
Get Growing!
Planting potatoes is a rewarding journey from sprout to supper. With a little care and attention, you can enjoy a delicious harvest right from your own garden. Share your potato planting adventures with us in the comments below!