There’s nothing quite as satisfying as harvesting fresh produce from your very own garden, and sweet potatoes are a fantastic crop to add to your homegrown bounty! Not only are they delicious and versatile in the kitchen, but growing them can be an incredibly rewarding experience. Whether you’re a seasoned gardener or just starting out, this guide will walk you through the simple steps to cultivate your own sweet potatoes from a single tuber all the way to a plentiful harvest.
Sweet potatoes are surprisingly easy to grow and can thrive in various climates, producing a generous yield with just a little care. They love warm weather and plenty of sunshine, making them a perfect addition to your summer garden. Let’s dig in and discover how to grow these nutritional powerhouses!
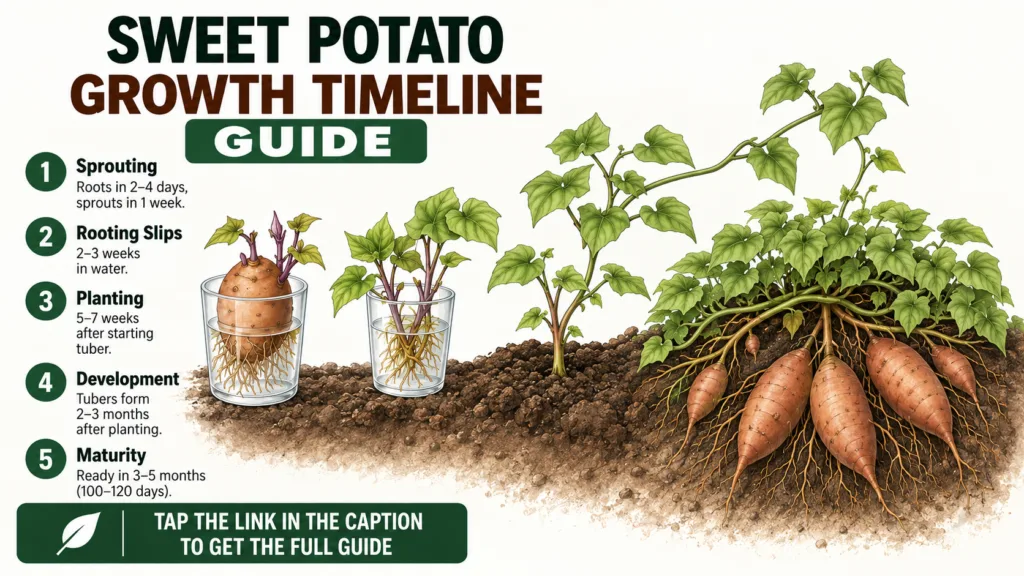
Stage 1: Sprouting Your Sweet Potato Slips
The journey begins with a mature sweet potato! You’re not planting the whole potato directly; instead, you’ll be growing ‘slips,’ which are sprouts that emerge from the potato. Choose an organic, healthy sweet potato free from blemishes for the best results.
How to Sprout Slips:
- Method 1 (Water): Partially submerge a sweet potato in a glass of water, using toothpicks to hold it in place. Place the glass in a sunny window. Replace the water every few days to keep it fresh.
- Method 2 (Soil): Bury about half of the sweet potato in a pot filled with moist potting mix. Keep the soil consistently damp and place the pot in a warm, sunny spot.
Within a few weeks, you should start to see sprouts (slips) emerging from the sweet potato. Once these slips are about 4-6 inches long with several leaves, they’re ready for the next step.
Stage 2: Rooting Your Sweet Potato Slips
Once your slips are of adequate size, it’s time to encourage them to grow their own roots, separate from the parent potato.
Steps for Rooting:
- Carefully twist or snap the slips off the sweet potato. Make sure each slip has a few leaves.
- Remove the bottom few leaves from each slip, exposing about 1-2 inches of the stem.
- Place the bottom ends of the slips into a glass of water. Again, put them in a sunny location.
- Change the water every 1-2 days. Within about a week or two, you should see small roots beginning to form.
Once the roots are about an inch long, your slips are ready to be planted in the garden!
Stage 3: Planting the Slips Outdoors
Sweet potatoes love warmth, so don’t rush planting them outdoors. Wait until all danger of frost has passed and the soil temperature is consistently above 60°F (15°C). They thrive in full sun, meaning at least 6-8 hours of direct sunlight per day.
Preparing Your Garden Bed:
- Soil: Sweet potatoes prefer loose, well-draining soil. Amend heavy clay soils with compost or sand to improve drainage. A slightly acidic to neutral pH (5.5-7.0) is ideal.
- Location: Choose a spot that gets plenty of sun and has good air circulation.
Planting Process:
- Dig small holes about 1 foot apart.
- Gently place one rooted slip into each hole, burying the stem up to the first set of leaves.
- Lightly firm the soil around each slip.
- Water thoroughly immediately after planting.
Stage 4: Caring for Your Sweet Potato Plants
Sweet potato plants are generally low-maintenance once established, but a little care will ensure a bountiful harvest.
Key Care Tips:
- Watering: Keep the soil consistently moist, especially during dry spells and when the plants are first getting established. Once established, they can tolerate some dryness but perform best with regular watering.
- Weeding: Keep weeds at bay, especially when the plants are young, as weeds can compete for nutrients and water. Once the vines start to spread, they’ll naturally suppress most weeds.
- Fertilizing: Sweet potatoes don’t require heavy fertilization. If your soil is poor, a balanced, slow-release organic fertilizer applied once or twice during the growing season can be beneficial. Avoid high-nitrogen fertilizers, which can promote leafy growth at the expense of tuber development.
- Pest Control: While generally pest-resistant, keep an eye out for common garden pests. Healthy plants are your best defense. Companion planting with herbs like marigolds can also help deter some pests naturally.
Stage 5: Harvesting Your Sweet Potato Bounty
Sweet potatoes typically take 90 to 120 days to mature, depending on the variety and your climate. You’ll know they’re ready when the leaves and vines start to turn yellow and die back, usually before the first frost in autumn.
How to Harvest:
- Carefully loosen the soil around the plant using a digging fork or spade, taking care not to damage the tubers.
- Gently lift the entire plant from the soil.
- Brush off excess soil, but do not wash the potatoes.
Curing Your Sweet Potatoes:
For the best flavor and storage, sweet potatoes need to be ‘cured’ after harvesting. This process helps to sweeten them and toughen their skins, allowing for longer storage.
- Place harvested sweet potatoes in a warm (85-90°F or 29-32°C), humid (80-90% humidity) location for 5-10 days.
- After curing, store them in a cool (55-60°F or 13-16°C), dark, and well-ventilated area.
Growing your own sweet potatoes is a rewarding journey that connects you with your food source and provides delicious, healthy tubers for your family. With these simple steps, you’ll be enjoying your homegrown sweet potatoes in no time. Happy gardening!