Homemade Cheese with Blueberry Topping – Easy Creamy Fresh Cheese Recipe
Making cheese at home may sound complicated, but this simple Homemade Fresh Cheese recipe uses everyday ingredients and requires no special cheese-making equipment. The result is a mild, creamy cheese that can be enjoyed on its own or paired with a sweet fruit topping.
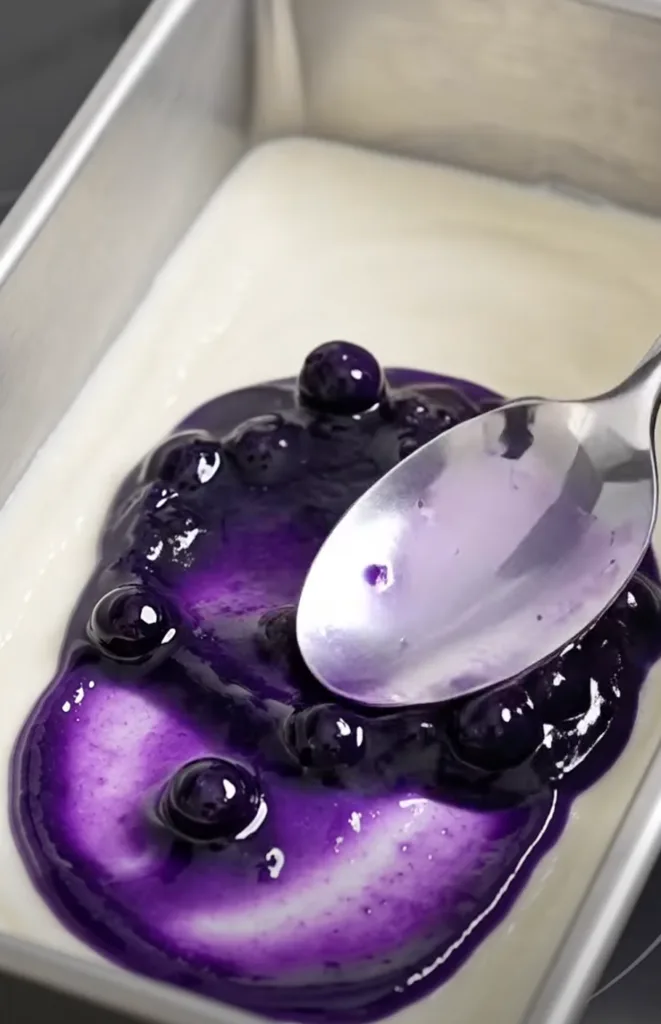
For this version, we’ll finish the homemade cheese with a glossy blueberry topping, creating a beautiful contrast between the creamy white cheese and deep purple berries. It’s perfect for spreading on toast, serving with crackers, or enjoying as a simple dessert.
Homemade Fresh Cheese Recipe
Prep Time: 10 minutes
Cooking Time: 15–20 minutes
Draining & Chilling Time: 2–4 hours
Servings: 4–6
Difficulty: Easy
Ingredients for the Homemade Cheese
- 4 cups (1 liter) whole milk
- 2 tablespoons fresh lemon juice or white vinegar
- 1/2 teaspoon salt
- 2–3 tablespoons plain Greek yogurt, optional for extra creaminess
- 1–2 tablespoons heavy cream, optional
- 1 teaspoon honey, optional for a slightly sweeter version
Important: Use regular pasteurized whole milk rather than ultra-high-temperature (UHT) milk when possible, since UHT milk may not form curds as reliably.
Ingredients for the Blueberry Topping
- 1 cup fresh or frozen blueberries
- 2 tablespoons sugar or honey
- 1 tablespoon fresh lemon juice
- 2 tablespoons water
- 1 teaspoon cornstarch
- 1 tablespoon water for mixing with the cornstarch
How to Make Homemade Cheese
Step 1: Heat the Milk
Pour 4 cups (1 liter) of whole milk into a clean, heavy-bottomed saucepan.
Heat it slowly over medium heat, stirring occasionally to prevent the milk from sticking to the bottom.
Heat until the milk is steaming and just beginning to simmer around the edges, approximately 185–195°F (85–90°C).
You don’t need a vigorous boil.
Step 2: Add the Lemon Juice
Reduce the heat to low and gradually add 2 tablespoons of fresh lemon juice or white vinegar.
Stir gently for approximately 20–30 seconds.
Then stop stirring and allow the milk to sit for 5–10 minutes.
You should begin to see the milk separate into white curds and a pale yellowish liquid called whey.
If the milk hasn’t separated after several minutes, add another teaspoon of lemon juice and wait again.
Step 3: Let the Curds Develop
Turn off the heat and leave the mixture undisturbed for another 5 minutes.
Avoid excessive stirring at this stage because you want the curds to remain relatively large.
The more clearly the curds separate from the whey, the easier the cheese will be to strain.
Step 4: Strain the Cheese
Place a fine-mesh strainer over a large bowl and line it with clean cheesecloth.
Carefully pour the curds and whey into the strainer.
Allow most of the liquid to drain naturally for about 10–15 minutes.
Be careful because the mixture may still be hot.
Step 5: Drain to Your Preferred Texture
Gather the edges of the cheesecloth together.
For a soft, creamy cheese, drain for approximately 30–60 minutes.
For a firmer cheese, allow it to drain for 1–2 hours.
You can also gently press the cheese to remove additional whey, but avoid squeezing too aggressively if you want a creamy texture.
Step 6: Make the Cheese Creamy
Transfer the drained curds to a clean bowl.
Add:
- 1/2 teaspoon salt
- 2–3 tablespoons Greek yogurt
- 1–2 tablespoons heavy cream, optional
Mash everything thoroughly with a fork or blend briefly in a food processor.
Continue mixing until the cheese reaches a smooth, creamy, spreadable consistency.
If you’re making this as a dessert-style cheese, you can also add 1 teaspoon of honey.
Step 7: Shape the Cheese
Transfer the creamy cheese into a small rectangular container or mold.
Press and smooth the surface with the back of a spoon.
Cover the container and refrigerate for at least 2 hours.
The cheese will become slightly firmer as it chills.
How to Make the Blueberry Topping
Step 8: Cook the Blueberries
Place 1 cup of blueberries in a small saucepan.
Add:
- 2 tablespoons sugar or honey
- 1 tablespoon lemon juice
- 2 tablespoons water
Cook over medium-low heat for approximately 4–5 minutes, stirring occasionally.
The berries should begin releasing their juices, but some blueberries should remain whole.
Step 9: Thicken the Blueberry Sauce
In a small bowl, combine:
1 teaspoon cornstarch + 1 tablespoon cold water.
Mix until completely smooth.
Slowly pour the cornstarch mixture into the simmering blueberries while stirring.
Cook for another 1–2 minutes, until the sauce becomes glossy and slightly thick.
The finished topping should still be pourable rather than extremely thick.
Step 10: Cool the Blueberry Sauce
Remove the saucepan from the heat.
Allow the blueberry topping to cool completely before adding it to the cheese.
Don’t pour a very hot fruit sauce directly over chilled fresh cheese, as it can soften the cheese considerably.
Assemble the Homemade Cheese
Step 11: Add the Blueberry Topping
Remove the chilled cheese from the refrigerator.
Spoon the blueberry mixture over the surface.
Spread the purple sauce gently with the back of a spoon, allowing some of the blueberry syrup to swirl naturally across the creamy white surface.
Leave several whole blueberries visible on top for a more appealing presentation.
Step 12: Chill Again
Cover the container and refrigerate for another 30–60 minutes.
This gives the blueberry topping time to set slightly and allows the flavors to come together.
Step 13: Serve
Serve the homemade cheese chilled.
You can enjoy it with:
- Toasted sourdough
- Croissants
- Crackers
- Bagels
- Fresh berries
- Granola
- Pancakes
- Waffles
- Honey
- Chopped nuts
For a dessert-style serving, place a generous spoonful of cheese in a bowl and top it with extra blueberry sauce and fresh berries.
Tips for Making Better Homemade Cheese
Use whole milk. Its higher fat content produces a richer and creamier cheese.
Don’t aggressively boil the milk. Gentle heating gives you better control over the curdling process.
Add the acid gradually. Too much lemon juice or vinegar can make the finished cheese unnecessarily sour.
Drain according to the texture you want. Less draining produces soft spreadable cheese, while longer draining gives you firmer curds.
Cool the blueberry sauce first. This helps preserve the texture of the chilled cheese.
Don’t throw away the whey. The leftover liquid can be used in bread dough, pancakes, smoothies, or other recipes.
Savory Version
You don’t have to make this cheese sweet. Skip the honey and blueberry topping and season the fresh cheese with ingredients such as:
- Black pepper
- Chopped chives
- Fresh parsley
- Garlic
- Chili flakes
- Dried herbs
- Olive oil
Spread it over toasted bread and finish with tomatoes or fresh herbs for an easy savory breakfast.
How to Store Homemade Cheese
Transfer the fresh cheese to a clean airtight container and keep it refrigerated at 40°F (4°C) or below.
Because this recipe contains fresh dairy and doesn’t contain commercial preservatives, it’s best to make relatively small batches. For best quality and safety, use it within 3–4 days and discard it sooner if you notice an unusual odor, mold, or other signs of spoilage.
Keep the cheese refrigerated rather than leaving it at room temperature for extended periods.
Why You’ll Love This Homemade Cheese
This recipe transforms simple milk into a soft, fresh, creamy homemade cheese with only a few basic steps. You can keep it savory for toast and sandwiches or turn it into a beautiful dessert-style spread with homemade blueberry topping.
The combination of mild creamy cheese, sweet-tart blueberry sauce, and juicy whole blueberries is especially delicious—and the vivid purple topping makes this simple homemade recipe look impressive enough to serve to guests.