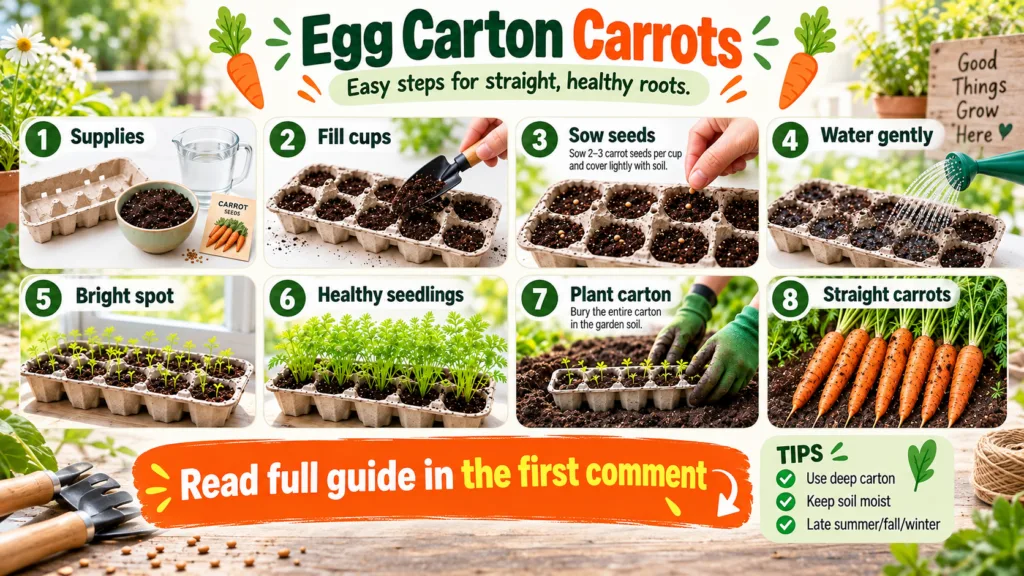
There’s nothing quite like the satisfaction of pulling a fresh, vibrant carrot straight from your garden. But for many home gardeners, growing perfectly straight carrots can feel like a myth. Often, they emerge twisted, forked, or stunted, leading to frustration. If you’ve ever dreamt of harvesting long, beautiful carrots without the fuss, we have an incredibly simple hack for you – using everyday egg cartons!
This method is not only budget-friendly and sustainable, but it also provides the ideal environment for your carrot roots to grow straight and strong, avoiding many common issues. Ready to transform your carrot patch? Let’s dive in!
Why Use Egg Cartons for Growing Carrots?
Egg cartons offer several fantastic benefits for carrot cultivation, making them a game-changer for gardeners of all experience levels:
- Root Protection: The individual compartments provide a clear, unobstructed path for carrot taproots to grow downwards, preventing them from hitting obstacles and forking.
- Easy Spacing: Each section naturally spaces your seeds, reducing the need for extensive thinning later on.
- Minimized Transplant Shock: When it’s time to move your seedlings to the garden, you can plant the entire carton section (if using compostable cartons), protecting the delicate roots.
- Cost-Effective and Eco-Friendly: Repurpose something you’d otherwise discard!
What You’ll Need:
- Empty paper or cardboard egg cartons (compostable ones are best!)
- Good quality potting mix or seed-starting mix
- Carrot seeds (choose varieties suited for your climate)
- A watering can with a fine rose
- A tray or shallow container to place the egg carton in
- A larger pot or prepared garden bed for transplanting
Your 8-Step Guide to Egg Carton Carrots:
Step 1: Gather Your Supplies
Ensure you have all your materials ready: egg cartons, soil, seeds, and water. A sunny spot for your seedlings is also crucial.
Step 2: Prepare Your Egg Cartons
Carefully poke a small drainage hole in the bottom of each egg cup. This prevents waterlogging, which can harm your delicate seedlings.
Step 3: Fill with Potting Mix
Fill each egg cup almost to the top with your chosen potting mix. Gently press down to remove any large air pockets, but don’t compact it too much, as carrots prefer loose soil.
Step 4: Sow Your Carrot Seeds
Place 1-2 carrot seeds in the center of each cup. Carrot seeds are tiny, so try not to sow too many. Lightly cover them with a thin layer of soil, about 1/4 inch deep. Remember to read your seed packet for specific depth recommendations.
Step 5: Water Gently
Using a watering can with a fine rose, gently water the soil until it’s consistently moist but not soggy. You can also bottom-water by placing the egg carton in a tray of water for about 15-20 minutes, allowing the soil to absorb moisture from below.
Step 6: Watch Them Sprout!
Place your egg carton in a warm, sunny location or under grow lights. Keep the soil consistently moist. Carrot seeds can take anywhere from 1 to 3 weeks to germinate, so be patient! Once they sprout, ensure they get plenty of light to prevent them from becoming leggy.
Step 7: Thin and Transplant
Once your seedlings have developed their second set of true leaves (not the initial cotyledons), it’s time to thin them. If you have two seedlings per cup, gently snip the weaker one at the soil line with small scissors, leaving the strongest. When the seedlings are about 3-4 inches tall and strong enough, it’s time to transplant. If you used compostable egg cartons, you can carefully cut out each individual cup and plant the entire cup directly into your garden bed or larger containers. The carton will decompose, minimizing root disturbance and ensuring straight growth.
Step 8: Ongoing Care and Harvest
After transplanting, continue to water your carrots regularly, ensuring the soil remains consistently moist. Carrots need at least 6 hours of direct sunlight per day. Keep the area around them free of weeds, which can compete for nutrients and water. Depending on the variety, carrots are typically ready to harvest in 60-80 days. You’ll know they’re ready when the tops of the carrots show a bit above the soil line. Gently loosen the soil around them and pull them straight up!
Pro Tips for Carrot Success:
- Soil is Key: Carrots thrive in loose, well-draining soil free of rocks and debris. Amend heavy clay soils with compost and sand to improve drainage and texture.
- Consistent Moisture: Irregular watering can lead to splitting or tough carrots. Aim for consistent moisture, especially during germination and root development.
- Sunlight: Ensure your carrots receive ample sunlight throughout their growth cycle.
- Pest Watch: Keep an eye out for common pests like carrot rust flies. Companion planting with strong-smelling herbs like rosemary or sage can help deter them.
Growing your own straight, healthy carrots using this egg carton hack is not only incredibly rewarding but also a fantastic way to utilize household items in your garden. Say goodbye to crooked carrots and hello to bountiful harvests!
Have you tried this hack or have other clever carrot-growing tips? Share your experiences and photos with us in the comments below. Happy gardening!