Looking for a fun, personalized activity that brings people together and tests their memory? A custom photo memory game is a fantastic way to do just that! Whether you want to celebrate a family member’s journey through life, create a game with beloved pets, or simply enjoy a unique twist on a classic, this DIY project is simple, rewarding, and offers endless possibilities for personalization.
It’s a wonderful alternative to store-bought games, providing a personal touch that makes every round more meaningful. Plus, it’s a great way to use cherished photos that might otherwise stay hidden away on your phone or computer.
What You’ll Need
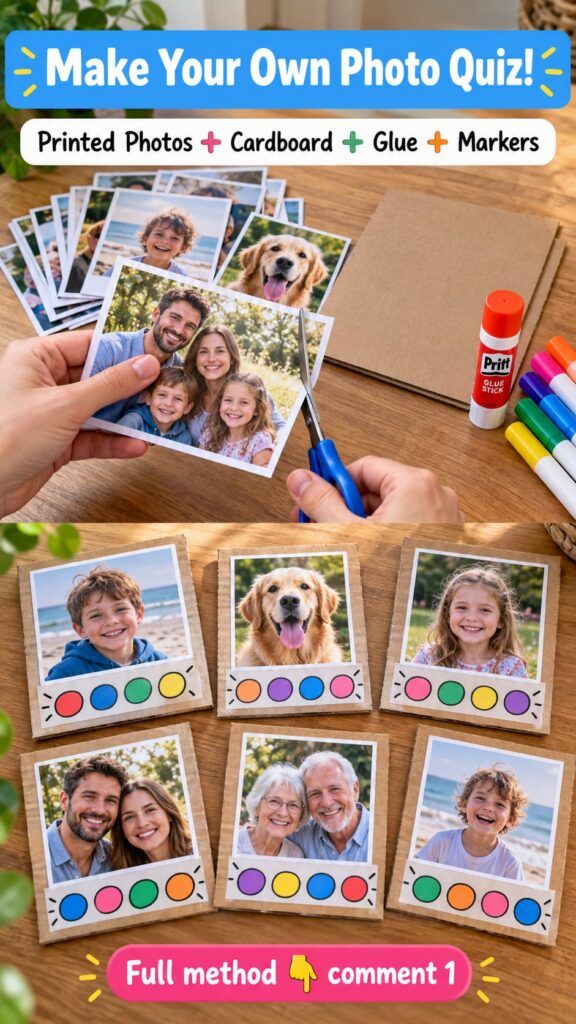
- Approximately 10-20 pairs of photos (20-40 individual photos total). For a “through the ages” game, this means 10-20 different subjects, each with two photos showing them at different life stages. For a standard memory game, you’ll need 10-20 unique images, and then print two copies of each.
- Printer and photo paper (or access to a photo printing service)
- Sturdy cardstock or cardboard (e.g., cereal boxes, craft cardboard)
- Scissors or a craft knife
- Glue stick or spray adhesive
- Ruler and pencil (optional, for precise cutting)
- Laminating sheets or clear contact paper (optional, for durability)
Why This DIY Can Be Useful
Creating your own photo memory game offers several unique advantages:
- Personalization: You choose the subjects, making the game instantly more engaging and meaningful than generic store-bought versions.
- Memory Boost: Like all memory games, it sharpens cognitive skills and visual recall, but with familiar faces or places, it can add an emotional layer to the challenge.
- Creative Expression: It’s a fun crafting project that allows you to flex your creative muscles and make something truly unique.
- Affordable Entertainment: Once you have your photos, the additional materials are often inexpensive or items you already have around the house.
How to Make It
- Select and Prepare Photos: Choose 10-20 subjects for your game. If you’re doing a “through the ages” game, select two distinct photos for each person (e.g., one childhood, one adult). For a traditional memory game, select 10-20 unique images you like. Ensure the photos are roughly the same orientation (all portrait or all landscape) and similar dimensions for consistency.
- Print Your Photos: Print your selected photos. Each photo will need a matching pair, so if you have 10 unique images, print two copies of each, totaling 20 cards. For the “through the ages” concept, you’ll have 10 subjects, each with two distinct photos (e.g., young Harrison Ford, adult Harrison Ford), totaling 20 cards.
- Prepare Card Backings: Cut your cardstock or cardboard into uniform squares or rectangles. These should be slightly larger than your printed photos. Aim for a consistent size for all cards (e.g., 2.5 x 2.5 inches or 3 x 3 inches).
- Attach Photos to Backings: Carefully glue each printed photo onto the center of a cardstock backing. Make sure they are flat and smooth. If using spray adhesive, do this in a well-ventilated area.
- Increase Durability (Optional): For cards that will withstand many game nights, cover each completed card with clear contact paper or laminate them using laminating sheets. Trim any excess material.
- Trim to Final Size: Once everything is glued and dry, use scissors or a craft knife to trim the cards to a uniform final size, ensuring all edges are neat and consistent. This helps prevent players from recognizing cards by imperfections.
How to Use It
Playing your custom photo memory game is just like playing any classic memory game:
- Shuffle the Cards: Thoroughly shuffle all the cards and lay them face down in a grid pattern on a flat surface.
- Take Turns: The first player flips over two cards, trying to find a matching pair.
- Match or Turn Back: If the two cards are a match (either identical photos, or two photos of the same person at different ages for the “through the ages” version), the player keeps the pair and takes another turn. If they are not a match, the player flips them back face down in their original spots, and the turn passes to the next player.
- Continue Playing: Play continues until all pairs have been found. The player with the most matching pairs at the end wins!
What to Expect
You can expect a game that’s full of laughter, conversation, and maybe even a few challenging moments! Younger players might need a little help, while adults will enjoy the nostalgia or the challenge of recognizing faces across different life stages. The fun is in the personalization and the shared experience, not necessarily in perfect, store-bought quality. Each game you make will be unique and reflect the memories you choose to highlight.
Helpful Tips
- Photo Quality: Use clear, well-lit photos. High-resolution images will look best when printed.
- Theme Ideas: Beyond “through the ages,” consider themes like family vacations, favorite places, pets, flowers, or even famous landmarks.
- Consistent Backs: Ensure the back of your cardstock is uniform so players can’t identify cards through differences in color or pattern. You can glue plain paper to the backs of recycled cardboard if needed.
- Storage: Keep your game in a small box or a cloth bag to protect the cards when not in use.
Important Notes / Safety
- When using scissors or a craft knife, always exercise caution. Supervise children closely if they are helping with the cutting steps.
- If using spray adhesive, ensure good ventilation and follow the product’s safety instructions.
- Always ensure cards are completely dry before shuffling and playing to prevent sticking.