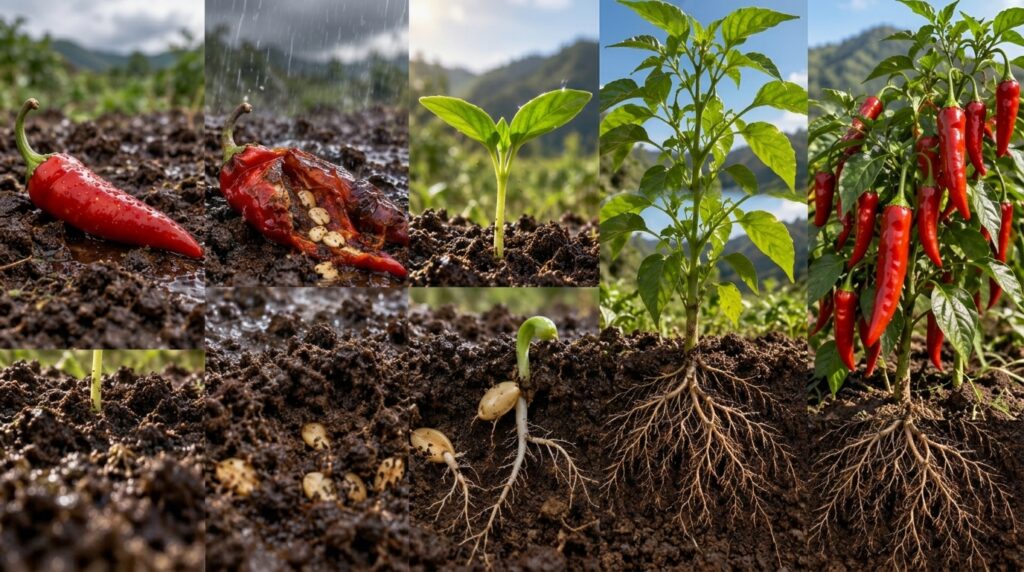
There’s nothing quite as satisfying as plucking a vibrant, fiery chili pepper straight from your own garden. Whether you love a mild jalapeño or crave the intense heat of a habanero, growing chili peppers at home is a rewarding journey. It transforms a tiny seed into a plant bursting with flavor and heat, ready to spice up your favorite dishes. Join us as we explore the complete life cycle of a chili pepper, from the moment it’s a humble seed until it’s a spicy sensation!
Starting Your Chili Adventure: The Mighty Seed
Every great chili begins its life as a small, unassuming seed. These seeds hold all the genetic information needed to grow into a specific type of chili plant. The first step is selecting the right seeds for your climate and taste preference. You can purchase seeds from a reputable supplier or even save them from a ripe chili you enjoyed.
Germination: Awakening the Seed
Germination is the process where your chili seed awakens and begins to sprout. Chili seeds love warmth! To encourage them to sprout, you’ll need a warm environment, ideally between 75-85°F (24-29°C). Here’s how to give them the best start:
- Seed Starting Mix: Use a light, well-draining seed-starting mix. Avoid heavy garden soil at this stage.
- Planting Depth: Plant seeds about 1/4 inch (0.6 cm) deep.
- Moisture: Keep the soil consistently moist but not waterlogged. A spray bottle can help.
- Warmth: Consider using a heating mat designed for seedlings to maintain optimal temperature.
- Light: Once they sprout, provide plenty of light, either from a sunny windowsill or grow lights.
Patience is key! Some chili varieties can take anywhere from a week to a month to germinate.
Nurturing Your Young Chili Seedlings
Once your seeds have sprouted and developed their first set of true leaves (the second set of leaves to appear), they are officially seedlings! This is a crucial stage for developing strong, healthy plants.
Thinning and Potting Up
If you’ve planted multiple seeds per cell, thin them to the strongest seedling. Gently snip off the weaker ones at the soil line. As your seedlings grow, they will eventually outgrow their small seed-starting cells. When roots start to show at the bottom or the plant looks crowded, it’s time to move them into larger pots, usually 3-4 inches (7-10 cm) in diameter. Use a good quality potting mix for this.
Light, Water, and Airflow
- Light: Continue providing ample light. Insufficient light can lead to leggy, weak plants.
- Water: Water thoroughly when the top inch of soil feels dry, but allow the soil to dry slightly between waterings to prevent root rot.
- Airflow: Good air circulation is important to prevent fungal diseases. A small fan can help strengthen stems and improve airflow.
Transplanting to Their Permanent Home
Before moving your chili plants outdoors permanently, it’s essential to ‘harden them off’. This means gradually exposing them to outdoor conditions over 7-10 days, increasing their time outside each day. This toughens them up and reduces transplant shock.
Chili peppers thrive in full sun, meaning at least 6-8 hours of direct sunlight per day. Choose a location in your garden with well-draining soil that’s rich in organic matter, or a large pot (at least 5-gallon/19-liter for most varieties) if you’re container gardening.
Feeding Your Growing Plants
As your plants grow larger and begin to flower, they will benefit from regular feeding. Use a balanced fertilizer, switching to one higher in phosphorus and potassium when flowers start to appear to encourage fruiting.
The Reward: Flowers and Fruits!
Eventually, your chili plants will begin to produce delicate white or purple flowers. These flowers are self-pollinating, but gentle shaking of the plant or a light breeze can help ensure good fruit set. Soon after, tiny green chilies will begin to form from the base of the faded flowers.
As the chilies mature, they will grow in size and begin to change color, often from green to red, orange, or yellow, depending on the variety. This color change indicates they are ripening and developing their full flavor and heat.
Harvesting Your Homegrown Chilies
Knowing when to harvest is crucial for the best flavor. Most chilies are ready when they have reached their mature size and full color. You can harvest some varieties while they are still green if you prefer a milder flavor, but for maximum heat and characteristic taste, wait for them to fully ripen.
To harvest, use clean pruning shears or a sharp knife to snip the stem just above the cap of the chili. Avoid pulling or tugging, as this can damage the plant. Regular harvesting encourages the plant to produce more chilies throughout the season.
Enjoy the Spice!
From a tiny seed to a vibrant, spicy fruit, growing chili peppers is an incredibly rewarding experience. You’ll not only enjoy fresh, flavorful chilies but also gain a deeper appreciation for the cycles of nature. So, roll up your sleeves, get your hands dirty, and embark on your own chili pepper journey. Happy gardening!