Are you ready to add a touch of homegrown sweetness to your garden and your plate? Growing sweet potatoes is a wonderfully rewarding experience, and it’s surprisingly easy to do right in your own backyard or even in containers. Forget buying expensive starter plants; all you need is a sweet potato from your pantry and a little patience to create your own ‘slips’ – the sprouts that will become new plants!
At Garden – L. Quyên, we believe in making gardening accessible and fun for everyone. This guide will walk you through the simple, step-by-step process of growing delicious sweet potatoes from slips, ensuring you have a bountiful harvest. Let’s dig in!
Why Grow Sweet Potatoes?
Sweet potatoes are not only incredibly versatile and delicious in the kitchen, but they are also packed with nutrients like Vitamin A and C, and fiber. Growing them at home ensures you get fresh, organic produce free from unwanted chemicals. Plus, the process of nurturing a plant from a simple sprout is immensely satisfying.
What You’ll Need
Gathering your tools before you begin makes the process smooth and enjoyable:
- A healthy sweet potato: Choose one that’s firm and blemish-free, preferably organic to avoid sprout inhibitors.
- Jars or glasses: Any glass jar will do; you’ll need one for each sweet potato.
- Toothpicks: About 3-4 per sweet potato.
- Water: Room temperature water is best.
- Sunny location: A warm windowsill is ideal for sprouting.
- Potting mix or garden soil: Rich, well-draining soil for planting.
- Container or garden bed: Sweet potatoes need space, so choose wisely.
Step-by-Step Guide to Growing Sweet Potatoes from Slips
Step 1: Sprouting Your Sweet Potato (Creating Slips)
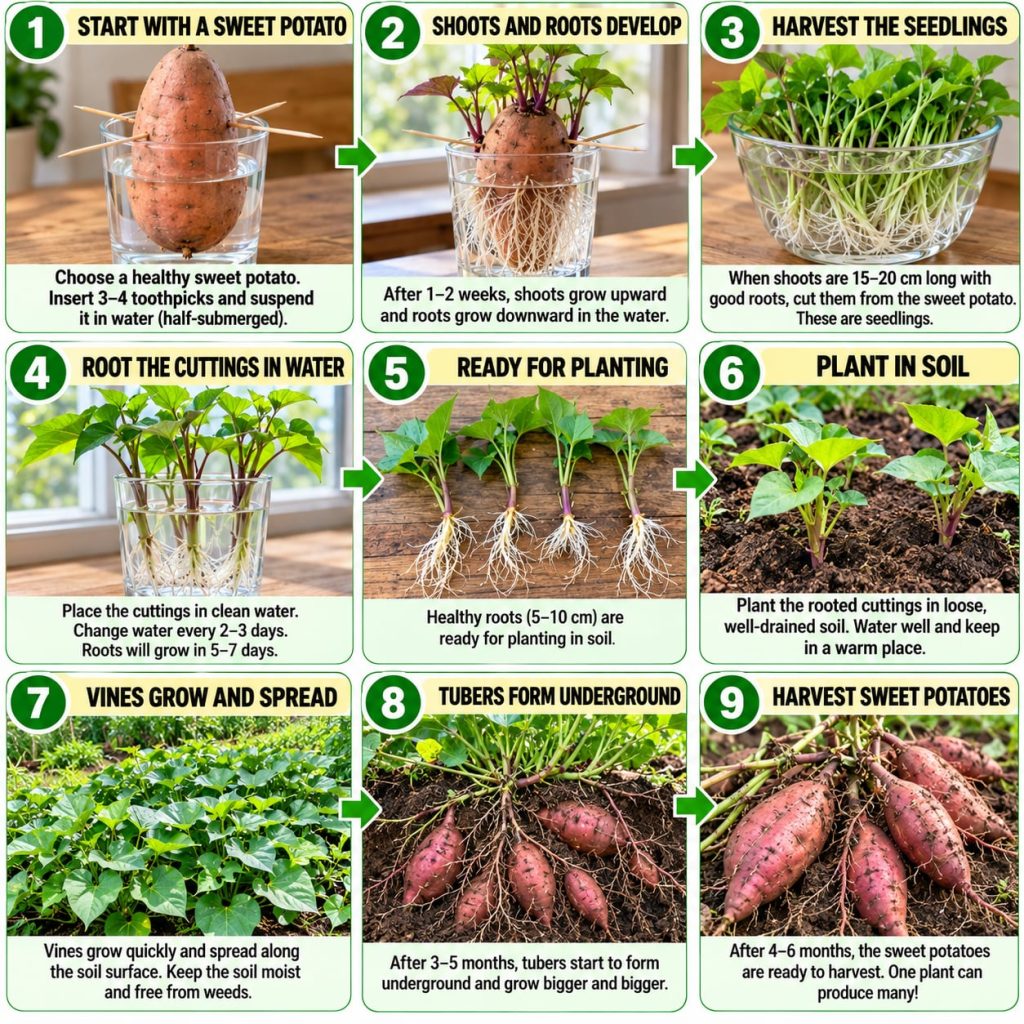
- Prepare Your Sweet Potato: Wash your sweet potato thoroughly. You can cut it in half or leave it whole. Cutting can sometimes yield more slips.
- Suspend in Water: Insert 3-4 toothpicks around the middle of the sweet potato. These will act as a tripod.
- Place in Water: Suspend the sweet potato, blunt end down (or the end with more ‘eyes’), over a jar or glass filled with water. About half of the sweet potato should be submerged.
- Find a Sunny Spot: Place your jar in a warm, sunny location, like a windowsill.
- Change Water Regularly: Change the water every few days to keep it fresh and prevent mold.
- Watch for Growth: Within a few weeks, you’ll start to see roots forming in the water and small sprouts (slips) emerging from the top of the potato.
Step 2: Separating and Rooting Your Slips
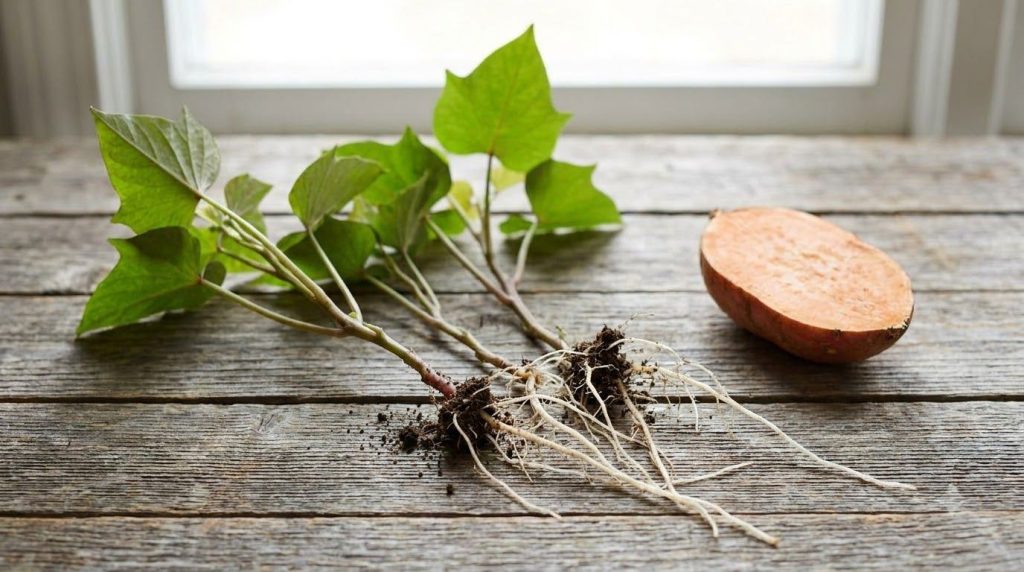
- Harvest the Slips: Once the slips are about 4-6 inches long and have a good set of leaves, gently twist or snap them off the sweet potato. Ensure each slip has some small roots or a ‘node’ (a tiny bump where roots will form).
- Rooting the Slips: Place the separated slips into fresh jars of water, submerging the bottom half. Keep them in a sunny spot.
- Wait for Strong Roots: In about 1-2 weeks, the slips will develop a strong root system. Once the roots are about an inch long, they are ready for planting.
Step 3: Preparing Your Garden Bed or Container
Sweet potatoes thrive in loose, well-draining soil and love full sun (at least 6-8 hours a day). They prefer a slightly acidic to neutral pH (5.5-6.5).
- Garden Bed: Loosen the soil to a depth of at least 8-12 inches. Amend with compost or well-rotted manure to improve fertility and drainage. Create mounds about 6-8 inches high and 12-18 inches apart.
- Container: Choose a large container, at least 15-gallon capacity or a grow bag, as sweet potato vines spread. Fill with a good quality potting mix enriched with compost.
Step 4: Planting Your Rooted Slips
- Planting Time: Plant your slips after all danger of frost has passed and the soil has warmed up (temperatures consistently above 60°F or 15°C).
- How to Plant: Plant one rooted slip into each mound or directly into your container. Bury the slip up to its top leaves, ensuring the roots are well covered.
- Water Thoroughly: Water your newly planted slips immediately and generously to help settle the soil around the roots.
Step 5: Ongoing Care for Bountiful Harvests
- Watering: Sweet potatoes need consistent moisture, especially during dry spells. Aim for about 1 inch of water per week, either from rain or irrigation. Reduce watering as harvest approaches to prevent rot and encourage tuber development.
- Fertilizing: While sweet potatoes don’t need heavy fertilization, a balanced, organic fertilizer or a side dressing of compost mid-season can boost growth. Avoid high-nitrogen fertilizers, which encourage vine growth over tuber development.
- Weeding: Keep the area around your young plants free of weeds, which compete for nutrients and water. Once the vines spread, they will naturally shade out most weeds.
- Pest and Disease Control: Sweet potatoes are generally hardy, but keep an eye out for common garden pests. Healthy plants are your best defense. Companion planting can also help deter pests naturally.
Harvesting Your Homegrown Sweet Potatoes
Sweet potatoes are typically ready for harvest in 90-120 days from planting. Look for signs like the leaves starting to turn yellow and the vines dying back. Before harvesting, use a garden fork to carefully loosen the soil around the plants to avoid damaging the tubers. Gently pull up the plants, unearthing the sweet potatoes.
After harvesting, ‘cure’ your sweet potatoes for about 1-2 weeks in a warm (80-85°F), humid place. This process allows their skins to toughen and converts starches to sugars, enhancing flavor and storage life. After curing, store them in a cool, dark, well-ventilated area (around 55-60°F).
Tips for Sweet Potato Success
- Rotate Crops: Don’t plant sweet potatoes in the same spot year after year to prevent soil-borne diseases.
- Mound Planting: Mounds help warm the soil and improve drainage, which sweet potatoes love.
- Pinch Back Vines (Optional): While not strictly necessary for tuber development, pinching back some of the longest vines can encourage bushier growth and prevent them from taking over your garden.
Growing sweet potatoes from slips is a rewarding project for any gardener. With these easy steps, you’ll be enjoying your own fresh, delicious sweet potatoes in no time. Happy gardening!