Imagine having an endless supply of your favorite plants without spending another dime! Plant propagation is a magical process that allows you to do just that. By taking a small piece of an existing plant, known as a cutting, you can grow an entirely new one. It’s a rewarding, cost-effective, and incredibly fun way to expand your green oasis and share the joy with friends.
Whether you’re looking to fill your home with more lush greenery, start a new herb garden, or simply enjoy the satisfaction of nurturing life from scratch, propagating plants from cuttings is a skill every gardener should master. Let’s dive into the simple steps to turn one plant into many!
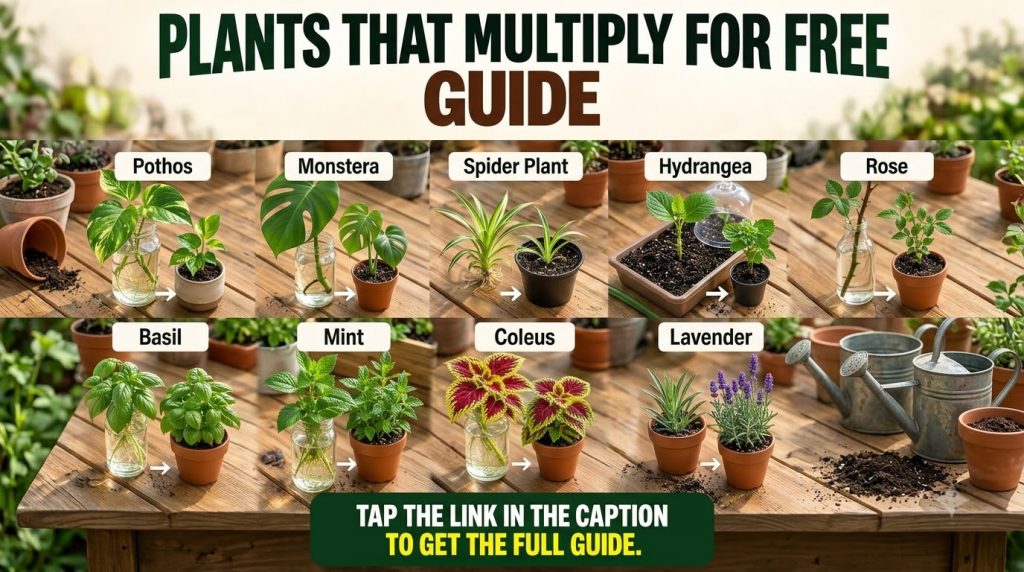
What Exactly is Plant Propagation?
Plant propagation is the process of creating new plants from existing ones. While there are several methods, such as starting from seeds or division, propagating from cuttings is one of the easiest and most popular for home gardeners. It involves taking a stem, leaf, or root section from a ‘parent’ plant and encouraging it to grow roots and develop into a new, independent plant.
Why Should You Propagate Your Plants?
There are countless reasons to embrace plant propagation:
- Save Money: Why buy new plants when you can grow them for free?
- Expand Your Collection: Easily multiply your favorite varieties or create lush, full planters.
- Share with Friends: Cuttings make wonderful, personalized gifts for fellow plant lovers.
- Rejuvenate Plants: Some plants can become leggy or sparse over time. Cuttings allow you to start fresh.
- Experiment and Learn: It’s a fantastic way to deepen your understanding of plant growth and biology.
Getting Started: Essential Tools and Materials
You don’t need much to begin your propagation journey. Here’s a quick list:
- Healthy Parent Plant: Choose a vigorous, disease-free plant.
- Sharp Pruners or Scissors: Sterilize them with rubbing alcohol to prevent disease transmission.
- Clean Containers: Jars, glasses, or small pots for rooting.
- Water or Potting Mix: Depending on your chosen method.
- Optional: Rooting hormone (powder or gel), a clear plastic bag or dome for humidity.
Step-by-Step Guide to Taking Cuttings
1. Choose the Right Parent Plant and Cutting
Select a healthy, mature stem from your parent plant. Look for stems with several leaves and no flowers or buds, as the plant’s energy will be directed towards rooting rather than blooming. Aim for a cutting that is 4-6 inches long.
2. Make a Clean Cut
Using your sterilized pruners or scissors, make a clean cut just below a ‘node.’ A node is where a leaf or branch grows from the stem, and it’s where new roots are most likely to form. A diagonal cut can increase the surface area for water absorption.
3. Prepare Your Cutting
Remove any leaves from the bottom 1-2 inches of your cutting. This prevents them from rotting in water or being buried in soil, which can lead to fungal issues. If using rooting hormone, dip the cut end into the powder or gel according to product instructions.
4. Choose Your Rooting Medium: Water or Soil?
Water Propagation
- Place your cutting in a clean jar or glass filled with fresh water, ensuring the nodes are submerged but no leaves are in the water.
- Place the container in a warm spot with bright, indirect light.
- Change the water every few days to keep it fresh and prevent bacterial growth.
- Roots typically appear within a few weeks, depending on the plant species.
Soil Propagation
- Fill a small pot with a well-draining potting mix. A mix of peat moss and perlite often works well.
- Make a small hole in the center of the soil with a pencil or your finger.
- Gently insert the cutting into the hole, ensuring the nodes are buried. Firm the soil around the base.
- Water thoroughly and cover the pot with a clear plastic bag or propagation dome to create a humid environment.
- Place in a warm spot with bright, indirect light. Keep the soil consistently moist but not waterlogged.
5. Patience is Key: Caring for Your Cuttings
Propagation requires patience! Roots don’t grow overnight. Continue to provide consistent care:
- Light: Bright, indirect light is crucial. Direct sun can be too intense for delicate new cuttings.
- Temperature: Most plants prefer warm temperatures (65-75°F or 18-24°C) for optimal rooting.
- Humidity: Higher humidity often encourages faster rooting, especially for soil cuttings.
- Monitor: Check for root development regularly. For water cuttings, you’ll see roots forming. For soil cuttings, a gentle tug will reveal if there’s resistance, indicating root growth.
6. Potting Up Your Rooted Cuttings
Once your cuttings have developed a healthy root system (typically 1-2 inches long for water cuttings, or when soil cuttings show new leaf growth and resistance to a gentle tug), it’s time to pot them into their new homes. Use a small pot with fresh potting mix and gradually acclimate them to less humid conditions if they were under a dome.
Popular Plants to Propagate from Cuttings
Many plants are incredibly easy to propagate from cuttings. Some of our favorites include:
- Pothos: Known for their vigorous rooting in water.
- Monstera: Can root in water or soil, especially with aerial roots.
- Spider Plant: Propagate the ‘plantlets’ that dangle from the mother plant.
- Hydrangea: Stem cuttings taken in late spring/early summer work well.
- Roses: Hardwood cuttings can be taken in late fall or winter.
- Basil & Mint: These herbs root quickly in water, perfect for kitchen gardens.
- Coleus: Colorful foliage plants that root easily in water or soil.
- Lavender: Softwood cuttings in spring or semi-hardwood cuttings in summer.
Start Propagating Today!
There’s immense satisfaction in watching a tiny cutting transform into a vibrant, thriving plant. Plant propagation is not just a gardening technique; it’s a journey of discovery and a celebration of nature’s ability to renew itself. So grab those pruners, choose your favorite plant, and start multiplying your green beauties for free!
Happy gardening!