Do you have beautiful silver jewelry, flatware, or decorative items that have lost their luster? That dull, blackish film we call tarnish can be frustrating, making your treasured pieces look old and neglected. But what if we told you there’s a surprisingly simple, effective, and natural way to bring back their brilliant shine using ingredients you likely already have in your kitchen?
Many people resort to harsh chemical cleaners or expensive professional services to tackle tarnished silver. However, this guide will introduce you to a fantastic DIY method that harnesses a safe electrochemical reaction to effortlessly lift tarnish right off your silver. It’s not only budget-friendly but also incredibly satisfying to watch your silver transform!
This comprehensive guide is for anyone who wants to revitalize their tarnished silver without scrubbing or using harsh chemicals. Whether you have antique silver pieces, everyday jewelry, or a collection of silver-plated items, you’ll learn a gentle yet powerful technique that will make them sparkle once again. Get ready to rediscover the beauty of your silver!
In this article, you will learn the exact steps to create a homemade silver cleaning solution, understand how it works, and get expert tips for keeping your silver bright for longer. Say goodbye to dull silver and hello to dazzling shine!
Quick Summary
- Preparation Time: 5 minutes
- Application Time: 10-15 minutes (per batch)
- Difficulty Level: Easy
- Best Uses: Removing tarnish from sterling silver, silver-plated items, and pure silver.
- Suitable Surfaces: Sterling silver, fine silver, silver-plated items (without delicate glues or porous stones).
- Storage Time: The cleaning solution is used immediately and not stored.
Why You’ll Love This DIY Solution
- Easy to make: Requires minimal preparation and common household items.
- Budget-friendly: Uses inexpensive ingredients you probably already have.
- Chemical-free: A natural alternative to abrasive or harsh chemical silver polishes.
- Beginner-friendly: Simple enough for anyone to follow with great results.
- Non-abrasive: Cleans without scrubbing, preventing scratches and damage to your silver.
- Quick to prepare: Get started in minutes and see results fast.
- Safe for most silver: Suitable for a wide range of silver and silver-plated items.
Ingredients / Materials
- 1 large heat-resistant bowl (glass, ceramic, or plastic)
- Aluminum foil (enough to line the bowl)
- 1 cup boiling hot water
- 1/4 cup baking soda (sodium bicarbonate)
- 1/4 cup non-iodized salt (table salt or sea salt)
- 1 tablespoon white vinegar (optional, for extra boost)
Equipment Needed
- Measuring cups and spoons
- Kettle or saucepan (to boil water)
- Tongs (optional, for handling hot silver)
- Soft, lint-free cloth (e.g., microfiber cloth) for drying and buffing
- Clean dish towel or paper towels
Step-by-Step Instructions
Follow these simple steps to restore the shine to your tarnished silver:
-
Prepare Your Bowl (2 minutes)
Line the bottom and sides of your heat-resistant bowl with aluminum foil, ensuring the shiny side of the foil is facing up. Crumple the foil loosely to create more surface area for the reaction. This foil acts as a cathode in our electrochemical process, which is key to removing tnish.
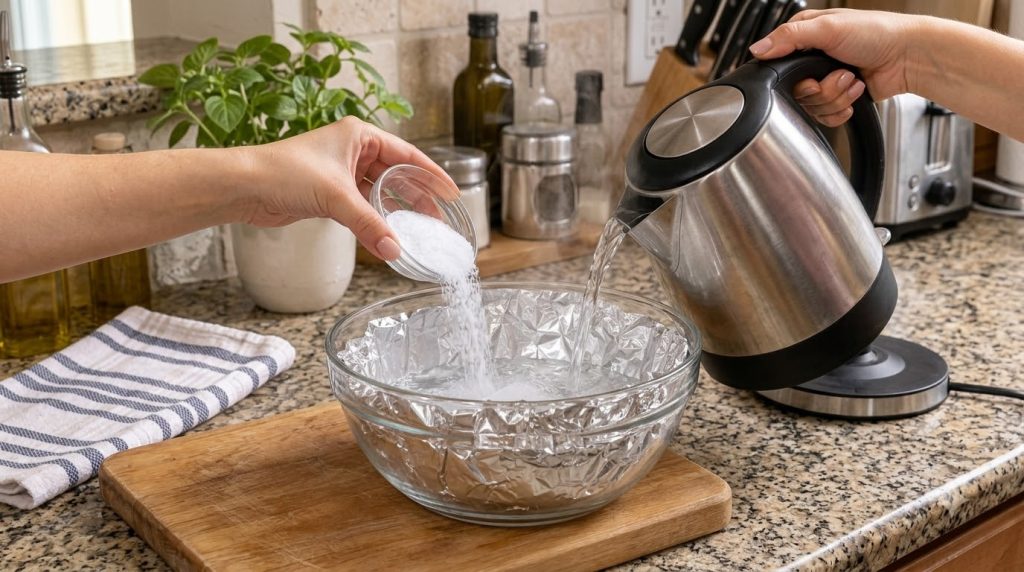
Starting the silver cleaning process by lining the bowl with foil and adding ingredients. -
Add Cleaning Agents (1 minute)
Place your tarnished silver items directly onto the aluminum foil in the bowl. Try to ensure each piece is in contact with the foil for the best results. Sprinkle the baking soda and non-iodized salt evenly over the silver items and the foil.
-
Pour Hot Water (1 minute)
Carefully pour one cup of boiling hot water over the silver and the powder mixture. If using, you can also add the tablespoon of white vinegar at this stage. You will immediately notice a slight fizzing or bubbling as the chemical reaction begins. This is normal and indicates the process is working.
-
Let it Soak (5-10 minutes)
Allow the silver to soak in the hot solution for 5-10 minutes. For heavily tarnished items, you might need to extend the soaking time slightly, but typically no more than 15 minutes. The tarnish will transfer from the silver to the aluminum foil, a fascinating process to observe!
-
Remove and Rinse (2 minutes)
Using tongs (if the water is still hot) or gloved hands, carefully remove the silver items from the bowl. You should see a noticeable difference in their appearance. Rinse each piece thoroughly under cool running water to remove any residue from the cleaning solution.
-
Dry and Buff (2 minutes)
Immediately dry your silver items completely with a clean, soft, lint-free cloth. This is crucial to prevent new water spots or further tarnishing. For an extra shine, gently buff the silver with the same cloth. Your silver should now be gleaming!
Best Uses
This DIY silver cleaning method is incredibly versatile and effective for various silver items:
- Sterling Silver Jewelry: Rings, necklaces, bracelets, and earrings (without delicate stones or components).
- Silver Flatware: Forks, spoons, knives, and serving utensils.
- Silver-Plated Items: Trays, bowls, picture frames, and decorative accents.
- Coin Collections: Silver coins can be gently cleaned, but always research proper numismatic care if they are valuable or collectible.
- Small Silver Ornaments: Statuettes or small decorative pieces.
Surface Limitations: Avoid using this method on items with glued components (like some knife handles or decorative elements) as the hot water can loosen the glue. Also, do not use on silver with a deliberate antiqued or oxidized finish, as it will remove the beautiful dark patina. Porous gemstones like pearls, opals, turquoise, and amber should also be kept away from this solution, as they can be damaged by heat and chemicals.
Safety Notes
- Wear Gloves: While the ingredients are natural, prolonged contact with the solution can dry out your skin. Wearing gloves is recommended.
- Handle Hot Water Carefully: Always exercise caution when pouring and handling boiling hot water to prevent burns. Use tongs to retrieve silver if the water is still hot.
- Ventilation: Ensure good ventilation in your work area, especially if you add vinegar, as the fumes can be strong.
- Test First: If you are unsure about an item, especially antique pieces or those with unique features, always test the method on a small, inconspicuous area first.
- Do Not Ingest: Keep all cleaning solutions and ingredients out of reach of children and pets. This solution is not for consumption.
Expert Tips
- Add Vinegar for Tough Tarnish: For stubborn tarnish, adding 1 tablespoon of white vinegar to the hot water along with the baking soda and salt can accelerate the reaction and provide an extra cleaning boost.
- Ensure Foil Contact: Make sure every silver item is touching the aluminum foil directly for the chemical reaction to occur effectively. If you have many pieces, you may need to do them in batches.
- Don’t Over-Soak: While effective, over-soaking silver (especially plated items) isn’t necessary and could potentially dull the finish over time. 10-15 minutes is usually sufficient.
- Pre-Clean if Very Dirty: If your silver has food residue or heavy dirt, give it a quick wash with mild dish soap and water before the tarnish removal process for better results.
- Immediate Drying is Key: After rinsing, dry your silver immediately and thoroughly. Any lingering moisture can lead to water spots or encourage new tarnishing.
- Proper Storage Prevents Tarnish: Store your clean silver in anti-tarnish bags or cloth, or wrap it in acid-free tissue paper. Airtight containers are also excellent for preventing exposure to air, which causes tarnish.
- Use Distilled Water: If you live in an area with hard water, using distilled water for this process can help prevent mineral deposits or water spots on your freshly cleaned silver.
- Gentle Buffing for Extra Shine: After drying, a quick, gentle buff with a clean, soft microfiber cloth will enhance the shine and luster of your silver.
Storage Instructions
The cleaning solution itself is meant for immediate use and should not be stored. Once the silver is clean, the solution can be safely poured down the drain.
- Best Storage Container: Store your freshly cleaned silver in anti-tarnish bags, flannel pouches, or airtight containers.
- Storage Location: Keep silver in a dry, cool place away from humidity, direct sunlight, and heat sources, as these can accelerate tarnishing.
- Signs the Solution Should Be Discarded: Since the solution is for single-use, there are no signs to look for. Simply discard after use.
- Preventing Future Tarnish: Consider placing a piece of chalk or a silica gel packet in your silver storage area to absorb moisture, which contributes to tarnish.
Frequently Asked Questions
Q: How does this method actually work to clean silver?
A: This method uses an electrochemical reaction. The aluminum foil, baking soda, salt, and hot water create an electrolyte bath. The sulfur compounds (tarnish) on the silver are attracted to the aluminum, effectively ‘transferring’ from the silver to the foil, leaving your silver shiny again.
Q: Can I use this method on all types of silver?
A: It’s excellent for sterling silver, fine silver, and most silver-plated items. However, avoid using it on items with porous gemstones (like pearls, opals), glued components, or pieces with an intentional oxidized (antiqued) finish, as it can remove the desired patina.
Q: What if my silver doesn’t get completely clean after one soak?
A: For very heavily tarnished items, you might need to repeat the process with fresh foil and solution. Ensure good contact between the silver and the foil, and consider adding white vinegar for an extra boost.
Q: Is it safe to use this method on silver-plated items?
A: Yes, it is generally safe for silver-plated items because it’s non-abrasive. Unlike polishing, it won’t rub off the thin silver layer. Just be cautious with items that have glued parts, as hot water can loosen adhesives.
Q: Can I substitute baking soda for something else?
A: Baking soda (sodium bicarbonate) is crucial for this chemical reaction. It’s not recommended to substitute it. However, you can use regular table salt or sea salt (non-iodized) interchangeably.
Q: How often can I clean my silver this way?
A: You can use this method as often as needed when you notice tarnish building up. Because it’s non-abrasive, it won’t wear down your silver like traditional polishing cloths might.
Q: Why do I need to use hot water?
A: Hot water helps to speed up the chemical reaction, making the tarnish removal process more efficient and effective.
Q: Will this remove scratches from my silver?
A: No, this method removes tarnish, which is a chemical layer on the surface. It will not remove physical scratches or dents. For those, professional restoration might be necessary.
Conclusion
Bringing back the gleam to your tarnished silver doesn’t have to be a daunting task. With this easy, natural, and highly effective DIY method, you can restore your cherished silver pieces right in your own kitchen using common household ingredients. Say goodbye to harsh chemicals and tedious scrubbing, and hello to sparkling silver!
Remember to follow the safety notes, especially when handling hot water and delicate items. With a little care and these simple steps, your silver will once again be a dazzling highlight in your home. Go ahead, give it a try, and enjoy the radiant results!