Tired of scrubbing away at stubborn bathroom mold without seeing real results? That unsightly, often unhealthy, visitor seems to cling to grout lines and tile surfaces, making your bathroom feel less than pristine. But what if we told you that two common household items could become your secret weapon in the fight against this persistent problem?
Get ready to transform your bathroom from grime to gleam with a powerful, budget-friendly DIY cleaning solution. We’re talking about a dynamic duo: shaving cream and hydrogen peroxide. This ingenious combination is not just effective; it’s also incredibly simple to prepare and apply, making those challenging mold spots a thing of the past.
Why Bathroom Mold Is a Nuisance (and a Health Concern)
Mold isn’t just an aesthetic issue; it can also pose health risks, especially for individuals with allergies or respiratory sensitivities. It thrives in damp, humid environments, making bathrooms prime breeding grounds. Over time, mold can degrade grout, damage sealants, and leave behind unpleasant musty odors. While commercial mold removers exist, many contain harsh chemicals that can be irritating or costly. Our DIY approach offers a gentler, yet equally effective, alternative.
The Secret Weapon: Shaving Cream & Hydrogen Peroxide
This unlikely pairing creates a powerful and practical solution for banishing bathroom mold. Let’s break down why these two ingredients work so well together:
Hydrogen Peroxide: The Disinfectant & Whitener
- Powerhouse Cleaner: Hydrogen peroxide is a mild antiseptic and disinfectant. It works by releasing oxygen, which helps break down mold spores and lightens stains.
- Eco-Friendlier Alternative: Compared to bleach, hydrogen peroxide is less corrosive and breaks down into water and oxygen, making it a more environmentally conscious choice for many households.
Shaving Cream: The Cling Factor & Mild Scrubber
- Adhesive Carrier: The foamy, thick consistency of shaving cream (the cheap, basic kind works best!) acts as an excellent carrier for the hydrogen peroxide. It allows the peroxide to cling to vertical surfaces like shower walls and tiled grout lines, giving it more contact time to work its magic.
- Gentle Abrasive: Shaving cream contains mild detergents and often has a slightly abrasive quality, which can help lift surface grime and make scrubbing easier.
- Odor Masking: While its primary role isn’t odor removal, the fresh scent of shaving cream can temporarily mask the musty smell of mold until it’s eradicated.
Your DIY Mold-Fighting Recipe
Ready to reclaim your bathroom’s sparkle? Here’s what you’ll need and how to mix up this effective solution.
Ingredients:
- ½ cup hydrogen peroxide (3% solution)
- ½ cup inexpensive shaving cream (foam, not gel)
Tools You’ll Need:
- Glass bowl or non-metallic container for mixing
- Spoon or stirring stick
- Old toothbrush or small scrub brush
- Cleaning sponge
- Rubber gloves
- Ventilation (open a window or turn on the fan)
Step-by-Step Instructions:
- Prepare Your Space: Ensure good ventilation in your bathroom by opening windows or turning on the exhaust fan. Put on your rubber gloves to protect your hands.
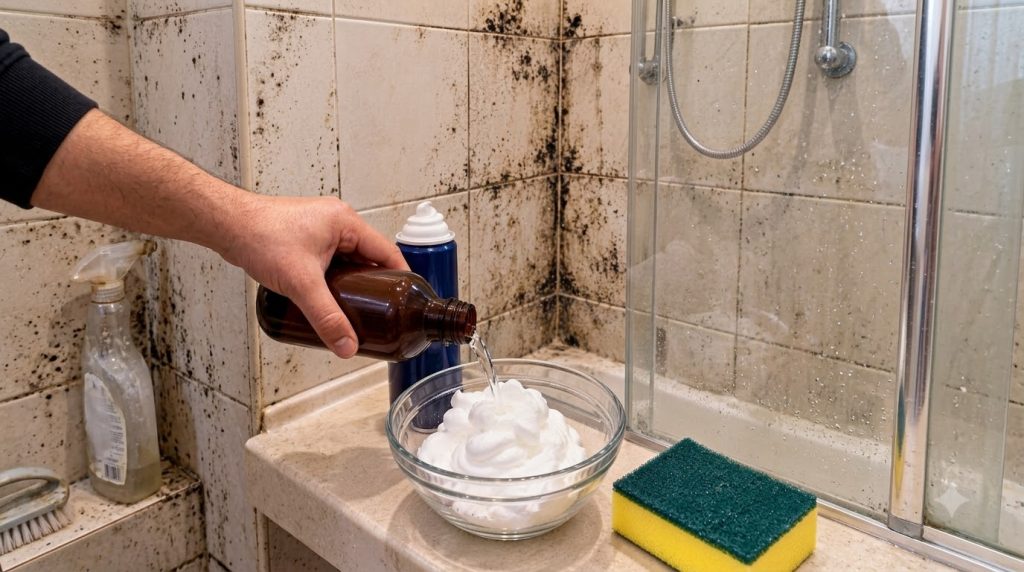
- Mix the Solution: In your glass bowl, combine ½ cup of hydrogen peroxide with ½ cup of shaving cream. Stir gently until you have a uniform, frothy mixture. It should have a consistency that’s easy to spread but thick enough to stick to surfaces.
- Apply to Mold: Using a spoon or your gloved hand, generously apply the mixture directly onto the mold-stained areas of your tiles, grout, and shower walls. Don’t be shy – cover the mold completely.
- Let It Dwell: Allow the mixture to sit on the mold for at least 30 minutes, or even up to an hour for very stubborn stains. The longer it sits, the more time the hydrogen peroxide has to penetrate and break down the mold.
- Scrub Away: After the dwell time, take your old toothbrush or scrub brush and vigorously scrub the treated areas. You’ll notice the mold lifting and the surfaces brightening as you scrub.
- Rinse Thoroughly: Rinse the entire area with clean water, ensuring all the shaving cream and mold residue are washed away. You can use a wet sponge or spray bottle for this step.
- Wipe Dry: Finish by wiping the surfaces dry with a clean cloth to prevent new mold growth.
Tips for Best Results
- Patch Test: Before applying to a large area, always test the solution on an inconspicuous spot, especially on colored grout or delicate surfaces, to ensure no discoloration occurs.
- Consistency is Key: For vertical surfaces, make sure the mixture is thick enough to cling without dripping excessively. Adjust the ratio slightly if needed.
- Regular Maintenance: To prevent mold from returning, consider applying a lighter coat of hydrogen peroxide directly to susceptible areas every few weeks, or after deep cleaning.
- Ventilation: Always ensure proper ventilation when working with cleaning solutions, even mild ones.
Safety First!
While this DIY solution is relatively mild, it’s always important to take precautions:
- Gloves: Always wear rubber gloves to protect your skin.
- Ventilation: Work in a well-ventilated area.
- Eye Protection: Avoid contact with eyes. If contact occurs, rinse immediately with plenty of water.
- Keep Out of Reach: Store hydrogen peroxide and shaving cream safely away from children and pets.
Say goodbye to stubborn bathroom mold and hello to a sparkling clean bathroom! This simple yet effective hack harnesses the power of common household items to deliver impressive results. Give it a try and share your own mold-fighting success stories in the comments below!