Imagine plucking fresh, fragrant herbs from your kitchen counter whenever inspiration strikes, regardless of the season or whether you have a garden plot. It’s not a dream reserved for seasoned gardeners. Water rooting offers a simple, rewarding path to cultivating a vibrant herb collection without ever touching soil. This accessible method transforms fresh cuttings into thriving plants, bringing the joy of homegrown flavor right into your home. If you’ve ever felt intimidated by gardening, or simply lack outdoor space, water rooting is your perfect starting point for enjoying fresh herbs all year long. Let’s dive into how you can easily grow nine popular herbs right in a glass of water, nurturing them from cutting to a healthy, harvestable plant.
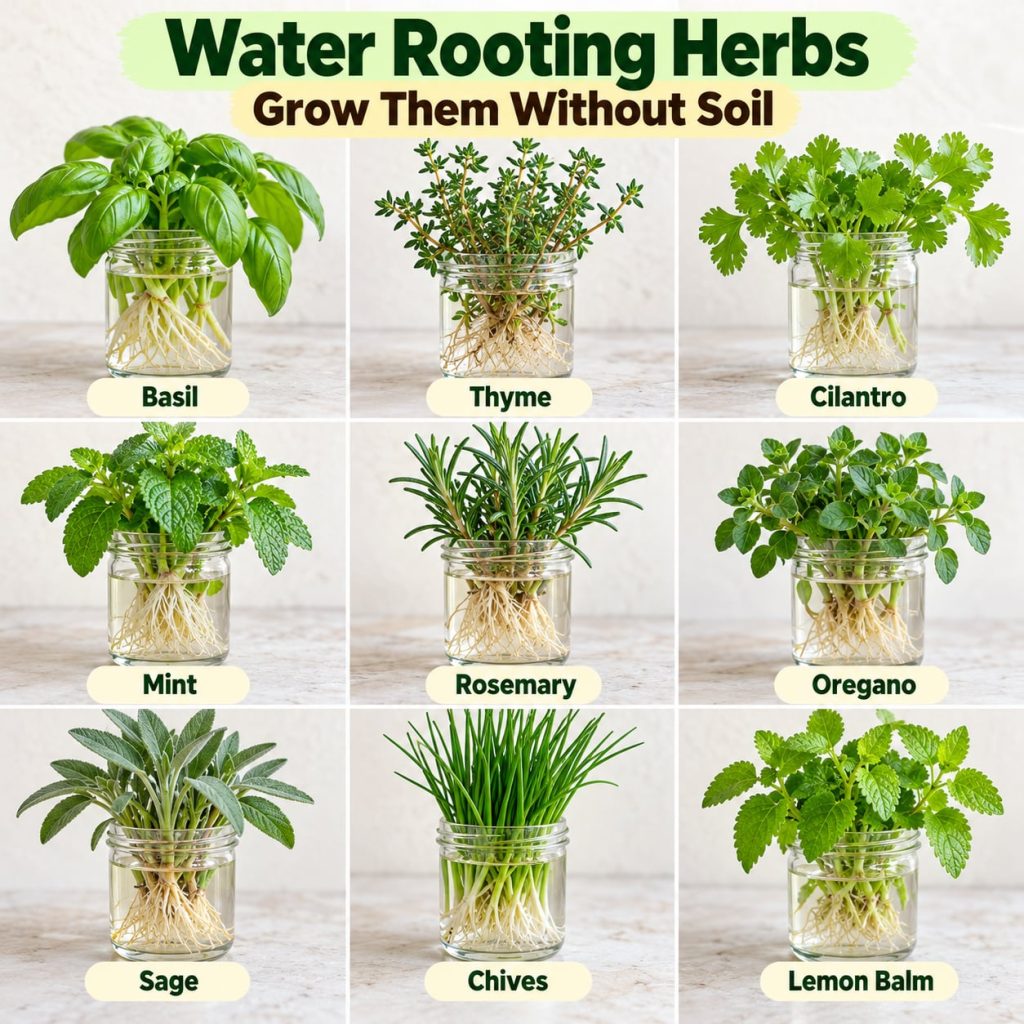 Start your soil-free herb garden by water rooting these nine common culinary herbs.
The Magic of Water Rooting: Your Soil-Free Gateway to Fresh Herbs
Water rooting, also known as water propagation, is a remarkably straightforward method where plant cuttings are placed in water to develop roots. Many herbs readily respond to this technique, making it an excellent choice for beginners and those with limited space. The primary benefit is its simplicity: no soil, no mess, and you can visually observe the roots developing, which is incredibly satisfying! Once rooted, these cuttings can either continue to grow in water with proper care or be transitioned to a potting medium for more sustained growth.
Essential Principles for Successful Water Rooting
- Healthy Cuttings: Always start with vigorous, disease-free cuttings from a mature plant.
- Clean Water: Use fresh, non-chlorinated water (tap water left out overnight often works, or filtered water).
- Clean Containers: Sterilize your jars or vases to prevent fungal or bacterial growth.
- Adequate Light: Provide bright, indirect light. Direct scorching sun can overheat the water and stress the cuttings.
- Consistent Care: Change the water every few days to a week to replenish oxygen and prevent stagnation.
Your Nine Water-Rooting Herb Companions
Let’s explore the specific details for successfully water rooting these popular herbs.
Basil (Ocimum basilicum)
Basil is one of the easiest and most rewarding herbs to root in water. It loves warmth and bright light. Take cuttings that are about 4-6 inches long, just below a leaf node, removing any leaves that would fall below the waterline. You’ll often see roots emerge within 7-14 days. Once the roots are 1-2 inches long, you can transplant them into soil or continue growing them in water, ensuring regular water changes and occasional liquid fertilizer.
Practical Tip: For bushier growth, pinch off the central stem once the plant has a few sets of true leaves, even when growing in water.
Thyme (Thymus vulgaris)
Thyme cuttings root well, though they might take a little longer than basil. Choose soft, pliable stems that are 4-6 inches long, rather than woody ones. Remove leaves from the bottom inch or two. Thyme cuttings appreciate a slightly warmer environment. Roots typically form within 2-4 weeks. Once established with a good root ball, thyme can be transplanted to a well-draining soil mix or kept in water.
Practical Tip: If your thyme cuttings are struggling, try dipping the cut end in rooting hormone before placing it in water to encourage faster root development.
Cilantro (Coriandrum sativum)
Cilantro can be rooted in water, particularly from fresh grocery store bunches. Select stems with plenty of healthy leaves. Trim the bottom of the stems and remove any leaves that would be submerged. Cilantro prefers cooler temperatures and bright, indirect light. Roots can appear within 1-2 weeks. While you can root cilantro this way, it tends to bolt (go to seed) quickly and may not produce a long-lasting plant. It’s often best used for extending the life of your cut cilantro for a week or two before consuming it, rather than for long-term propagation.
Practical Tip: Place rooted cilantro in a cool spot to extend its fresh life before using it in your cooking.
Mint (Mentha spp.)
Mint is incredibly easy to root in water and is an ideal plant for beginners. Take cuttings 4-6 inches long, snipping just below a node. Remove the lower leaves. Mint roots vigorously, often within a week. Its rapid rooting makes it very satisfying to grow this way. Be aware that if you eventually transplant mint to a garden, it can spread aggressively, so consider keeping it in pots.
Practical Tip: Try rooting different varieties of mint, like peppermint or spearmint, to enjoy a range of flavors.
Rosemary (Salvia rosmarinus)
Rosemary can be rooted in water, but it’s one of the slower herbs on this list. For best results, take 4-6 inch semi-hardwood cuttings (stems that are firm but still somewhat flexible) from the tips of new growth. Strip the leaves from the bottom 2 inches. Patience is key, as it can take 3-6 weeks, or even longer, for roots to form. A touch of rooting hormone can also be beneficial here.
Practical Tip: Keep the water consistently clean and warm, and ensure good indirect light to encourage rosemary roots.
Oregano (Origanum vulgare)
Like mint, oregano is a fantastic candidate for water rooting. Take 4-6 inch cuttings, removing lower leaves. You’ll likely see roots forming within 1-3 weeks. Oregano is a relatively low-maintenance herb that thrives in bright light and can easily be transferred to soil once a robust root system develops. It offers a steady supply of flavorful leaves for culinary use.
Practical Tip: Regular harvesting of the top leaves will encourage bushier growth, whether in water or soil.
Sage (Salvia officinalis)
Sage cuttings, similar to rosemary, do best when taken from newer, non-woody growth. Aim for 4-6 inch cuttings and remove the bottom leaves. Sage generally roots within 3-4 weeks. Provide good indirect light and ensure the water is changed frequently to prevent issues. Once rooted, sage is an attractive and aromatic addition to any garden or container.
Practical Tip: Choose variegated or purple sage varieties for an added ornamental touch while rooting.
Chives (Allium schoenoprasum)
While chive stalks can root in water, creating a new, thriving chive plant from a single stalk is generally not effective. Chives are typically grown from seed or, more commonly, by dividing established clumps. The roots you see developing on cut chive stalks in water are mainly for temporary rehydration and to extend their freshness for a short period before consumption. For true propagation, look for small chive bulbs or division of a mature plant.
Practical Tip: If you’re using water rooting for chives, consider it a method to keep store-bought chives fresh and vibrant for a bit longer, allowing you to harvest as needed.
Lemon Balm (Melissa officinalis)
Lemon Balm is another enthusiastic water rooter, similar to mint. Cuttings of 4-6 inches, with lower leaves removed, will typically root within 1-2 weeks. It grows quickly and produces beautiful, fragrant leaves perfect for teas, garnishes, or infusing drinks. Its ease of rooting makes it a rewarding choice for beginners.
Practical Tip: Harvest lemon balm regularly to prevent it from flowering prematurely, which can reduce leaf flavor.
Step-by-Step Guide: How to Water Root Your Herbs
Ready to start your water garden? Here’s how:
- Select Healthy Cuttings: Choose fresh, non-flowering stems from a healthy plant. Aim for stems about 4-6 inches long. Avoid any stems with signs of disease or pests.
- Prepare the Cuttings: Using sharp, clean pruning shears or scissors, make a clean cut just below a leaf node (the bump on the stem where a leaf or branch emerges). Carefully strip off all leaves from the bottom 1-2 inches of the stem. These submerged leaves would rot and contaminate the water.
- Choose Your Container: Clear glass jars or vases are ideal as they allow you to monitor root development and water clarity. Ensure the opening is wide enough to easily place and remove cuttings.
- Add Water: Fill your container with non-chlorinated water. Leave a small air gap at the top.
- Place Cuttings: Place 1-3 cuttings in each jar, ensuring the stripped portion of the stem is submerged. Don’t overcrowd the jar, as this can impede airflow and encourage rot.
- Find the Right Spot: Position your jars in a location that receives bright, indirect sunlight. A north- or east-facing window is often perfect. Avoid direct, intense sunlight which can cook the cuttings or encourage algae growth. Maintain a consistent room temperature, ideally between 65-75°F (18-24°C).
- Change the Water Regularly: This is crucial! Change the water every 2-3 days, or at least once a week. This replenishes oxygen, removes any accumulating plant hormones or potential pathogens, and prevents the water from becoming stagnant.
- Observe and Wait: Roots can appear anywhere from a few days to several weeks, depending on the herb. Be patient!
Transitioning to Soil: The Next Big Step
Once your herb cuttings have developed a robust root system (typically 1-3 inches long, depending on the herb), they are ready for their next adventure: transplanting into soil. This transition is important for long-term growth as soil provides essential nutrients that water alone cannot sustain indefinitely.
- Prepare Your Pots: Choose small pots (4-6 inches in diameter) with good drainage holes. Fill them with a high-quality, well-draining potting mix.
- Handle with Care: Gently remove the rooted cutting from the water. Avoid damaging the delicate new roots.
- Planting: Create a small hole in the center of the potting mix. Carefully place the rooted cutting into the hole, ensuring the roots are spread out. The base of the stem (where the roots begin) should be just at the soil line.
- Water Thoroughly: Water immediately after planting until water drains from the bottom of the pot. This helps settle the soil around the new roots.
- Acclimate Gradually: New transplants are delicate. Keep them in a warm, sheltered spot with bright, indirect light for the first week or two. If planning to move them outdoors, gradually expose them to increasing periods of outdoor conditions (hardening off) over 7-10 days to prevent transplant shock.
Common Mistakes and How to Avoid Them
Even with a simple method like water rooting, a few pitfalls can hinder success. Knowing these can help you avoid them:
- Leaving Leaves Below the Waterline: Submerged leaves will rot, fouling the water and potentially harming your cutting. Always remove them.
- Neglecting Water Changes: Stagnant water deprives roots of oxygen and can foster bacterial growth. Frequent water changes are vital.
- Insufficient Light: While direct sun can be too harsh, cuttings still need bright, indirect light for photosynthesis to produce the energy required for rooting.
- Overcrowding Jars: Too many cuttings in one jar limit air circulation and increase the risk of rot. Give them space.
- Transplanting Too Soon or Too Late: Transplanting before roots are sufficiently developed can lead to shock. Waiting too long, allowing roots to become very long and entangled, can also make the transition difficult. Aim for roots 1-3 inches long.
- Not Hardening Off: If moving a plant from a gentle indoor environment to the outdoors, neglecting to gradually introduce it to sun, wind, and fluctuating temperatures will cause severe stress or even death.
Regional & Seasonal Considerations for Your Water-Rooted Herbs
While water rooting can be done indoors year-round, understanding climate and seasonal factors helps integrate your new plants into your garden or home successfully.
- Indoor Growing (Year-Round): For most of the U.S., growing these herbs indoors is a year-round possibility. Focus on window direction (south-facing in winter, east/west in summer for good indirect light), consistent room temperature, and adequate humidity, especially during dry winter months. Supplemental grow lights can be a game-changer if natural light is insufficient.
- Outdoor Transition (Spring/Summer): If you plan to move your water-rooted herbs outdoors, timing is crucial. Wait until all danger of frost has passed in your USDA hardiness zone and soil temperatures have warmed sufficiently. This typically means late spring for most regions (e.g., May or June for Zones 5-7, earlier for Zones 8-11). Remember to harden off your plants before their permanent move outside.
- USDA Hardiness Zones: Most of these herbs (like Basil, Cilantro, Lemon Balm) are tender annuals or perennials that are only truly perennial in very warm climates (USDA Zones 9-11+). In colder zones (3-8), they are grown as annuals outdoors or brought indoors before the first frost to overwinter. Rosemary, Thyme, and Sage can be perennial in a wider range of zones (often 5-9, depending on cultivar and microclimate), but young, recently rooted cuttings are more vulnerable to cold.
Cultivate Your Green Thumb
Water rooting herbs is an accessible and deeply satisfying way to connect with the plant world, providing fresh, flavorful ingredients right at your fingertips. From the initial thrill of seeing roots emerge to the pride of harvesting your own homegrown leaves, this method offers continuous rewards. Don’t hesitate to experiment with different herbs and explore what works best in your home. With a little care and observation, you’ll soon have a thriving collection of herbs, enhancing your cooking and bringing a touch of green vitality to your living space. Which herb will you root first? Happy growing!