Are you tired of scrubbing endlessly at your shower head, only to see stubborn mineral buildup stubbornly cling on? Or perhaps your shower’s water pressure isn’t what it used to be? Limescale and mineral deposits are common culprits, and they can make your shower experience less enjoyable and even reduce the lifespan of your fixtures.
The good news is, you don’t need harsh chemicals or endless elbow grease to get your shower head sparkling and flowing freely again. This simple DIY bag trick uses common household ingredients to dissolve that stubborn buildup with minimal effort. It’s an effective, affordable, and surprisingly easy way to restore your shower head to its former glory!
What You’ll Need
- White Vinegar: Approximately 1-2 cups, or enough to submerge your shower head.
- Water: Approximately 1-2 cups (optional, for dilution).
- Strong Plastic Bag: A gallon-sized freezer bag or similar sturdy, clear plastic bag.
- Rubber Band, Zip Tie, or String: To secure the bag.
- Old Toothbrush or Small Scrub Brush: For light scrubbing.
- Measuring Cup: To measure liquids.
Why This DIY Can Be Useful
This method works wonders primarily because of the acetic acid in white vinegar. Acetic acid is a mild acid that effectively breaks down and dissolves the alkaline mineral deposits, such as limescale and calcium, that accumulate on shower heads over time. By submerging the shower head in a vinegar solution, you allow the acid ample time to work its magic, softening and dissolving the buildup without the need for harsh scrubbing.
It’s also a fantastic alternative to expensive commercial cleaners, many of which contain harsh chemicals that can be irritating or require careful handling. Vinegar is a natural, non-toxic, and readily available solution for many household cleaning tasks.
How to Make It
Preparing your cleaning solution is incredibly straightforward:
- Measure Your Solution: Pour 1 to 2 cups of white vinegar into your plastic bag. If your shower head isn’t heavily soiled, you can dilute the vinegar with an equal amount of water (1 cup vinegar to 1 cup water). For very stubborn buildup, use undiluted vinegar.
- Prepare the Bag: Ensure the plastic bag is free of holes and can comfortably hold the liquid without leaking.
How to Use It
This soaking method makes cleaning your shower head almost hands-off:
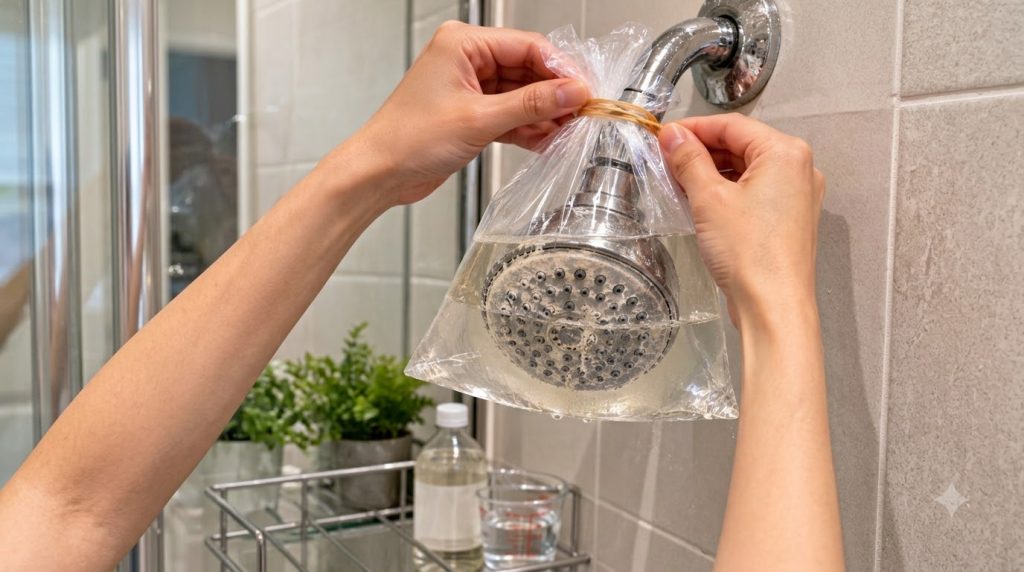
- Position the Bag: Carefully place the plastic bag over your shower head, ensuring that the entire head, especially the spray nozzles, is fully submerged in the vinegar solution.
- Secure the Bag: Gather the opening of the bag around the neck of the shower head. Use a strong rubber band, a zip tie, or a piece of string to secure the bag tightly, preventing the liquid from leaking out and holding the bag in place. Make sure it’s snug enough that the shower head remains completely immersed.
- Let it Soak: Allow the shower head to soak in the solution for at least 2-4 hours. For heavy mineral buildup, it’s best to leave it overnight (6-8 hours). The longer it soaks, the more time the vinegar has to break down the deposits.
- Remove and Scrub: Carefully remove the rubber band and the plastic bag. You might see some dislodged mineral flakes in the bag or around the shower head. Use an old toothbrush or small scrub brush to gently scrub away any remaining softened deposits from the nozzles and surface of the shower head.
- Rinse Thoroughly: Turn on the shower and let hot water run through it for several minutes. This will flush out any remaining vinegar solution and loosened debris from inside the nozzles, restoring proper water flow.
What to Expect
After following this DIY method, you can expect a noticeably cleaner shower head with significantly reduced mineral buildup. The spray pattern should be more even, and you’ll likely experience improved water pressure. While it won’t make an old, heavily corroded shower head look brand new, it will effectively remove the unsightly deposits and improve its functionality. Regular maintenance with this trick can keep your shower head in excellent condition.
Helpful Tips
- Regular Maintenance: To prevent heavy buildup, repeat this cleaning process once a month or every few months, depending on your water hardness.
- Use a Sturdy Bag: Don’t skimp on the plastic bag; a thin bag could tear and cause a messy leak. A freezer bag is usually a good choice.
- Check for Leaks: After securing the bag, double-check for any drips to ensure a good seal.
- Consider Descaling Other Fixtures: This same vinegar-soaking method can often be used for faucet aerators or other small fixtures with mineral buildup.
Important Notes / Safety
- Ventilation: While vinegar is natural, it has a strong odor. Ensure good ventilation in your bathroom by opening a window or turning on the exhaust fan.
- Test Surfaces: While generally safe for most chrome, stainless steel, and plastic shower heads, be cautious with certain finishes like brass, bronze, or natural stone. Vinegar is acidic and can etch or discolor some delicate materials. If unsure, test a small, inconspicuous area first or opt for a citric acid solution which is milder.
- Avoid Eye Contact: Always avoid getting vinegar in your eyes. If it happens, rinse thoroughly with water.
- Rinse Well: Always rinse the shower head thoroughly with water after cleaning to remove any residual vinegar.
- Don’t Mix Chemicals: Never mix vinegar with bleach or other strong chemical cleaners, as this can create dangerous fumes.