Most gardeners strive for the biggest, juiciest watermelons, yet many overlook a powerful technique that can transform their harvest: grafting. Instead of simply planting watermelon seeds, imagine a method that gives your plants superior strength, disease resistance, and a longer growing season. The secret? Pairing your favorite watermelon variety with the robust root system of a pumpkin.
This isn’t just a garden hack; it’s a strategic move embraced by commercial growers and savvy home gardeners alike. Grafting watermelons onto pumpkin rootstock provides an incredible boost, offering a resilience that an ordinary watermelon plant simply can’t match. If you’ve struggled with weak vines, soil-borne diseases, or just want to push the boundaries of your watermelon yield, this guide is for you.
What is Watermelon Grafting onto Pumpkin Rootstock?
Watermelon grafting is an horticultural technique where the top part of a watermelon plant (the ‘scion’) is joined with the root system of another plant (the ‘rootstock’), in this case, a pumpkin or a specific type of gourd. The goal is to combine the desirable fruiting characteristics of the watermelon with the robust and disease-resistant root system of the pumpkin.
Pumpkin rootstocks are known for their vigor, tolerance to various soil conditions, and resistance to common watermelon diseases like Fusarium wilt and nematodes. This fusion creates a ‘super plant’ that can absorb nutrients and water more efficiently, leading to healthier vines, higher yields, and often, larger, sweeter fruits. It’s an age-old practice that offers a modern solution to common gardening challenges.
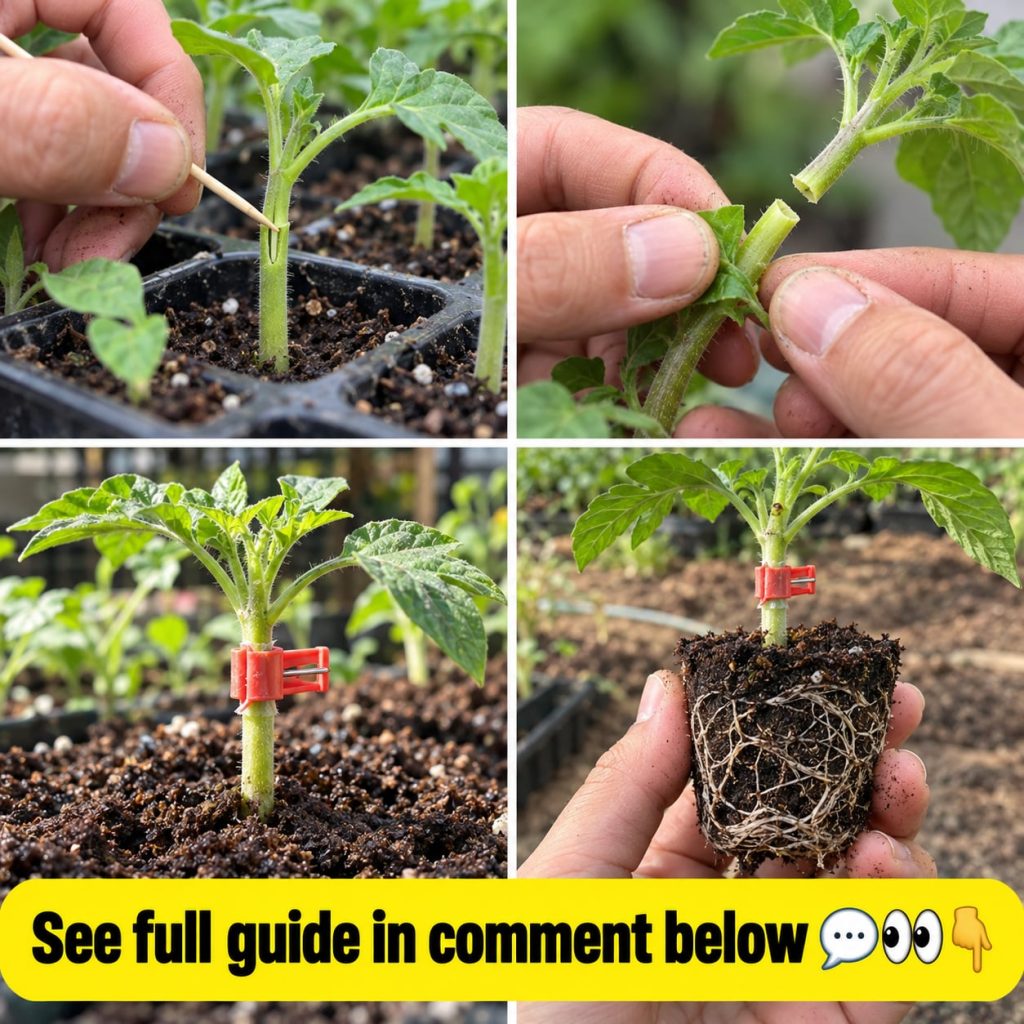
Materials You’ll Need
- Watermelon Seeds: Choose your favorite sweet, high-yielding variety.
- Pumpkin Rootstock Seeds: Specific ‘inter-specific hybrid’ pumpkin or gourd varieties (e.g., ‘Shintosa’, ‘Strongtosa’) are ideal. These are bred specifically for grafting.
- Sharp Razor Blade or Grafting Knife: Essential for clean cuts.
- Grafting Clips: Small clips (silicone or plastic) designed to hold the scion and rootstock together during healing.
- Seed Starting Trays and Mix: For germinating seeds.
- Clear Plastic Dome or Humidity Chamber: Crucial for maintaining high humidity post-grafting.
- Sterile Gloves: To minimize contamination.
- Rubbing Alcohol: For sterilizing tools.
Quick Tip: Choosing the Right Rootstock
Don’t just use any pumpkin seed. Specialized rootstock varieties are crucial. They offer specific disease resistance and compatibility with watermelons. Generic pumpkin seeds might work, but won’t provide the same benefits or success rate.
Step-by-Step Grafting Method: The Splice Graft
The splice graft is one of the easiest for beginners. Here’s how to do it:
- Seed Sowing: Plant your watermelon scion seeds 2-3 days after your pumpkin rootstock seeds. This ensures both plants reach a similar stem diameter and growth stage for grafting.
- Timing is Key: Graft when both the watermelon and pumpkin seedlings have developed their first true leaves, but before the second true leaves emerge. The stems should be tender and flexible, roughly 2-3mm in diameter.
- Prepare Your Tools: Sterilize your razor blade or grafting knife with rubbing alcohol. Put on sterile gloves.
- Cut the Rootstock: Carefully cut the pumpkin rootstock seedling straight across, just below the cotyledons (seed leaves) and above the first true leaves. Discard the top part.
- Cut the Scion: Take your watermelon seedling. Make a straight cut just below the cotyledons, removing the root system entirely. This top part is your scion.
- Join Them: Immediately place the cut surface of the watermelon scion onto the cut surface of the pumpkin rootstock. Ensure the cuts align perfectly.
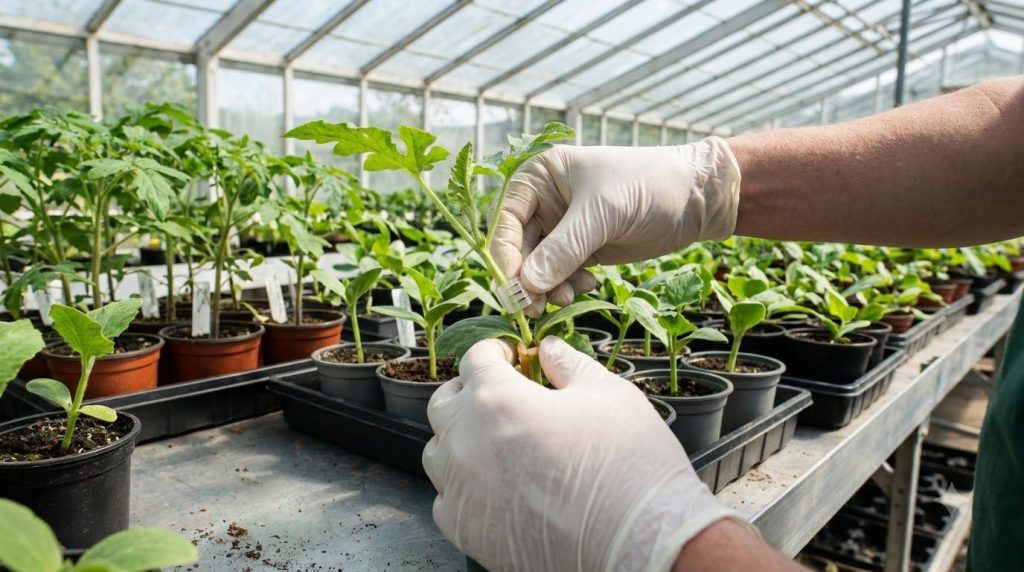
- Secure the Graft: Gently but firmly secure the joined plants with a grafting clip. The clip should hold the union together without crushing the delicate stems.
- Create a Healing Chamber: Place the newly grafted seedlings into a high-humidity environment (a clear plastic dome or dedicated chamber). Maintain 90-100% humidity and temperatures around 75-85°F (24-30°C). Keep them out of direct sunlight for the first 3-5 days.
- Gradual Acclimation: After 3-5 days, slowly reduce humidity and increase light exposure over a week. This process, called ‘hardening off,’ allows the plants to adjust to normal conditions.
- Planting Out: Once the graft union has healed (typically 7-10 days), and the plants are acclimated, they are ready to be transplanted into your garden or larger pots.
How to Care for Grafted Watermelons
Once your grafted watermelons are established, treat them like any other watermelon plant, but be aware of a few key differences:
- Planting Depth: Ensure the graft union remains above the soil line when transplanting. If the watermelon scion develops its own roots, it defeats the purpose of the rootstock.
- Watering: Grafted plants may have a more vigorous root system, potentially requiring less frequent but deep watering. Monitor soil moisture closely.
- Fertilization: While pumpkin rootstock is efficient at nutrient uptake, a balanced feeding program will still benefit fruit development.
- Pruning: Regular pruning to manage vine growth and promote air circulation can still be beneficial.
How Often to Graft?
Grafting is a one-time process for each plant. You’ll graft your seedlings once, and then those grafted plants will grow to produce fruit. If you want more grafted watermelons in subsequent seasons, you will need to repeat the grafting process with new seedlings each time.
Choosing and Buying Materials
The success of your grafting often starts with the right seeds. Look for specialized ‘inter-specific hybrid’ rootstock seeds from reputable seed suppliers. These are specifically bred for compatibility with cucurbits like watermelons and provide superior disease resistance. For your watermelon scion, choose varieties known for flavor and yield in your climate.
Grafting clips are also important; silicone clips offer gentle yet firm pressure and are reusable. Invest in a good quality razor blade or grafting knife for clean, precise cuts.
Storage Tips for Grafted Seedlings
Once grafted and healed, treat your young grafted watermelon plants like any other seedling prior to transplanting. Keep them in a protected environment, gradually hardening them off to outdoor conditions over a week or two. Do not store grafted plants for extended periods; they are best transplanted into their final growing location as soon as they are ready.
Did You Know? Increased Yields!
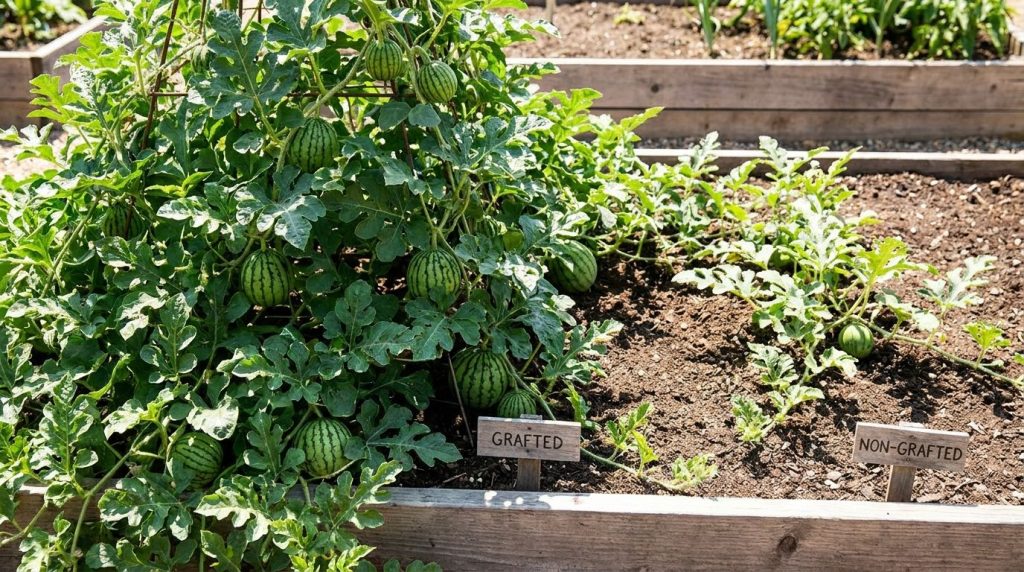
Studies have shown that grafted watermelon plants can often produce significantly higher yields than non-grafted plants, sometimes by as much as 20-50%, due to enhanced vigor and disease resistance.
Practical Tips for Success
- Practice Makes Perfect: Grafting requires precision. It’s okay if your first few attempts aren’t perfect. Practice on extra seedlings.
- Sanitation is Key: Always sterilize your tools before and between each graft to prevent disease transmission.
- Humidity is Crucial: The high humidity in the healing chamber is non-negotiable for the first few days. It prevents dehydration of the scion before the vascular systems connect.
- Even Growth: Sow seeds so scion and rootstock stems are roughly the same diameter at grafting time. This ensures a better union.
Common Mistakes to Avoid
One small preparation mistake can ruin the whole batch. Here are common pitfalls:
- Poor Tool Sterilization: Leading to infection at the graft site.
- Uneven Cuts: If the cut surfaces don’t match perfectly, the vascular tissues won’t connect, and the graft will fail.
- Low Humidity: The scion will dry out and die before it can heal.
- Direct Sunlight Post-Graft: Intense light can overheat and stress the delicate union.
- Graft Union Buried: If the watermelon scion roots into the soil, it negates the benefits of the pumpkin rootstock.
- Using the Wrong Rootstock: Not all pumpkins are suitable; specific hybrid varieties are essential.
Cautions and Who Should Avoid It
While grafting is beneficial, it does add a layer of complexity to growing. If you are a complete beginner to gardening, it might be advisable to start with standard watermelon cultivation to get a feel for the plant’s needs before attempting grafting. Also, individuals with fine motor skill challenges might find the precise cuts difficult. There are no direct health cautions associated with eating grafted watermelons; they are safe and often improved in quality.
Quick Summary
Grafting watermelons onto pumpkin rootstock is a smart technique for increasing yield, disease resistance, and plant vigor. Use specialized rootstock seeds and a clean splice graft method. Maintain high humidity during the healing process and ensure the graft union stays above soil when planting. Avoid common mistakes like uneven cuts or burying the graft. It’s an investment in time that pays off with stronger, more productive plants.
FAQ
- Can I use any pumpkin for rootstock?
No, it’s best to use specific inter-specific hybrid gourd or pumpkin rootstock seeds bred for grafting, such as ‘Shintosa’ or ‘Strongtosa’. - How long does the grafting union take to heal?
Typically, the graft union takes 7-10 days to heal completely in ideal high-humidity conditions. - What if my scion wilts after grafting?
Wilting usually indicates insufficient humidity or a failed graft. Ensure your healing chamber maintains very high humidity. - Do grafted watermelons taste different?
The rootstock generally does not affect the fruit’s flavor, as the watermelon scion provides the genetic material for the fruit. - Can I reuse grafting clips?
Yes, silicone grafting clips are reusable after proper sterilization. - When is the best time to graft?
Graft when seedlings have their first true leaves, ideally before the second set emerges, ensuring stems are flexible.
Conclusion
Transforming your watermelon patch from ordinary to extraordinary is within reach with the power of grafting. By leveraging the inherent strength of pumpkin rootstock, you can cultivate watermelons that not only withstand common garden challenges but thrive, delivering an abundance of delicious fruit. This technique, though requiring a bit of initial effort, rewards gardeners with healthier plants and a harvest to be truly proud of. Give it a try, and prepare to be amazed by your unstoppable watermelons!
You may also like: The Full Guide to Organic Pest Control in Your Garden
Read more: Boosting Soil Health for Vibrant Plants
