Unlock the secret to youthful, glowing skin right in your own kitchen! Forget expensive serums and complicated routines; it’s surprisingly simple to whip up your very own potent anti-aging cream using everyday ingredients. This homemade ‘collagen cream’ recipe is designed to rejuvenate your skin, promote a radiant complexion, and help diminish the signs of aging, all while keeping your skincare routine affordable and incredibly effective. Get ready to embrace a more youthful glow with this easy-to-make life hack!
Why DIY Skincare is a Game-Changer
In a world overflowing with commercial beauty products, choosing to go the DIY route offers numerous benefits. Not only does it allow you to control exactly what goes onto your skin, avoiding harsh chemicals and artificial fragrances, but it also empowers you to customize solutions tailored to your unique needs. Plus, homemade skincare is often far more budget-friendly, proving that you don’t need to break the bank for beautiful skin.
The Power of Homemade ‘Collagen’ Support
While true collagen can’t be created in a jar from these ingredients, this DIY cream harnesses the power of natural components known for their ability to moisturize, protect, and support healthy, youthful-looking skin. By providing deep hydration and antioxidant benefits, these ingredients work synergistically to improve skin elasticity and reduce the appearance of fine lines and wrinkles, mimicking the visible benefits often associated with collagen-rich skin.
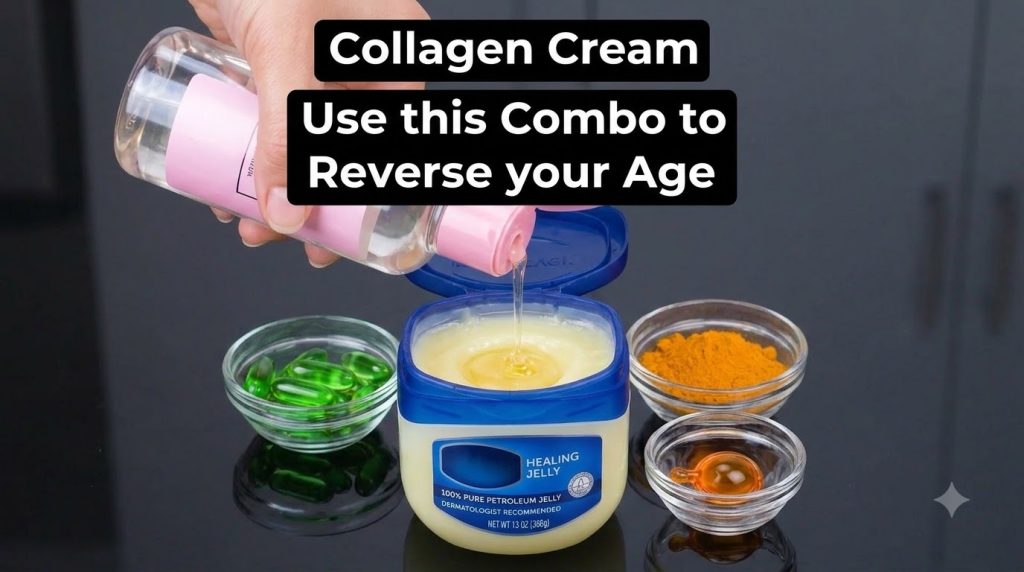
Key Ingredients for Your Youthful Glow
Each component in this DIY anti-aging cream plays a vital role:
- Petroleum Jelly (e.g., Vaseline): This provides an occlusive barrier, locking in moisture and protecting the skin from environmental stressors. Its deeply moisturizing properties can help smooth the appearance of fine lines by plumping the skin.
- Carrier Oil (e.g., Almond Oil, Olive Oil, Coconut Oil): Rich in vitamins and fatty acids, these oils nourish the skin, improve elasticity, and act as a wonderful emollient. Choose one that suits your skin type.
- Turmeric Powder: A powerful antioxidant and anti-inflammatory, turmeric is known for brightening the skin, reducing hyperpigmentation, and giving a healthy glow.
- Softgel Capsules (e.g., Vitamin E or ingestible Collagen): Vitamin E is a potent antioxidant that aids in skin repair and protection against free radical damage. If using ingestible collagen capsules, the hydrolyzed collagen can offer additional skin-supporting benefits when applied topically, although its efficacy in penetrating the skin barrier in this form is still debated.
Step-by-Step Guide to Crafting Your Cream
Materials You’ll Need:
- A small, clean, airtight jar or container
- 1-2 tablespoons of petroleum jelly
- 1 teaspoon of your chosen carrier oil
- A pinch of turmeric powder (about 1/4 teaspoon)
- Contents of 1-2 softgel capsules (Vitamin E or ingestible collagen)
- A clean stirring stick or small spoon
Instructions:
- Prepare Your Base: Scoop the petroleum jelly into your clean, airtight container.
- Add the Oils: Pour in your chosen carrier oil. If using softgel capsules, carefully pierce them with a clean needle or pin and squeeze the liquid contents into the petroleum jelly mixture.
- Introduce Turmeric: Add a small pinch of turmeric powder. Remember, a little goes a long way, as too much can temporarily tint your skin.
- Mix Thoroughly: Using your clean stirring stick or spoon, mix all the ingredients together until they are well combined and form a smooth, uniform cream. Ensure there are no lumps and the turmeric is evenly distributed.
- Store Properly: Close the lid tightly and store your homemade collagen cream in a cool, dry place. It’s best to use it within 2-3 weeks for optimal freshness.
How to Use Your Homemade Anti-Aging Cream
For best results, incorporate this cream into your nightly skincare routine. After cleansing and toning your face, take a small amount of the cream and gently massage it onto your face and neck using upward strokes. Focus on areas prone to fine lines and wrinkles, such as around the eyes and mouth. Allow it to absorb fully before heading to bed. Consistent use will yield the most noticeable benefits.
Important Considerations and Patch Test
While natural, it’s always wise to perform a patch test before applying any new product to your entire face. Apply a tiny amount of the cream to a small, inconspicuous area of your skin (like behind your ear or on your inner arm) and wait 24 hours to check for any adverse reactions, such as redness, itching, or irritation. If you experience any discomfort, discontinue use. Also, be mindful that turmeric can stain fabrics, so allow the cream to absorb fully before resting your head on pillows.
Beyond the Cream: Holistic Anti-Aging Tips
Remember that a truly youthful glow comes from within and without! Complement your DIY skincare efforts with these holistic anti-aging practices:
- Stay Hydrated: Drink plenty of water throughout the day to keep your skin plump and healthy.
- Eat a Balanced Diet: Incorporate antioxidant-rich fruits, vegetables, and healthy fats into your meals.
- Protect from the Sun: Always use broad-spectrum sunscreen, even on cloudy days, to prevent premature aging.
- Get Enough Sleep: Allow your skin time to repair and regenerate overnight.
- Manage Stress: High stress levels can impact skin health; find ways to relax and de-stress.
Embrace Your Radiant, Youthful Self!
Creating your own anti-aging cream is a rewarding experience that puts the power of natural beauty into your hands. This simple yet effective formula can become a staple in your routine, helping you achieve that radiant, youthful glow you’ve always desired. Give it a try and discover the magic of homemade skincare!
What’s your favorite DIY beauty tip? Share your secrets with the Life Hack Daily community below!