Craft Your Own Powerhouse Cleaning Paste: The Ultimate DIY Soft Scrub
Ever wondered how incredibly satisfying it is to make your own household essentials? Imagine tackling grime and grease with a cleaner you crafted yourself, knowing exactly what went into it. With just a few simple, everyday ingredients you likely already have in your pantry, you can create a highly effective and personalized home care product right in your own kitchen! Say goodbye to expensive, chemical-laden store-bought cleaners and hello to your new favorite DIY solution.
This homemade cleaning paste, a versatile soft scrub, is perfect for a multitude of surfaces and tough spots around your home. It’s a game-changer for anyone looking to embrace a more natural, budget-friendly approach to cleaning.
Why Make Your Own Cleaning Paste?
Ditching commercial cleaners for a DIY alternative offers a wealth of benefits that extend beyond just a sparkling home:
- Cost-Effective: You’re using inexpensive staples, saving you money in the long run.
- Fewer Harsh Chemicals: Control the ingredients, avoiding harsh chemicals, strong fumes, and unknown additives found in many commercial products.
- Customizable: While this recipe is fantastic as is, once you master it, you can experiment with natural essential oils for a custom scent.
- Effective Cleaning: Don’t let the simplicity fool you; this paste is incredibly powerful at cutting through grease, soap scum, and everyday dirt.
- Eco-Friendly: Reduce plastic waste by reusing your own containers for storage.
Your Secret Weapon: The Homemade Cleaning Paste Recipe
Ready to get started? This recipe transforms humble ingredients into a formidable cleaning force.
What You’ll Need (Ingredients)
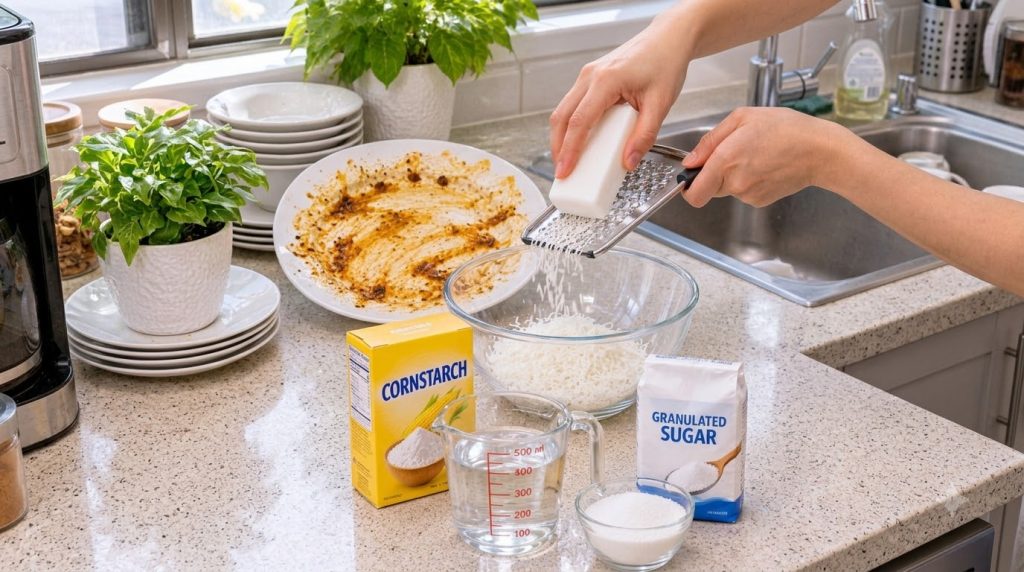
- 1 bar (approx. 4-5 oz or 113-140g) White Bar Soap: Choose a plain, unscented bar for general cleaning. This is your primary cleaning agent, providing surfactant power to lift dirt and grime.
- 2 cups Hot Water: Essential for dissolving the soap and helping to create a smooth paste.
- ½ cup Cornstarch: Acts as a mild abrasive, thickener, and helps to absorb grease and dirt, leaving surfaces polished.
- 2 tablespoons Granulated Sugar: A subtle abrasive that aids in scrubbing away stubborn stains without scratching, and helps the ingredients bind.
Tools & Supplies
- Cheese grater or food processor (for grating soap)
- Large heat-safe mixing bowl
- Whisk or spoon
- Saucepan (optional, for dissolving soap over heat)
- Airtight container (glass jar, old cleaning balm container) for storage
Step-by-Step Instructions
- Grate Your Soap: Using a cheese grater (the finer side works best) or a food processor, grate the entire bar of white soap into fine shavings. The smaller the pieces, the faster it will dissolve.
- Dissolve the Soap: Place the grated soap into your large heat-safe mixing bowl. Pour the 2 cups of hot water over the soap shavings. Stir well until the soap completely dissolves and you have a cloudy, soapy liquid. If your water isn’t hot enough, you can gently heat the mixture in a saucepan over low heat, stirring constantly, until the soap is fully melted.
- Add Cornstarch and Sugar: Once the soap is dissolved, gradually add the ½ cup of cornstarch and 2 tablespoons of granulated sugar to the soapy water. Stir continuously with a whisk or spoon.
- Mix to a Paste: Keep mixing until all the ingredients are thoroughly combined and you achieve a thick, uniform paste consistency. It should be firm enough to scoop but spreadable. If it’s too thin, you can add a tiny bit more cornstarch; if too thick, a tablespoon of hot water at a time.
- Cool and Store: Allow the paste to cool completely before transferring it to an airtight container. A glass jar with a lid or an old, clean plastic container works perfectly.
How to Use Your DIY Cleaning Paste
This versatile paste can be used on a wide range of surfaces. Always test in an inconspicuous area first, especially on delicate materials.
- Kitchen Surfaces: Perfect for scrubbing sinks (stainless steel or ceramic), countertops (non-porous), stovetops (cool), and even tackling baked-on grease on oven doors. Apply with a damp sponge or cloth, scrub gently, and rinse thoroughly.
- Bathroom Brilliance: Eradicate soap scum, hard water stains, and grime from bathtubs, showers, tiles, and sinks. It’s also excellent for cleaning grout lines – apply, let sit for a few minutes, scrub with an old toothbrush, and rinse.
- General Cleaning: Use it on scuff marks on floors, plastic outdoor furniture, or even to shine chrome fixtures.
Application Tip: For tough stains, apply the paste directly, let it sit for 5-10 minutes to allow the ingredients to work their magic, then scrub and rinse.
Tips for Success & Storage
- Consistency is Key: The ideal paste should be thick enough to cling to surfaces but still spreadable. If it hardens too much over time, you can add a small amount of hot water and stir to rehydrate it.
- Airtight Storage: Always store your cleaning paste in an airtight container to prevent it from drying out and to maintain its potency.
- Shelf Life: Because this paste contains water and natural ingredients, it’s best used within 2-4 weeks. Keep an eye (and nose) out for any changes in texture or odor.
- Patch Test: Before applying to a large or delicate surface, always perform a small patch test in an inconspicuous area to ensure no discoloration or damage occurs.
The Science Behind the Scrub (Why it Works)
This simple formula works wonders thanks to the synergistic action of its components:
- Soap: The foundation of our cleaner, soap molecules have a dual nature – one end attracts water, the other attracts oil. This allows them to lift grease and dirt from surfaces, encapsulating them so they can be rinsed away.
- Cornstarch: This acts as a gentle yet effective abrasive. Its fine particles provide friction to scrub away dried-on grime and stains without being harsh enough to scratch most surfaces. It also helps to absorb oils and thicken the paste, making it easy to apply.
- Sugar: While primarily a sweetener in food, in this context, granulated sugar contributes a very mild abrasive quality, helping to dislodge stubborn particles. It can also act as a humectant, drawing moisture and potentially aiding in the dissolution of grime.
Important Safety Notes
- Always Patch Test: Especially on delicate, porous, or painted surfaces.
- Keep Out of Reach: Store your homemade cleaning paste away from children and pets. Although made with common ingredients, it’s not for consumption.
- Ventilation: While natural, it’s always good practice to ensure good ventilation when cleaning, especially in enclosed spaces like bathrooms.
- Avoid Eye Contact: If contact occurs, rinse thoroughly with water.
Embrace the satisfaction of a clean home achieved with your own two hands and simple, effective ingredients. This DIY cleaning paste is more than just a cleaner; it’s a testament to practical, budget-friendly home maintenance. Give it a try, and you might just find your new favorite homemade hack!