Easy Coconut Cream Pie Recipe (No-Bake Method)
Coconut cream pie is one of those classic American desserts that feels like a special occasion treat but is surprisingly simple to make at home. This version starts with a graham cracker crust and a silky coconut custard filling made on the stovetop, topped with a cloud of lightly sweetened whipped cream and a sprinkle of toasted coconut. No oven is needed for the pie itself, which makes it a great choice for warm weather, potlucks, or holiday dinners when oven space is limited.
The filling is rich without being heavy, with a clean coconut flavor that comes from both coconut milk and toasted shredded coconut. Once chilled, each slice holds its shape and cuts cleanly, so it looks just as good on the plate as it tastes.
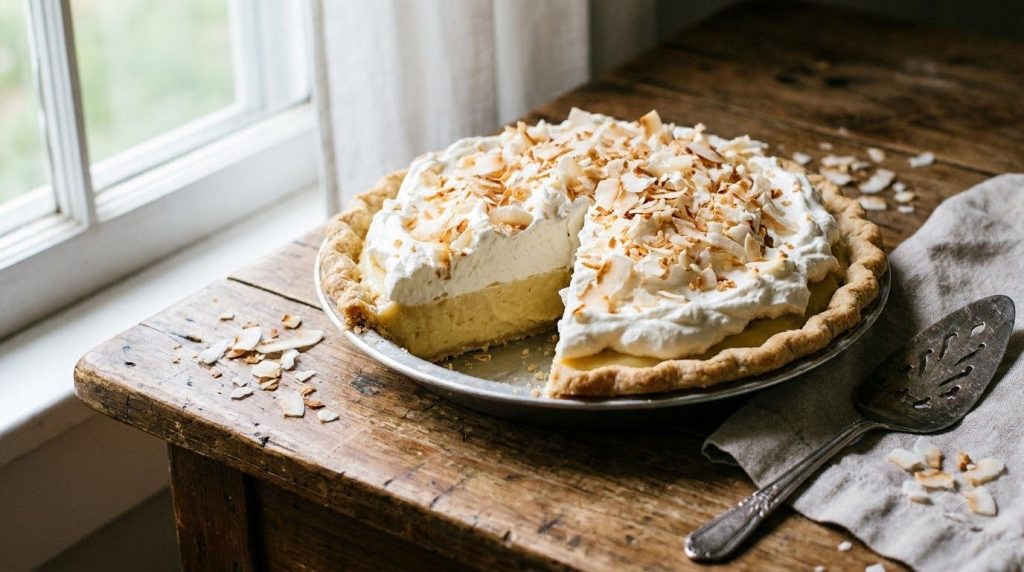 A whole no-bake coconut cream pie ready to chill and serve.
Why You Will Love This Coconut Cream Pie
- No baking required for the pie: The filling is cooked on the stove and chilled, so you do not need to bake the pie itself.
- Simple ingredients: Most of what you need, including milk, sugar, eggs, cornstarch, and coconut, is found in a standard American kitchen.
- Rich, creamy texture: The custard sets into a smooth, sliceable filling that holds together well.
- Make-ahead friendly: The pie needs several hours in the refrigerator to set, so it is ideal for preparing the day before a party.
- Crowd-pleasing flavor: Coconut lovers and dessert fans alike tend to enjoy the balance of sweet custard, crisp crust, and light whipped cream.
Coconut Cream Pie Ingredients
This recipe makes one 9-inch pie, which serves about 8 people.
For the Crust
- 1 (9-inch) graham cracker crust, store-bought or homemade (about 6 to 9 oz / 170 to 255 g crust)
For the Coconut Custard Filling
- 1 cup (240 ml) whole milk
- 1 can (13.5 oz / 400 ml) full-fat coconut milk, well shaken
- 3/4 cup (150 g) granulated sugar
- 1/3 cup (40 g) cornstarch
- 1/4 tsp (1.5 g) fine salt
- 4 large egg yolks (about 60 g)
- 2 tbsp (28 g) unsalted butter, cut into small pieces
- 1 1/2 tsp (7.5 ml) pure vanilla extract
- 1 1/2 cups (120 g) sweetened shredded coconut, divided
For the Whipped Cream Topping
- 1 1/2 cups (360 ml) cold heavy cream
- 2 tbsp (15 g) powdered sugar
- 1/2 tsp (2.5 ml) pure vanilla extract (optional)
Ingredient Notes
Full-fat coconut milk gives the custard its signature coconut flavor and a thick, creamy body. Light coconut milk is thinner and can produce a filling that is less rich and may not set as firmly. Shake the can well before opening, since the cream and liquid can separate.
Cornstarch is what thickens the filling. Cook it fully until the custard bubbles and thickens, or the filling may taste starchy and stay loose.
Egg yolks add richness and help the custard set smoothly. Save the whites for another recipe such as meringue or scrambled eggs.
Sweetened shredded coconut is used in two ways here. Some is folded into the filling for texture and flavor, and the rest is toasted for a crunchy topping. Unsweetened coconut can be used, but you may want to add a little extra sugar to the filling.
Graham cracker crust is the easiest choice for a no-bake pie. A homemade crust made from crushed graham crackers, melted butter, and a little sugar works well too, as long as it is pressed firmly into the pan and chilled before filling.
Equipment You Will Need
- Medium saucepan with a heavy bottom
- Whisk
- Heatproof spatula or wooden spoon
- Fine-mesh sieve (optional, for straining the custard)
- 9-inch pie dish or the pan that came with the crust
- Small rimmed baking sheet (for toasting coconut)
- Mixing bowl and hand mixer or stand mixer for the whipped cream
- Plastic wrap
How to Make Coconut Cream Pie Step by Step
Step 1: Toast the Coconut
Preheat your oven to 325°F (163°C). Spread 1/2 cup (40 g) of the shredded coconut in a thin layer on a rimmed baking sheet. Bake for about 5 to 8 minutes, stirring once or twice, until the coconut is golden brown. Watch it closely near the end, because it can go from golden to burnt quickly. Set it aside to cool. Keep the remaining 1 cup (80 g) of untoasted coconut for the filling.
Step 2: Mix the Dry Ingredients
In a medium saucepan, whisk together the sugar, cornstarch, and salt until no lumps remain. Mixing the cornstarch with the sugar first helps prevent clumps when the liquid is added.
Step 3: Add the Liquids and Yolks
Slowly whisk in the whole milk and coconut milk until smooth. In a small bowl, whisk the egg yolks. Add about 1/2 cup (120 ml) of the warm milk mixture to the yolks, whisking constantly, to temper them. This keeps the yolks from scrambling. Then pour the yolk mixture back into the saucepan and whisk to combine.
Step 4: Cook the Custard
Place the saucepan over medium heat. Cook while whisking constantly, scraping the bottom and corners of the pan so nothing sticks or scorches. The mixture will start thin and gradually thicken. Continue cooking for about 8 to 10 minutes, until the custard is thick, glossy, and bubbles across the surface. Let it bubble gently for 1 full minute while whisking. This step fully cooks the cornstarch and eggs. The custard should coat the back of a spoon and hold a clear line when you run your finger through it.
Step 5: Finish the Filling
Remove the pan from the heat. Stir in the butter, vanilla, and 1 cup (80 g) of the untoasted coconut until the butter has melted and the filling is smooth. For an extra-silky texture, pour the custard through a fine-mesh sieve into a clean bowl before filling the crust.
Step 6: Fill and Chill the Pie
Pour the warm filling into the prepared graham cracker crust and smooth the top with a spatula. Press a sheet of plastic wrap directly onto the surface of the custard to prevent a skin from forming. Let the pie cool at room temperature for about 30 minutes, then refrigerate it for at least 4 hours, or until the filling is firm and set when gently touched. Overnight chilling gives the cleanest slices.
Step 7: Make the Whipped Cream
In a chilled bowl, beat the cold heavy cream on medium-high speed until it starts to thicken. Add the powdered sugar and optional vanilla. Continue beating until stiff peaks form, meaning the cream holds its shape when you lift the beaters. Be careful not to overbeat, or the cream can turn grainy.
Step 8: Top and Garnish
Remove the plastic wrap from the pie. Spread or pipe the whipped cream over the chilled filling, swirling it decoratively if you like. Sprinkle the remaining toasted coconut over the top. Chill the pie for another 30 minutes, if needed, to help the topping hold its shape before slicing.
Pro Tips for the Best Results
- Whisk the custard constantly once it goes on the heat. Stopping for even a minute can cause scorching on the bottom of the pan.
- Use a graham cracker crust that is fully cooled before adding warm custard, or the crust may soften.
- Cover the custard surface with plastic wrap while it chills. This keeps it smooth and prevents a rubbery skin.
- Chill your mixing bowl and beaters before whipping the cream for faster, fluffier results.
- Stick to a sharp, thin knife dipped in hot water and wiped dry between cuts for neat slices.
Common Mistakes to Avoid
Filling that stays runny: This usually happens when the custard is not cooked long enough for the cornstarch to thicken. Make sure it bubbles and thickens fully, then bubbles gently for one minute.
Scrambled or lumpy eggs: Adding hot liquid to the yolks too quickly can cook them. Temper the yolks slowly with warm mixture and whisk constantly.
Pie that does not slice cleanly: Rushing the chilling step is the most common cause. Give the pie at least 4 hours, and overnight is even better.
Grainy whipped cream: Overbeating the cream can cause it to separate. Stop as soon as stiff peaks form.
Burnt coconut topping: Toasted coconut can burn quickly. Watch it closely and pull it out once it turns golden.
Variations and Substitutions
- Homemade crust: Combine about 1 1/4 cups (150 g) graham cracker crumbs with 1/4 cup (50 g) sugar and 6 tbsp (85 g) melted butter. Press into a 9-inch pie dish and chill for at least 30 minutes before filling.
- Toasted coconut in the filling: Toast all of the coconut for a deeper, nuttier flavor throughout the pie.
- Chocolate layer: Spread a thin layer of melted semisweet chocolate over the crust before adding the filling, then let it set.
- Dairy-free version: Use a dairy-free milk and dairy-free whipped topping, but keep in mind the texture and flavor will be different.
- Lighter topping: Use a store-bought whipped topping in place of homemade whipped cream for a quicker option.
Serving Suggestions
Serve coconut cream pie chilled, with slices cut using a clean knife. A cup of hot coffee, unsweetened iced tea, or a glass of cold milk pairs well with the rich custard. For a summer gathering, serve it alongside fresh berries or sliced pineapple for a bright contrast. It also works well as the finale to a barbecue or holiday dinner.
Storage and Reheating
Refrigerator: Keep the pie covered in the refrigerator. It is best eaten within 3 days for the best texture and flavor. Do not leave it out at room temperature for more than 2 hours.
Freezer: Freezing is not recommended, because the custard and whipped cream can change texture when thawed.
Reheating: Coconut cream pie is served cold, so it does not need to be reheated.
Best container: A pie carrier or a container with a tight-fitting lid helps keep the pie fresh and prevents it from absorbing odors from the refrigerator.
Frequently Asked Questions
Can I make coconut cream pie ahead of time?
Yes. Make the pie a day ahead and refrigerate it overnight. Add the whipped cream and toasted coconut shortly before serving, or make the whipped cream the same day for the best texture.
Can I freeze coconut cream pie?
Freezing is not recommended. The whipped cream and custard may become watery or grainy after thawing.
Why did my coconut cream pie not set?
The most likely reason is that the custard was not cooked long enough for the cornstarch to thicken. It can also happen if the pie was not chilled for at least 4 hours.
Can I use light coconut milk?
You can, but the filling will be thinner and less rich. Full-fat coconut milk gives the best results for this recipe.
Can I use unsweetened coconut?
Yes. Unsweetened coconut has a more intense coconut flavor and less sugar, so you may want to add a little extra sugar to the filling and whipped cream to taste.
How do I know when the custard is done?
The custard is ready when it is thick, glossy, and bubbles across the surface. It should coat the back of a spoon, and a line drawn through it with your finger should hold its shape.
Can I make the whole pie without an oven?
Yes, if you use a store-bought crust or make a crust that chills without baking. The only oven step in this recipe is toasting the coconut, which can also be done in a dry skillet over medium-low heat, stirring often, until golden.
This easy coconut cream pie is a practical and satisfying dessert that brings together a crisp crust, a rich coconut custard, and a light, sweet topping. With a little patience during the cooking and chilling steps, you can serve a pie that slices cleanly and tastes like a bakery favorite.