Most people throw away coffee grounds, dry straw, and cardboard without realizing they can feed a small crop of fresh mushrooms. The part most beginners skip is the preparation and sterilizing step, and that is what separates a bag that fruits from a bag that turns green and sour within a week.
What It Is
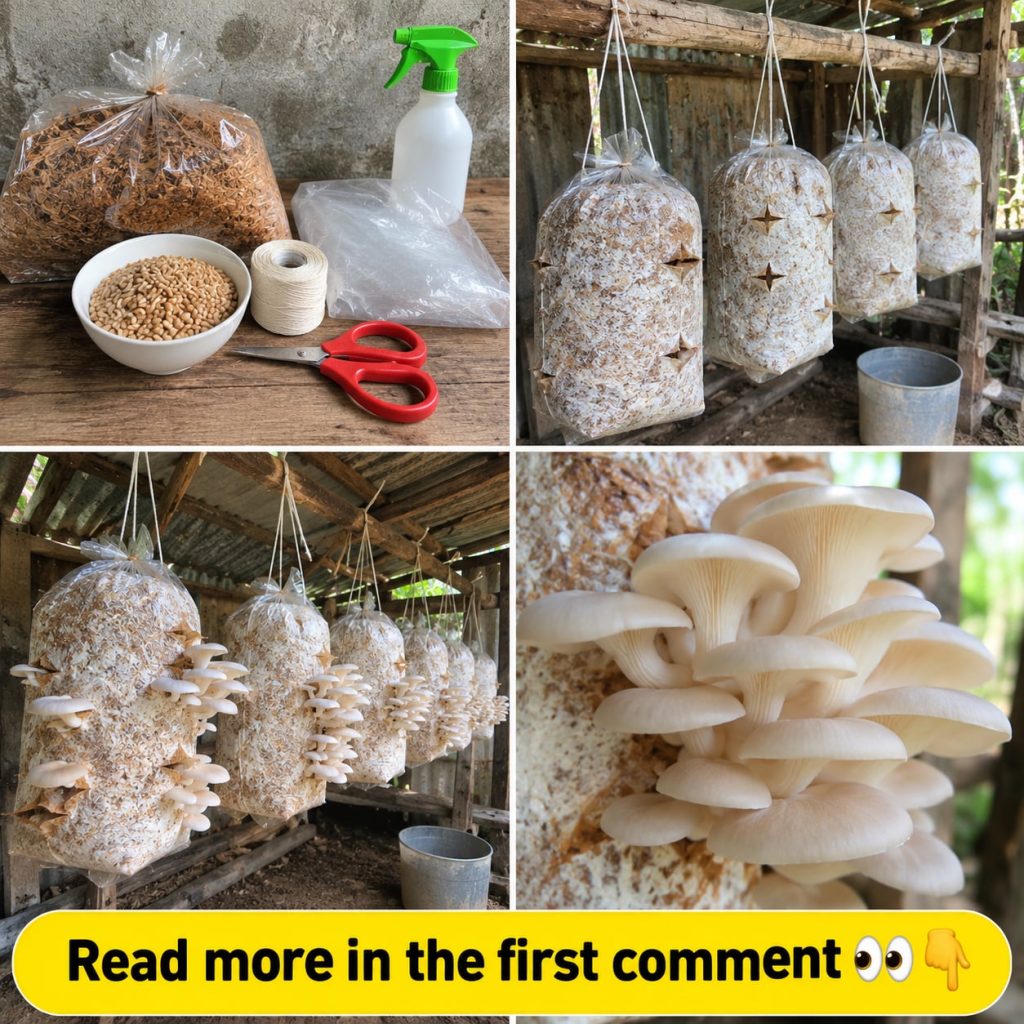
Bag growing is a simple home method where mushroom spawn is mixed into a prepared growing material, called substrate, and sealed inside a heat-safe plastic bag. Once the substrate is fully colonized by white mycelium, you cut small openings in the bag and the mushrooms form through those slits. Oyster mushrooms (Pleurotus species) are the easiest choice for beginners because they tolerate humidity, colonize quickly, and fruit reliably.
Ingredients and Materials
- 1 kg dry straw or dried hardwood sawdust per bag
- About 100 g oyster mushroom grain spawn per kg of substrate
- Heat-safe polypropylene grow bag with a microporous filter patch
- A large pot or bucket for hot-water pasteurization
- Clean water and a spray bottle
- A shaded shelf or box with indirect light
Approximate Measurements
| Item | Amount per bag | Notes |
|---|---|---|
| Dry straw or sawdust | About 1 kg | Soak until moisture reaches roughly 60 to 70 percent |
| Oyster spawn | About 100 g | Roughly 10 percent of the substrate weight |
| Slit openings | 4 to 6 small cuts | Each about 5 cm long, after colonization |
Formula and Recipe
The basic formula is simple: one part dry substrate, soaked and pasteurized, mixed with about one tenth of its weight in spawn. Many growers use straw for oyster mushrooms and sawdust for species that prefer hardwood, but both work well when the moisture level is correct.
Step-by-Step Method
- Soak the straw in hot water at about 70 to 80 degrees Celsius for one to two hours to pasteurize it, then drain it well.
- Squeeze a handful of substrate. It should feel damp, with only a few drops coming out.
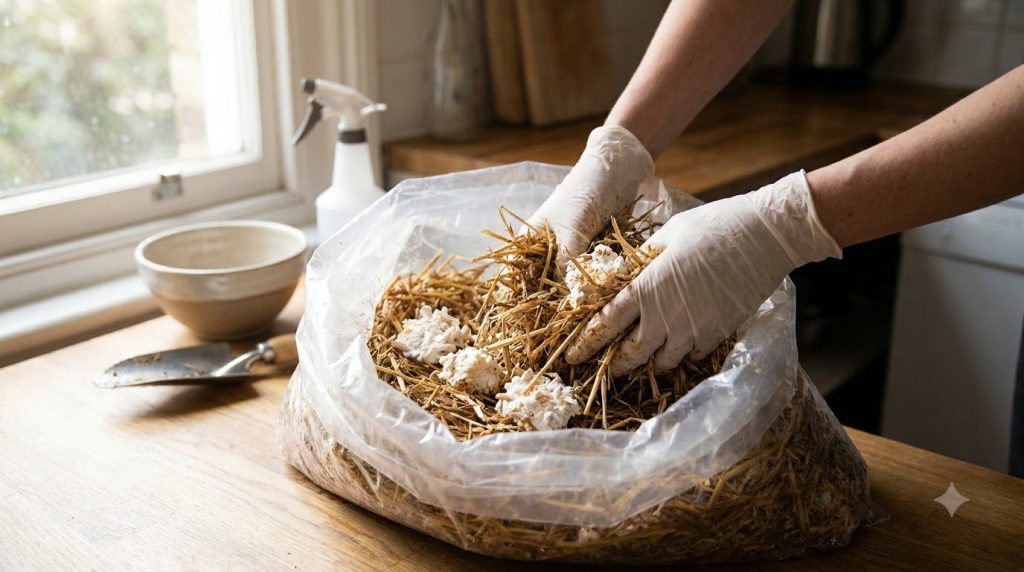
- Layer the substrate and spawn in the bag, pressing gently so the spawn is spread through the material.
- Seal the bag, then poke a few small holes for airflow if your filter patch is not enough.
- Keep the bag in a warm, dark place around 20 to 24 degrees Celsius for about two to three weeks until it is covered with white mycelium.
- Cut 4 to 6 small slits in the bag, then move it to a shaded spot with fresh air.
- Mist the opening once or twice a day and wait for mushrooms to form in about 5 to 10 days.
How to Use Your Harvest
Harvest oyster mushrooms when the caps are still slightly curved under the edge and before they flatten out. Twist the clusters gently at the base rather than pulling them. Cook them fully before eating. Sauteed, roasted, or added to soups, they work well in everyday meals.
How Often to Harvest
A healthy bag usually produces two or three flushes over several weeks. Mist between flushes, let the bag rest for a few days, and expect the yield to drop with each round. Most bags are spent after three to four flushes.
Choosing Your Substrate
| Substrate | Best for | Beginner friendly |
|---|---|---|
| Dry straw | Oyster mushrooms | Yes |
| Hardwood sawdust | Oyster and shiitake | Moderate |
| Used coffee grounds | Oyster mushrooms, mixed with straw | Yes, if fresh and not moldy |
Storage
Store fresh mushrooms in a paper bag in the refrigerator and use them within three to five days. Do not wash them until you are ready to cook. Spent substrate can be composted or used in a garden bed after the mushrooms are finished.
Practical Tips
Quick Tip: Keep the bag away from direct sun, which dries the surface and slows fruiting.
Did You Know? Coffee grounds can be mixed with straw, but use them fresh. Old grounds often carry mold and bacteria.
Here is the part most people skip: a clean workspace matters as much as the recipe. Wipe the table, wash your hands, and use clean containers.
Common Mistakes
- Skipping pasteurization and letting bacteria or mold take over the bag.
- Making the substrate too wet, which causes rot instead of mushrooms.
- Storing the bag in a warm, sealed space after cutting it open.
- Using spawn that smells sour or shows green or black patches.
- Harvesting too late, when the caps are flat and the texture turns tough.
Cautions and Who Should Avoid It
Only grow and eat species you have identified with certainty from a reliable grow kit or supplier. Never eat wild mushrooms you have picked yourself unless an expert has confirmed them. Cook mushrooms thoroughly, and if you have a known mushroom allergy or are pregnant or unwell, check with a healthcare professional before eating homegrown mushrooms.
Quick Summary
- Best preparation: Pasteurized straw with oyster spawn.
- Best use case: Fresh mushrooms for everyday cooking.
- Storage: Paper bag in the fridge for three to five days.
- When to use: Harvest when caps are still slightly curved.
- What to avoid: Wet, moldy, or sour-smelling substrate.
FAQ
Can I use fresh or dried straw? Use dry straw and pasteurize it. Fresh plant material often carries competing microbes.
How long does a bag produce mushrooms? Usually three to four flushes over several weeks.
Can I refrigerate the bag? Keep the bag at room temperature for fruiting. Refrigerate only the harvested mushrooms.
Can I freeze fresh mushrooms? Yes, sauté them first, then freeze in small portions for later cooking.
Can I reuse the spent substrate? Yes, compost it or add it to garden beds once fruiting has finished.
How often should I mist the bag? Once or twice a day during fruiting, keeping the surface damp but not dripping.
Is this method safe for beginners? Yes, if you use clean materials and only grow identified species from trusted kits.
Conclusion
Growing mushrooms in plastic bags is a practical way to turn simple materials into fresh food at home. Focus on clean preparation, correct moisture, and careful harvesting, and your first flush can arrive within a few weeks.
You may also like: Read more about pasteurizing straw for home projects in our full guide. Continue with: our beginner-friendly guide to composting spent substrate. Related guide: how to choose safe mushroom spawn for home growing.