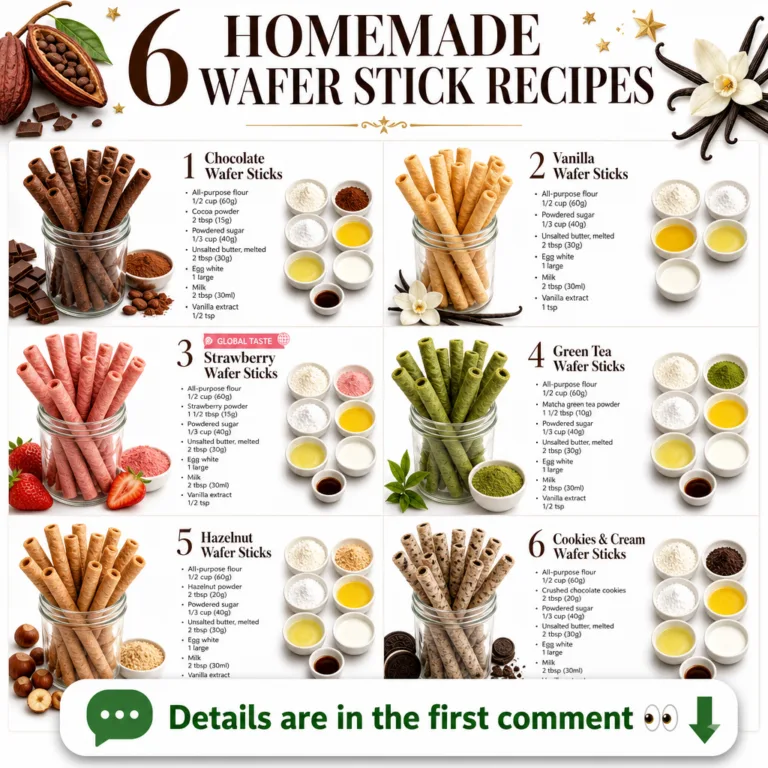
Ready to bake up some joy? Our latest collection of homemade wafer stick recipes reveals just how simple it is to create these delightful treats right in your own kitchen. Forget store-bought; these crispy, flavorful wafer sticks are easier than you think to master and are guaranteed to impress.
Whether you’re craving the rich indulgence of classic Chocolate, the refreshing notes of Green Tea, or the playful crunch of Cookies & Cream, we’ve got a recipe for every taste. Perfect for a delightful treat, a charming homemade gift, or an elegant addition to any dessert spread, these wafer sticks promise a delicious adventure.
Dive into our guide to discover how to transform simple ingredients into beautifully golden, perfectly rolled wafer sticks. Get ready to embark on a crispy, flavorful journey!
Mastering the Art of Homemade Wafer Sticks
Making wafer sticks might seem intimidating, but with the right technique and a dedicated wafer maker (or pizzelle iron), it’s a surprisingly straightforward and rewarding process. The key to perfect wafer sticks lies in a smooth batter, proper cooking time, and quick rolling while the wafer is still hot and pliable.
Basic Wafer Stick Batter Ingredients (Core for All Recipes):
- 1/2 cup (113g) unsalted butter, softened
- 1/2 cup (100g) granulated sugar
- 2 large eggs
- 1 cup (120g) all-purpose flour
- Pinch of salt
- 2-4 tablespoons milk (or as needed to reach desired consistency)
Each recipe below will build upon this core, adding unique flavor components to create a diverse range of delicious wafer sticks.
6 Amazing Wafer Stick Recipes to Try
1. Classic Chocolate Wafer Sticks
Indulge in the timeless taste of chocolate. These rich, dark wafer sticks are perfect for pairing with coffee or as a standalone treat.
Ingredients:
- 1/2 cup (113g) unsalted butter, softened
- 1/2 cup (100g) granulated sugar
- 2 large eggs
- 1/2 teaspoon vanilla extract
- 1 cup (120g) all-purpose flour
- 1/4 cup (25g) unsweetened cocoa powder
- Pinch of salt
- 2-4 tablespoons milk (as needed)
Instructions:
- In a medium bowl, cream together the softened butter and granulated sugar until the mixture is light and fluffy.
- Beat in the eggs one at a time, ensuring each is fully incorporated before adding the next. Stir in the vanilla extract.
- In a separate bowl, whisk together the all-purpose flour, unsweetened cocoa powder, and salt.
- Gradually add the dry ingredients to the wet ingredients, mixing until just combined and a smooth batter forms.
- Stir in milk, one tablespoon at a time, until the batter reaches a thick, pourable consistency, similar to pancake batter.
- Preheat your wafer stick maker or pizzelle iron according to the manufacturer’s instructions.
- Spoon about 1 to 2 tablespoons of batter onto the center of the heated iron. Close the lid and cook for 1 to 2 minutes, or until the wafer is golden brown and crisp.
- Carefully remove the hot wafer and immediately roll it tightly around a wooden dowel or chopstick. Hold it in shape for a few seconds until it sets.
- Transfer the rolled wafer sticks to a wire rack to cool completely. Repeat with the remaining batter.
- Once completely cooled, store the chocolate wafer sticks in an airtight container to maintain crispness.
2. Creamy Vanilla Wafer Sticks
Simple yet elegant, these vanilla wafer sticks offer a delicate sweetness and a wonderfully crisp texture.
Ingredients:
- 1/2 cup (113g) unsalted butter, softened
- 1/2 cup (100g) granulated sugar
- 2 large eggs
- 1 teaspoon vanilla extract (or 1/2 tsp vanilla bean paste)
- 1 cup (120g) all-purpose flour
- Pinch of salt
- 2-4 tablespoons milk (as needed)
Instructions:
- In a medium bowl, cream together the softened butter and granulated sugar until light and fluffy.
- Beat in the eggs one at a time, then stir in the vanilla extract or vanilla bean paste for a richer flavor.
- In a separate bowl, whisk together the all-purpose flour and salt.
- Gradually add the dry ingredients to the wet ingredients, mixing until just combined and a smooth batter forms.
- Stir in milk, one tablespoon at a time, until the batter reaches a thick, pourable consistency.
- Preheat your wafer stick maker according to the manufacturer’s instructions.
- Spoon about 1 to 2 tablespoons of batter onto the center of the heated iron. Close the lid and cook for 1 to 2 minutes, or until golden brown and crisp.
- Carefully remove the hot wafer and immediately roll it tightly around a wooden dowel or chopstick. Hold for a few seconds until it sets.
- Transfer to a wire rack to cool completely. Repeat with remaining batter.
- Store in an airtight container once completely cooled.
3. Sweet Strawberry Wafer Sticks
These vibrant pink wafer sticks bring a touch of fruity sweetness, making them a delightful and visually appealing treat.
Ingredients:
- 1/2 cup (113g) unsalted butter, softened
- 1/2 cup (100g) granulated sugar
- 2 large eggs
- 1 teaspoon strawberry extract
- A few drops of red or pink food coloring (optional, for vibrant color)
- 1 cup (120g) all-purpose flour
- Pinch of salt
- 2-4 tablespoons milk (as needed)
Instructions:
- In a medium bowl, cream together the softened butter and granulated sugar until light and fluffy.
- Beat in the eggs one at a time. Stir in the strawberry extract and optional food coloring for a beautiful pink hue.
- In a separate bowl, whisk together the all-purpose flour and salt.
- Gradually add the dry ingredients to the wet ingredients, mixing until just combined and a smooth batter forms.
- Stir in milk, one tablespoon at a time, until the batter reaches a thick, pourable consistency.
- Preheat your wafer stick maker according to the manufacturer’s instructions.
- Spoon about 1 to 2 tablespoons of batter onto the center of the heated iron. Close the lid and cook for 1 to 2 minutes, or until golden brown and crisp.
- Carefully remove the hot wafer and immediately roll it tightly around a wooden dowel or chopstick. Hold for a few seconds until it sets.
- Transfer to a wire rack to cool completely. Repeat with remaining batter.
- Store in an airtight container once completely cooled.
4. Refreshing Green Tea Wafer Sticks
For a sophisticated twist, these green tea (matcha) wafer sticks offer a subtle earthy flavor and a beautiful natural green color.
Ingredients:
- 1/2 cup (113g) unsalted butter, softened
- 1/2 cup (100g) granulated sugar
- 2 large eggs
- 1/2 teaspoon vanilla extract (optional)
- 1 cup (120g) all-purpose flour
- 1 tablespoon matcha green tea powder (ceremonial or culinary grade)
- Pinch of salt
- 2-4 tablespoons milk (as needed)
Instructions:
- In a medium bowl, cream together the softened butter and granulated sugar until light and fluffy.
- Beat in the eggs one at a time, then stir in the optional vanilla extract.
- In a separate bowl, whisk together the all-purpose flour, matcha green tea powder, and salt. Ensure the matcha is well distributed to avoid clumps.
- Gradually add the dry ingredients to the wet ingredients, mixing until just combined and a smooth, green-tinted batter forms.
- Stir in milk, one tablespoon at a time, until the batter reaches a thick, pourable consistency.
- Preheat your wafer stick maker according to the manufacturer’s instructions.
- Spoon about 1 to 2 tablespoons of batter onto the center of the heated iron. Close the lid and cook for 1 to 2 minutes, or until golden brown and crisp.
- Carefully remove the hot wafer and immediately roll it tightly around a wooden dowel or chopstick. Hold for a few seconds until it sets.
- Transfer to a wire rack to cool completely. Repeat with remaining batter.
- Store in an airtight container once completely cooled.
5. Nutty Hazelnut Wafer Sticks
If you love the rich, buttery flavor of hazelnuts, these wafer sticks are a must-try. The ground nuts add a lovely texture and depth of flavor.
Ingredients:
- 1/2 cup (113g) unsalted butter, softened
- 1/2 cup (100g) granulated sugar
- 2 large eggs
- 1/2 teaspoon vanilla extract
- 1/4 cup (25g) finely ground hazelnuts (toasted for enhanced flavor)
- 1 cup (120g) all-purpose flour
- Pinch of salt
- 2-4 tablespoons milk (as needed)
Instructions:
- In a medium bowl, cream together the softened butter and granulated sugar until light and fluffy.
- Beat in the eggs one at a time, then stir in the vanilla extract.
- In a separate bowl, whisk together the all-purpose flour, finely ground hazelnuts, and salt.
- Gradually add the dry ingredients to the wet ingredients, mixing until just combined and a smooth batter forms.
- Stir in milk, one tablespoon at a time, until the batter reaches a thick, pourable consistency.
- Preheat your wafer stick maker according to the manufacturer’s instructions.
- Spoon about 1 to 2 tablespoons of batter onto the center of the heated iron. Close the lid and cook for 1 to 2 minutes, or until golden brown and crisp.
- Carefully remove the hot wafer and immediately roll it tightly around a wooden dowel or chopstick. Hold for a few seconds until it sets.
- Transfer to a wire rack to cool completely. Repeat with remaining batter.
- Store in an airtight container once completely cooled.
6. Fun Cookies & Cream Wafer Sticks
A playful and delicious option, these wafer sticks are speckled with crushed chocolate sandwich cookies, offering a familiar and beloved flavor combination.
Ingredients:
- 1/2 cup (113g) unsalted butter, softened
- 1/2 cup (100g) granulated sugar
- 2 large eggs
- 1/2 teaspoon vanilla extract
- 1 cup (120g) all-purpose flour
- Pinch of salt
- 1/4 cup (about 4-5 cookies) crushed chocolate sandwich cookies (like Oreos)
- 2-4 tablespoons milk (as needed)
Instructions:
- In a medium bowl, cream together the softened butter and granulated sugar until light and fluffy.
- Beat in the eggs one at a time, then stir in the vanilla extract.
- In a separate bowl, whisk together the all-purpose flour and salt.
- Gradually add the dry ingredients to the wet ingredients, mixing until just combined. Fold in the crushed chocolate sandwich cookies gently.
- Stir in milk, one tablespoon at a time, until the batter reaches a thick, pourable consistency.
- Preheat your wafer stick maker according to the manufacturer’s instructions.
- Spoon about 1 to 2 tablespoons of batter onto the center of the heated iron. Close the lid and cook for 1 to 2 minutes, or until golden brown and crisp.
- Carefully remove the hot wafer and immediately roll it tightly around a wooden dowel or chopstick. Hold for a few seconds until it sets.
- Transfer to a wire rack to cool completely. Repeat with remaining batter.
- Store in an airtight container once completely cooled.
Tips for Perfect Homemade Wafer Sticks
- Consistency is Key: The batter should be thick enough to hold its shape but pourable. Adjust with a tablespoon of milk or flour if needed.
- Work Quickly: Wafers become brittle as they cool. You need to roll them immediately after removing them from the iron.
- Even Cooking: Ensure your wafer maker is fully preheated and consistently maintained at the right temperature for even browning.
- Storage: Once completely cooled, store wafer sticks in an airtight container at room temperature. This keeps them crisp for several days. Humidity can make them soft.
- Don’t Overfill: Use just enough batter to cover the iron’s pattern without overflowing. Too much batter will result in thick, less crispy sticks.
- Clean Your Iron: Wipe down your wafer maker between batches to prevent buildup and ensure clean patterns.
Frequently Asked Questions About Wafer Sticks
Q: Can I make wafer sticks without a specific wafer maker?
A: While a dedicated wafer stick maker or pizzelle iron works best, you can sometimes achieve a similar result using a non-stick griddle or a thin waffle maker and rolling the cooked batter immediately. However, the texture may vary.
Q: How long do homemade wafer sticks stay fresh?
A: When stored in an airtight container at room temperature, homemade wafer sticks typically stay crisp and fresh for up to 3-5 days. Beyond that, they may start to soften, though they’ll still be edible.
Q: Can I use different flavorings?
A: Absolutely! The base recipe is highly adaptable. You can experiment with almond extract, orange zest, lemon zest, or even a touch of cinnamon or cardamom for different flavor profiles.
Q: Why are my wafer sticks not crispy?
A: This can happen for a few reasons: the batter might be too thick (add a little more milk), they weren’t cooked long enough (increase cooking time slightly), or they weren’t rolled immediately and cooled completely on a wire rack before storing. Humidity can also cause them to soften.
Final Thoughts
Crafting your own homemade wafer stick recipes is a truly rewarding experience. Not only do you get to enjoy incredibly fresh, crispy treats tailored to your taste, but you also create something special to share with loved ones. From the classic comfort of vanilla to the exciting zest of green tea, these recipes are designed to bring joy and deliciousness into your home. So, gather your ingredients, fire up your wafer maker, and get ready to bake some magic!