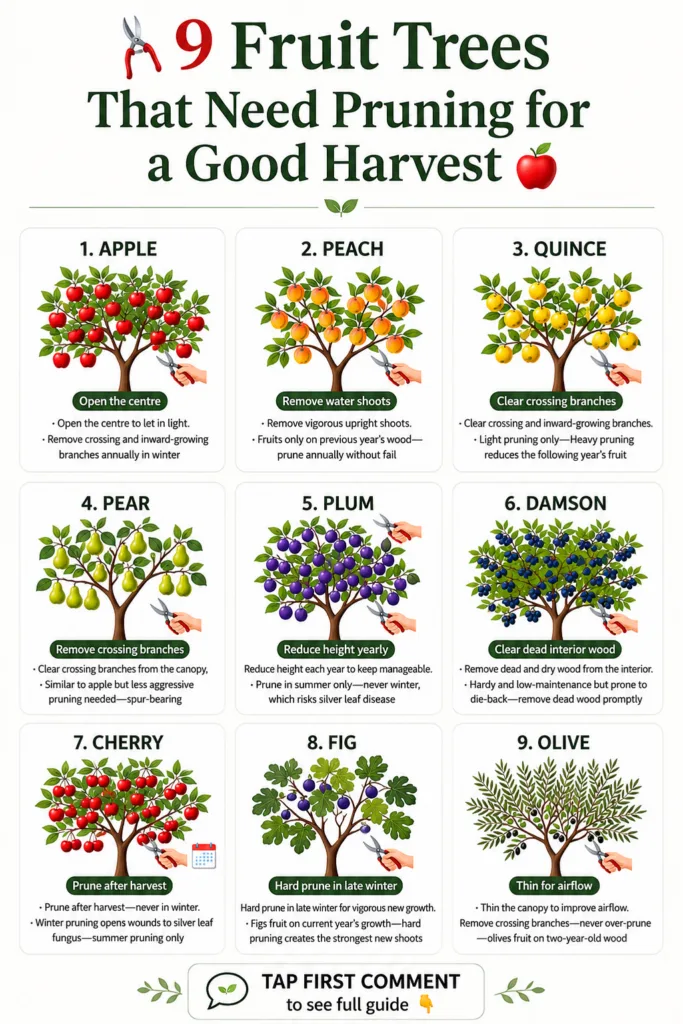
Pruning fruit trees isn’t just about making them look tidy. Done correctly, pruning can improve sunlight and airflow, remove damaged or diseased wood, control tree size, and encourage productive growth. The important part is that different fruit trees should not all be pruned the same way or at the same time.
Here’s a practical guide for the 9 trees in the graphic. 🍎✂️
Before You Start
Use clean, sharp pruning shears for small branches and loppers or a pruning saw for larger ones. Disinfect tools when moving between diseased branches or trees.
Before making a cut, look for four things first: dead or damaged wood, diseased branches, crossing/rubbing branches, and vigorous shoots growing straight upward or inward.
Avoid removing too much healthy canopy in one session. Heavy pruning can trigger excessive new growth and may reduce fruiting.
🍎 1. Apple Tree — Open the Center
Apple trees benefit from a canopy that allows sunlight and air to reach the interior.
Step 1: Remove dead, broken, or obviously diseased branches.
Step 2: Cut out branches growing toward the center of the tree.
Step 3: Remove branches that cross or rub against one another.
Step 4: Remove strong vertical water sprouts, especially those crowding the canopy.
Step 5: Thin overcrowded areas selectively rather than shortening every branch.
Step 6: Step back frequently and check that light can penetrate throughout the canopy.
For established apple trees, major structural pruning is commonly done during dormancy in late winter, while timing can vary somewhat with climate and your goals.
🍑 2. Peach Tree — Control Vigorous Growth
Peaches fruit mainly on one-year-old shoots, so pruning needs to preserve enough healthy young wood for the next crop.
Step 1: Remove dead and damaged branches.
Step 2: Remove vigorous upright water shoots.
Step 3: Cut out branches growing inward.
Step 4: Remove weak, shaded, or badly positioned shoots.
Step 5: Thin crowded fruiting shoots so sunlight reaches the developing peaches.
Step 6: Maintain an open, spreading canopy rather than allowing the center to become dense.
Avoid simply cutting off all new growth—you need some of that young wood for fruit production.
🍐 3. Quince — Prune Lightly
Quince generally needs a lighter touch than aggressively pruned fruit trees.
Step 1: Remove dead, damaged, and diseased wood.
Step 2: Find branches crossing through the center.
Step 3: Remove the weaker branch where two branches rub.
Step 4: Thin shoots growing directly inward.
Step 5: Remove suckers around the base if they are unwanted.
Step 6: Stop once the canopy is reasonably open.
The goal is light thinning rather than drastic reshaping.
🍐 4. Pear Tree — Remove Crossing Branches
Pear trees often respond to hard pruning by producing vigorous upright shoots, so restraint is useful.
Step 1: Remove dead or diseased wood.
Step 2: Remove crossing and rubbing branches.
Step 3: Cut away inward-growing shoots that congest the center.
Step 4: Remove unwanted water sprouts.
Step 5: Thin crowded areas to improve airflow and light.
Step 6: Preserve productive fruiting wood and avoid excessive cutting.
Think of pear pruning as strategic thinning rather than a major haircut.
🟣 5. Plum Tree — Keep It Manageable
Plums can become crowded quickly, but pruning timing matters because stone fruits can be susceptible to disease through pruning wounds.
Step 1: Remove dead and damaged branches.
Step 2: Remove crossing or rubbing growth.
Step 3: Thin congested areas.
Step 4: Shorten overly tall growth selectively if you need to control height.
Step 5: Maintain a balanced framework rather than stripping out large portions of the canopy.
For many plum varieties and climates, pruning during dry weather in the growing season is preferred over winter pruning because of disease concerns.
🔵 6. Damson — Clear Dead Interior Wood
Damsons are closely related to plums, so similar caution applies.
Step 1: Inspect the center for dead wood.
Step 2: Remove dead, damaged, or diseased branches first.
Step 3: Remove branches rubbing against each other.
Step 4: Thin crowded interior growth.
Step 5: Remove unwanted suckers around the base.
Step 6: Keep healthy productive branches whenever possible.
The goal is a canopy with enough space for sunlight and airflow without over-pruning.
🍒 7. Cherry Tree — Prune Carefully After Harvest
Cherry trees generally need less pruning than apples or peaches, and timing can be particularly important.
Step 1: After fruiting, inspect the tree for dead or damaged branches.
Step 2: Remove diseased wood using clean tools.
Step 3: Remove crossing branches.
Step 4: Thin crowded shoots selectively.
Step 5: Shorten excessively long branches only where necessary to maintain shape and size.
Step 6: Avoid unnecessary large cuts.
In many climates, cherries are preferably pruned during dry weather in summer or after harvest rather than during cold, wet winter conditions.
🟣 8. Fig Tree — Encourage Productive New Growth
Fig pruning depends considerably on climate and variety, so avoid assuming that hard pruning is always necessary.
Step 1: Remove winter-damaged or dead wood once you can identify it reliably.
Step 2: Remove weak and crossing branches.
Step 3: Thin congested growth so the canopy receives light.
Step 4: Remove unwanted suckers from the base.
Step 5: If the tree has become too large, gradually reduce its height rather than removing huge amounts at once.
Step 6: Keep a strong framework of healthy branches.
A light annual pruning is often enough for backyard figs unless you’re intentionally renovating an overgrown tree.
🫒 9. Olive Tree — Thin for Light and Airflow
Olives generally perform well with an open canopy.
Step 1: Remove dead and damaged branches.
Step 2: Remove suckers growing from the base or trunk.
Step 3: Cut out shoots growing toward the center.
Step 4: Remove crossing and rubbing branches.
Step 5: Thin dense sections to allow sunlight into the canopy.
Step 6: Maintain the tree’s main structural branches and avoid excessive pruning.
Olives fruit mainly on growth produced the previous season, so indiscriminately removing young wood can reduce the next crop.
✂️ A Simple Pruning Order to Remember
For almost any fruit tree, work in this order:
Dead → Diseased → Damaged → Crossing → Inward-growing → Crowded growth
Then stop, step back, and look at the whole tree before cutting more.
A good pruning session should leave the tree looking healthier and more open—not stripped bare.
🌱 Final Tip
The exact best pruning month depends on your tree variety, age, climate, and local disease pressure. If you’re unsure, identify the variety first and check recommendations from your local agricultural extension or horticultural service.
🍎 Save this guide before pruning season—you’ll want it when the shears come out!
👇 Want a printable pruning checklist for all 9 trees? Comment “PRUNE” below!