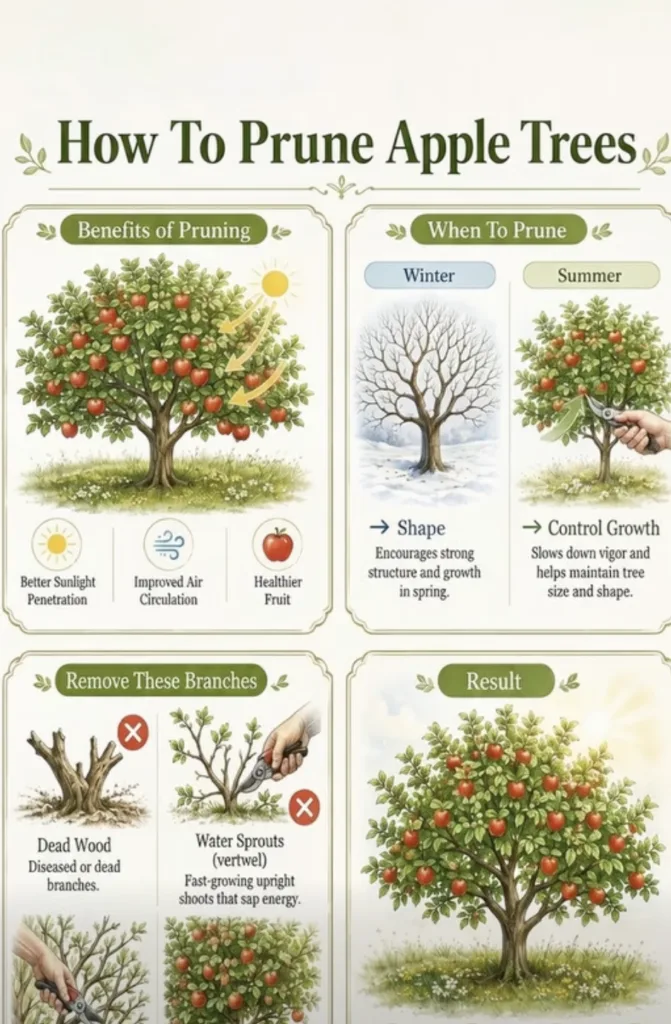
Pruning an apple tree can feel intimidating, but you don’t need to be an expert to get started. The goal isn’t simply to cut branches—it’s to create an open, balanced canopy that allows sunlight and air to reach the tree while maintaining strong fruit-bearing wood.
Follow this simple step-by-step method.
🌳 Step 1: Choose the Right Time to Prune
For most established apple trees, late winter to early spring, while the tree is still dormant and before vigorous new growth begins, is a common time for structural pruning.
Dormancy also makes it much easier to see the tree’s branch structure.
Summer pruning can be used more selectively to control vigorous growth, particularly unwanted upright shoots, but avoid excessive pruning during periods of heat or drought stress.
✂️ Step 2: Start With Dead, Diseased, or Damaged Wood
Before worrying about the tree’s shape, inspect the entire canopy.
Remove branches that are:
- Dead or broken
- Clearly diseased
- Badly damaged
- Dying back
When removing diseased material, clean your pruning tools appropriately before moving to healthy branches.
Easy rule to remember: remove the unhealthy wood first.
🌱 Step 3: Remove Water Sprouts and Suckers
Look for vigorous shoots growing almost straight upward from larger branches. These are commonly called water sprouts.
Also check around the base of the tree for suckers growing from the roots or below the graft union.
Remove unwanted sprouts close to their point of origin without damaging the surrounding bark.
🌿 Step 4: Remove Crossing and Rubbing Branches
Now look inside the canopy.
If two branches cross and rub against each other, decide which branch contributes more to the tree’s desired structure and remove the other.
Also consider removing branches that grow strongly inward toward the center.
The objective is a canopy with enough space for light and air—not a completely empty center.
🍎 Step 5: Deal With Low or Poorly Positioned Branches
Some very low branches can interfere with mowing, harvesting, airflow, or other branches.
Remove them when they don’t contribute to the permanent framework of the tree.
But don’t automatically remove every downward or horizontal branch. On apple trees, relatively horizontal wood can be valuable because it often carries fruiting spurs.
☀️ Step 6: Open Up an Overcrowded Canopy
Stand back and look at the whole tree before making more cuts.
Thin selected crowded branches so sunlight can penetrate deeper into the canopy.
Think:
☀️ More light + 💨 better airflow + 🌿 good structure
Rather than:
✂️ Cut as much as possible.
Over-pruning can stimulate lots of vigorous vegetative growth and reduce fruit production temporarily.
✂️ Step 7: Make Every Cut Correctly
For removing an entire branch, cut just outside the branch collar—the slightly swollen area where the branch joins the trunk or a larger limb.
Don’t cut flush against the trunk, and don’t leave a long stub.
For shortening a smaller shoot, make a clean cut just above an appropriately positioned bud.
Use:
- Hand pruners for small shoots
- Loppers for somewhat larger branches
- Pruning saws for larger limbs
Keep your tools sharp so the cuts are clean rather than crushed or torn.
⚠️ Step 8: Don’t Remove Too Much at Once
This is especially important for old or neglected apple trees.
Avoid trying to completely reshape a badly overgrown tree in one afternoon. Major renovation is generally better spread across multiple seasons.
After several important cuts, stop and look at the whole tree again before continuing.
You can always remove another branch later. You can’t put one back.
🍏 Step 9: Check the Finished Shape
When you’re finished, the apple tree should look balanced and noticeably more open, not stripped bare.
Ideally, you’ve achieved:
☀️ Better sunlight penetration
💨 Improved airflow
🌳 Stronger overall structure
🍎 Good access to productive fruiting wood
Remember that pruning alone doesn’t guarantee a huge crop. Apple production also depends on the cultivar, tree age, pollination, weather, pests and diseases, nutrition, water, and fruit thinning.
🌟 Quick Pruning Checklist
Before making a cut, ask yourself:
1. Is it dead, diseased, or damaged? → Remove it.
2. Is it an unwanted sucker or water sprout? → Usually remove it.
3. Is it crossing or rubbing another branch? → Select the better branch.
4. Is it crowding the canopy or growing inward? → Consider thinning it.
5. Is it healthy, well-positioned fruiting wood? → Think twice before cutting.
🍎 The Golden Rule
Prune with a purpose, not just because a branch is there.
A handful of carefully chosen cuts is often far better than aggressively cutting back the entire tree. Take your time, step back frequently, and let the tree’s natural structure guide you.
💬 Comment “APPLE” if you want more fruit-tree growing and pruning guides!