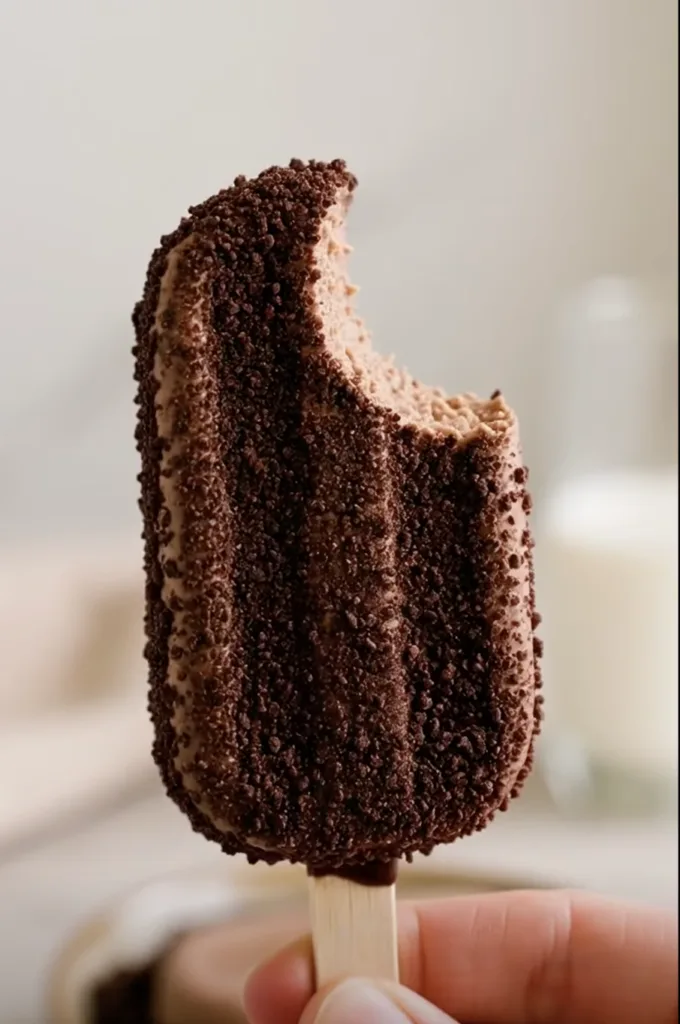
If you love banana, chocolate, and creamy frozen desserts, these homemade Chocolate Banana Popsicles are going to be a favorite. They have a smooth chocolate-banana center covered with a thin layer of dark chocolate and finished with crunchy chocolate crumbs.
The best part? No ice cream maker is required. Everything is blended, poured into popsicle molds, frozen, and dipped in chocolate.
Prep time: 15 minutes
Freezing time: 6 hours
Total time: About 6 hours 15 minutes
Makes: Approximately 8 popsicles
🛒 Ingredients
For the Chocolate Banana Popsicles
- 2 ripe bananas, peeled and cut into chunks
- 1 cup (240 ml) whole milk
- ½ cup (120 ml) heavy whipping cream
- 2 tbsp unsweetened cocoa powder
- 3 tbsp sweetened condensed milk
- 1 tsp vanilla extract
- 60 g dark chocolate, melted
For the Chocolate Coating
- 80 g dark chocolate
- 1–2 tsp coconut oil, optional, for a thinner, crispier shell
- ¼ cup finely chopped chocolate or chocolate crumbs
Optional Toppings
- Mini chocolate chips
- Crushed roasted peanuts
- Toasted coconut
- Chocolate shavings
- Crushed cookies
👩🍳 Step-by-Step Instructions
Step 1 – Prepare the Bananas
Start with 2 very ripe bananas.
The riper the bananas are, the sweeter and more flavorful your popsicles will be. Bananas with plenty of brown spots are perfect for this recipe.
Peel the bananas and cut them into chunks.
There’s no need to freeze the bananas beforehand because the entire mixture will be frozen inside the popsicle molds later.
Step 2 – Add the Bananas to the Blender
Place all of the banana chunks into a large glass blender.
The bananas create the naturally thick and creamy base of the popsicles.
Step 3 – Add the Milk
Pour 1 cup (240 ml) whole milk into the blender.
Whole milk works particularly well because it provides enough richness without making the mixture overly heavy.
Step 4 – Add the Heavy Cream
Next, pour in:
½ cup (120 ml) heavy whipping cream.
Heavy cream is one of the secrets to creating a smoother, creamier frozen texture.
It also helps prevent the popsicles from tasting like frozen chocolate milk.
Step 5 – Add the Cocoa Powder
Add 2 tablespoons unsweetened cocoa powder.
For the smoothest mixture, sift the cocoa powder before adding it to the blender. Cocoa tends to form small lumps when it comes into contact with liquid.
Unsweetened cocoa gives you control over the sweetness while adding a deeper chocolate flavor.
Step 6 – Add the Condensed Milk
Pour in 3 tablespoons sweetened condensed milk.
Watch that thick, glossy condensed milk fall over the bananas—this ingredient adds both sweetness and creaminess.
If your bananas are extremely ripe and sweet, you can slightly reduce the condensed milk.
Step 7 – Add Vanilla
Pour in 1 teaspoon vanilla extract.
Vanilla might seem like a small addition, but it rounds out the cocoa and makes the chocolate-banana flavor taste richer.
Step 8 – Add Melted Dark Chocolate 🍫
Melt 60 g dark chocolate until completely smooth.
Allow it to cool slightly so it’s warm rather than piping hot.
Slowly pour the melted chocolate into the blender.
This gives the popsicle base a deeper chocolate flavor than cocoa powder alone.
Step 9 – Blend Until Silky Smooth
Secure the blender lid.
Blend everything on high until the bananas have completely disappeared into the mixture.
The finished mixture should look:
Smooth → creamy → glossy → chocolate-brown → completely lump-free.
Usually, 30–45 seconds is enough, depending on your blender.
Stop and scrape down the sides if necessary, then blend again briefly.
Taste the mixture before freezing. If you want it slightly sweeter, you can add another small spoonful of condensed milk.
Remember that foods generally taste less sweet once frozen, so the unfrozen mixture can taste slightly sweeter than you ultimately want the popsicles to be.
Step 10 – Prepare the Popsicle Mold
Place your popsicle mold on a completely flat surface.
Make sure it’s stable before pouring.
If you’re using removable wooden sticks, have them ready beside the mold.
Step 11 – Pour Into the Popsicle Molds
Slowly pour the chocolate-banana mixture into each cavity.
Don’t fill them completely to the top. Leave a small amount of space because the mixture can expand slightly as it freezes.
Gently tap the mold against the countertop a few times.
This helps remove trapped air bubbles and allows the mixture to settle evenly.
Step 12 – Add the Wooden Sticks
Insert one wooden popsicle stick into the center of each mold.
Try to keep every stick as straight as possible.
If your particular mold requires the mixture to partially freeze before inserting wooden sticks, freeze it for approximately 30–60 minutes first, then insert them.
Otherwise, use the mold’s lid or stick holder to keep them centered.
Step 13 – Freeze for 6 Hours ❄️
Carefully transfer the entire popsicle mold to the freezer.
Make sure it sits completely flat.
Freeze for at least 6 hours, or preferably overnight.
Don’t try to remove the popsicles too early. They need to be completely firm before dipping them into warm melted chocolate.
Step 14 – Prepare the Chocolate Coating
Once the popsicles are completely frozen, prepare the chocolate shell.
Melt:
- 80 g dark chocolate
- 1–2 teaspoons coconut oil, optional
Stir until completely smooth and glossy.
The coconut oil makes the chocolate slightly thinner, which helps create a delicate shell rather than an excessively thick coating.
Transfer the melted chocolate into a tall, narrow glass.
A narrow container makes dipping much easier because you can coat most of the popsicle without needing a huge amount of chocolate.
Step 15 – Prepare the Chocolate Crumbs
Place ¼ cup finely chopped chocolate or chocolate crumbs in a small bowl.
Have them ready before dipping the popsicles.
This is important because chocolate begins setting extremely quickly when it touches the frozen popsicle.
You’ll only have a few seconds to add your toppings.
Step 16 – Remove the Popsicles From the Mold
Take the popsicle mold from the freezer.
Gently loosen one popsicle.
If it doesn’t release easily, briefly run the outside of the mold under lukewarm water for a few seconds.
Avoid getting water directly onto the popsicle.
Hold the wooden stick and gently pull until the popsicle slides out.
You should now have a smooth, firm chocolate-banana popsicle.
Step 17 – Dip in Melted Chocolate 🍫
Make sure your melted chocolate is smooth and fluid but not extremely hot.
Hold the frozen popsicle by the wooden stick.
Slowly lower it into the tall glass of melted dark chocolate.
You can cover:
- Half the popsicle
- About three-quarters
- Or almost the entire popsicle
Pull it straight back up and allow the excess chocolate to drip into the glass.
Because the popsicle is extremely cold, you’ll immediately see the chocolate coating begin to set.
Step 18 – Add the Chocolate Crumbs
Before the chocolate shell completely hardens, quickly sprinkle finely chopped chocolate or chocolate crumbs over the coating.
Turn the popsicle while sprinkling so the crumbs stick to multiple sides.
Work quickly!
Within moments, the chocolate coating will become firm and crisp.
Step 19 – Let the Chocolate Shell Set
Hold the popsicle for approximately 20–30 seconds, or until the chocolate shell has completely hardened.
You can then place it on a parchment-lined tray.
Repeat with the remaining popsicles.
If the melted chocolate becomes too thick during dipping, gently warm it again until fluid.
Step 20 – The Best Part: The Chocolate Crack 🤤
Now take your first bite.
The thin dark chocolate coating should give you a satisfying little CRACK.
Underneath you’ll find a completely different texture: cold, smooth, creamy chocolate-banana popsicle.
You get three textures in one bite:
Crunchy chocolate crumbs + crisp chocolate shell + creamy banana-chocolate center.
That’s what makes these popsicles so satisfying.
⭐ Tips for Perfect Chocolate Banana Popsicles
Use very ripe bananas. They’re naturally sweeter and have a stronger banana flavor.
Don’t skip the heavy cream. It helps create a richer frozen texture.
Use unsweetened cocoa powder. The condensed milk and bananas already provide sweetness.
Freeze completely before dipping. A partially frozen popsicle can soften or break when dipped into chocolate.
Use a tall glass for dipping. It’s much easier and requires less melted chocolate.
Prepare your toppings first. The chocolate shell can harden in seconds.
Don’t make the coating too thick. A thin chocolate layer produces a much more satisfying crack.
🍓 Fun Variations
Chocolate Peanut Butter Banana Popsicles
Add 2 tablespoons creamy peanut butter to the blender before blending.
Finish with chopped roasted peanuts.
Double Chocolate Popsicles
Mix mini chocolate chips into the blended mixture before pouring it into the molds, then coat with dark chocolate.
Cookies & Cream Chocolate Banana Popsicles
Replace the chocolate crumbs with finely crushed chocolate sandwich cookies.
Coconut Chocolate Banana Popsicles
Sprinkle toasted shredded coconut onto the freshly dipped chocolate coating.
Strawberry Chocolate Banana Popsicles
Add several fresh strawberries to the blender for a chocolate-covered-strawberry-meets-banana flavor.
❄️ How to Store Homemade Popsicles
Once the chocolate shell is completely set, wrap each popsicle individually in parchment paper or place them in an airtight freezer-safe container.
Store them in the freezer until ready to eat.
For the best flavor and texture, enjoy them within 1–2 weeks.
🍌🍫 Why You’ll Love This Recipe
These Chocolate Banana Popsicles look impressive, but the process couldn’t be much easier:
Blend → Pour → Freeze → Unmold → Dip → Sprinkle → Enjoy!
The bananas create natural creaminess, cocoa and dark chocolate deliver a rich chocolate flavor, and that final coating gives every bite an irresistible crunch.
And when you bite through the crisp chocolate shell into that creamy chocolate-banana center… that’s the moment everyone will want another one. 😍🍦
TAG a friend who needs to make these with you, and comment “CHOCOLATE” for the recipe! 🍌🍫✨