Turn Muddy Yards into Beautiful Landscapes: Your Guide to Dry Creek Beds for Better Drainage
Does your yard turn into a soggy, muddy mess every time it rains? Do you see unsightly puddles near your home’s foundation, threatening its integrity and creating an eyesore? You’re far from alone. Managing rainwater runoff and poor drainage is a common challenge for many homeowners, often leading to erosion, structural issues, and a less-than-inviting garden space. But what if those troublesome wet spots could be transformed into a stunning, functional landscape feature?
The solution lies in creating a dry creek bed. More than just a practical drainage system, a well-designed dry creek bed can become a captivating focal point in your garden, guiding water away efficiently while enhancing the beauty and biodiversity of your outdoor space. It’s a clever blend of engineering and aesthetics, turning a problem into an opportunity for garden transformation. This guide will walk you through the steps to reclaim your yard, offering practical advice to create a dry creek bed that’s both effective and enchanting.
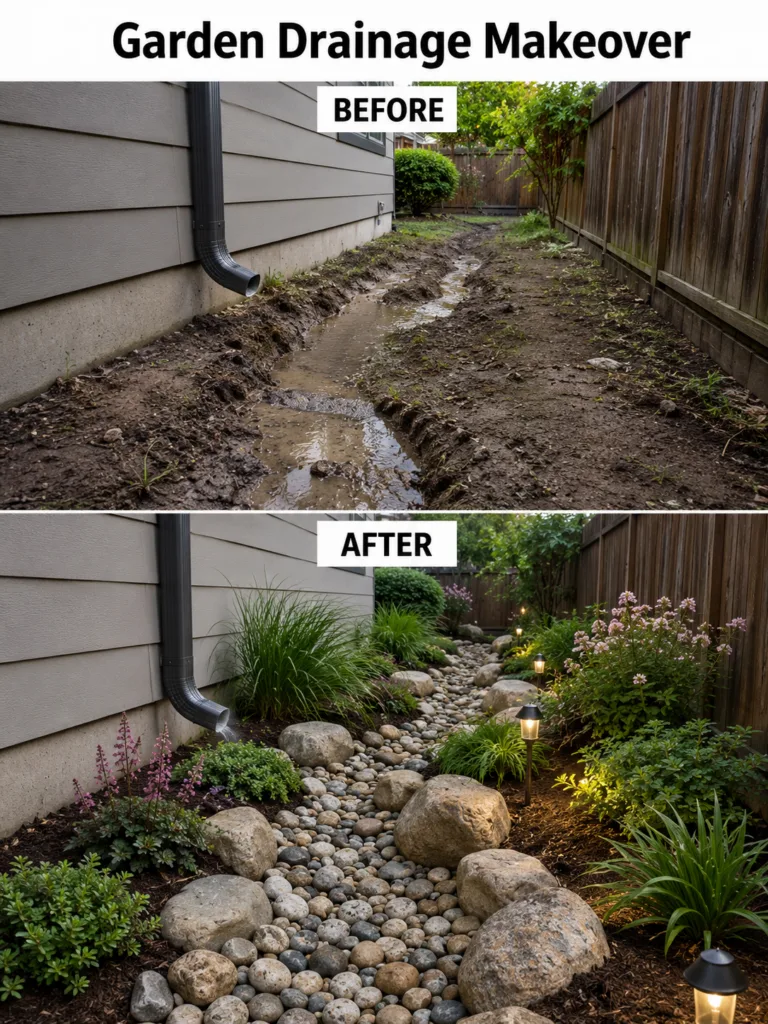
Understanding the Power of a Dry Creek Bed
At its core, a dry creek bed is a trench designed to mimic a natural streambed, lined with rocks and sometimes planted along its edges. Its primary function is to capture and redirect rainwater runoff from impervious surfaces like roofs, driveways, or compacted soil, guiding it to a more appropriate spot, such as a rain garden, a larger permeable area, or away from the house foundation. When it’s not raining, it remains a beautiful, dry landscape feature, hence the name.
This method of water management is far superior to simple ditches, which can erode further, become muddy, or turn into mosquito breeding grounds. A properly constructed dry creek bed creates a permeable surface that allows some water to infiltrate the soil slowly, reducing the volume of runoff and recharging groundwater. It’s a sustainable solution that works with nature to solve drainage issues.
Designing Your Dry Creek Bed: From Problem to Plan
The first step to a successful dry creek bed is thoughtful planning. Begin by observing your yard during a heavy rainstorm. Where does the water collect? Where does it flow from? Identifying the source and natural path of water is crucial for effective placement.
Site Analysis and Flow Path
Walk your property and identify problem areas. Note where downspouts discharge water. Use a garden hose to simulate a rain event and visualize the flow. Your dry creek bed should follow a gentle slope, allowing water to move naturally. Aim for a gradual descent of at least 1-2% (a drop of 1-2 feet over 100 feet of length) to ensure proper drainage without excessive erosion.
Sizing and Layout
The size of your creek bed depends on the volume of water it needs to handle. A good rule of thumb is for the bed to be at least twice as wide as the downspout opening or the concentrated flow. For a natural look, design a gently curving path rather than a straight line. Mark your proposed path with spray paint or a garden hose to visualize the layout and make adjustments before digging.
Building Your Dry Creek Bed: Step-by-Step Construction
Once you have a clear plan, it’s time to get started on the physical work.
1. Excavation
Dig a trench along your marked path. The depth should be at least 6-12 inches, creating a shallow basin. The width will vary based on your design, but ensure it’s wide enough to accommodate rocks and channel water effectively. Aim for gently sloped sides (a 2:1 ratio, meaning for every 1 foot of depth, the side extends 2 feet horizontally) to prevent collapse.
2. Lining for Stability
Before placing rocks, line the excavated trench with a heavy-duty geotextile fabric (also known as landscape fabric). This permeable fabric prevents soil from washing up between your rocks, keeps weeds down, and helps maintain the shape of your creek bed while allowing water to filter through. Overlap seams by at least 6 inches and secure with landscape staples.
3. Rock Placement
This is where the artistic transformation happens. Start by placing larger, irregularly shaped boulders along the edges and curves of the creek bed. These define the banks and add visual interest. Then, fill the main channel with a mix of medium-sized river rocks and smaller pebbles. Use different sizes, shapes, and colors to create a natural, varied look. Avoid perfectly uniform rocks; natural creek beds are always diverse. Ensure the rocks are tightly packed to prevent shifting and erosion during heavy flows.
Planting the Edges: Greenery for Beauty and Function
The plants flanking your dry creek bed are vital for softening its appearance, preventing erosion on the banks, and adding ecological value. Choose plants that can tolerate both occasional wet feet and dry spells, as the soil along a dry creek bed will fluctuate in moisture. Consider plants native to your region for best results and to support local wildlife.
Recommended Plant Types for Dry Creek Beds
- Ornamental Grasses: These provide year-round texture and movement, often thriving in a range of soil conditions. Their fibrous root systems also help stabilize soil.
- Switchgrass (Panicum virgatum): Many cultivars (e.g., ‘Shenandoah’, ‘Heavy Metal’) offer beautiful colors.
- Hardiness: USDA Zones 4-9
- Plant type: Perennial grass
- Exposure: Full sun
- Height: 3-6 feet
- Spread: 2-3 feet
- Care tip: Cut back in late winter to early spring before new growth appears.
- Maiden Grass (Miscanthus sinensis): ‘Gracillimus’ or ‘Morning Light’ are popular.
- Hardiness: USDA Zones 5-9
- Plant type: Perennial grass
- Exposure: Full sun
- Height: 4-7 feet
- Spread: 3-5 feet
- Care tip: Divide every few years to prevent overcrowding.
- Low-Growing Shrubs: These provide structure and evergreen interest, offering year-round appeal.
- Dwarf Inkberry Holly (Ilex glabra ‘Shamrock’): A native evergreen alternative to boxwood.
- Hardiness: USDA Zones 5-9
- Plant type: Evergreen shrub
- Exposure: Full sun to partial shade
- Height: 3-4 feet
- Spread: 3-4 feet
- Care tip: Tolerates moist soils and can be pruned for shape.
- Creeping Juniper (Juniperus horizontalis ‘Blue Chip’): A low-maintenance groundcover.
- Hardiness: USDA Zones 3-9
- Plant type: Evergreen shrub
- Exposure: Full sun
- Height: 6-12 inches
- Spread: 4-6 feet
- Care tip: Extremely drought-tolerant once established.
- Flowering Perennials: Introduce color and attract pollinators, enhancing the garden’s ecological value.
- Coneflower (Echinacea purpurea): Hardy, cheerful, and attracts bees and butterflies.
- Hardiness: USDA Zones 3-9
- Plant type: Perennial
- Exposure: Full sun to partial shade
- Height: 2-4 feet
- Spread: 1-2 feet
- Care tip: Deadhead spent blooms for continuous flowering.
- Garden Salvia (Salvia nemorosa ‘Caradonna’): Known for its vibrant purple spires and long bloom time.
- Hardiness: USDA Zones 4-8
- Plant type: Perennial
- Exposure: Full sun
- Height: 18-24 inches
- Spread: 18-24 inches
- Care tip: Shear back after the first flush of flowers for rebloom.
Soil and Spacing
Ensure the soil in your planting beds is well-draining, even if the dry creek bed itself handles excess water. Amend heavy clay soils with compost to improve structure. Space plants according to their mature size to allow for good air circulation and prevent overcrowding. Mulch around your new plantings with wood chips or shredded bark to suppress weeds, retain soil moisture, and moderate soil temperature.
Finishing Touches: Beyond Drainage
Once the rocks are laid and plants are in place, consider adding decorative elements. Solar pathway lights, as seen in the transformed garden, can illuminate your dry creek bed at night, highlighting its beauty and providing a subtle glow. Other elements like decorative bridges, strategically placed larger boulders, or even a small garden bench can further enhance the aesthetic appeal.
Common Mistakes to Avoid
Even with good intentions, a dry creek bed project can go awry. Here are some pitfalls to watch out for:
- Insufficient Slope: If the bed is too flat, water won’t flow, leading to stagnant puddles. If it’s too steep, water will rush through, causing erosion. Aim for a gentle, consistent grade.
- No Geotextile Fabric: Skipping the fabric liner allows soil to migrate up through the rocks, turning your beautiful creek bed into a muddy trench over time.
- Using the Wrong Rocks: Avoid small, uniform pebbles that can easily wash away. A mix of sizes, including larger rocks and boulders, creates stability and a natural look.
- Incorrect Plant Choices: Selecting plants that can’t handle varying moisture conditions will lead to stressed or dead plants. Choose species known for their tolerance to both wet and dry periods.
- Overlooking Downspout Connection: Ensure your downspout empties directly and efficiently into the start of your dry creek bed. Use a proper extension or adapter to prevent water from eroding the soil at the very beginning of the bed.
Regional and Climate Considerations
When selecting plants, always consider your specific USDA Hardiness Zone, which indicates a plant’s ability to survive winter cold. However, remember that zones don’t account for summer heat, rainfall patterns, or soil types, which also influence plant success.
- Zones 3-5 (Northern Climates): Choose extremely cold-hardy varieties of grasses like Switchgrass, shrubs like Dwarf Arctic Willow, and perennials like Siberian Iris or Daylilies.
- Zones 6-8 (Mid-Atlantic to Pacific Northwest): A wide range of plants thrive here, including many ornamental grasses, deciduous shrubs like Spirea, and perennials such as Coneflowers, Sedum, and various Salvias.
- Zones 9-11 (Southern & Coastal Climates): Focus on drought-tolerant and heat-loving plants. Consider plants like Muhly Grass, Dwarf Oleander (where not invasive), or various Agapanthus and Lantana.
Always check with your local extension service for plant recommendations best suited to your specific climate and soil conditions, as local microclimates can vary greatly even within a zone.
Reclaim Your Yard, Enhance Your Garden
Creating a dry creek bed is an investment in both the functionality and beauty of your home landscape. It solves a practical problem – managing rainwater – while simultaneously crafting a stunning garden feature that adds character, visual interest, and ecological value. By following these steps and choosing appropriate plants, you can transform those muddy puddles and erosion issues into a serene, sustainable, and truly inspiring part of your garden. Get ready to enjoy the sound of gentle water trickling through your garden during a rain shower, knowing your home is protected and your landscape is thriving.