Dreaming of skin that looks visibly youthful and glows with vitality? Many of us are, and the good news is that you don’t always need expensive products to achieve it. Today, we’re diving into a wonderful, simple homemade collagen cream recipe, blending natural oils and powders designed to help rejuvenate your skin and promote a healthy, youthful appearance.
As we age, our skin’s natural collagen production tends to slow down. Collagen is a vital protein that provides structure and elasticity to our skin, keeping it looking firm and smooth. While we can’t magically reverse aging, providing our skin with supportive ingredients through a nurturing routine can certainly help maintain its supple feel and vibrant look.
Why DIY Your Collagen Cream?
Making your own skincare products can be incredibly rewarding. It allows you to:
- Control Ingredients: Know exactly what goes onto your skin, avoiding harsh chemicals, synthetic fragrances, and unnecessary additives.
- Save Money: High-quality skincare can be pricey. DIY alternatives often use readily available and affordable natural ingredients.
- Customize: Tailor the recipe to your specific skin needs and preferences.
- Embrace Nature: Harness the power of natural oils, butters, and powders known for their skin-loving benefits.
Key Ingredients and Their Benefits
Our DIY collagen cream uses a blend of nourishing ingredients chosen for their beneficial properties:
Coconut Oil
- Deep Moisturization: Rich in fatty acids, coconut oil provides excellent hydration, helping to keep skin soft and smooth.
- Protective Barrier: It can help strengthen the skin’s natural barrier, locking in moisture and protecting against environmental stressors.
Sweet Almond Oil
- Gentle & Nourishing: A mild oil, it’s packed with Vitamin E, Vitamin A, and essential fatty acids, making it wonderful for nourishing and soothing the skin.
- Improves Skin Tone: Regular use may help with the appearance of even skin tone and texture.
Beeswax Pellets
- Natural Emulsifier & Thickener: Beeswax helps bind the oils and water (if any) together and gives the cream a lovely, stable consistency.
- Protective: It forms a protective barrier on the skin, which can help seal in moisture without clogging pores.
Vitamin E Oil
- Antioxidant Powerhouse: Vitamin E is a potent antioxidant that can help protect skin cells from damage.
- Skin Support: It’s commonly used in beauty products for its potential to support skin health and appearance.
Marine Collagen Powder (Hydrolyzed)
- Topical Support: While collagen applied topically doesn’t penetrate deep enough to become new collagen, people are trying marine collagen powder in creams to provide surface hydration and a smoother-looking finish.
- Amino Acids: It provides amino acids that can act as humectants, drawing moisture to the skin.
Essential Oils (Optional)
- Lavender Essential Oil: Known for its soothing aroma and calming properties.
- Frankincense Essential Oil: Popular in anti-aging routines for its reported ability to promote a refreshed skin appearance.
Your Easy DIY Collagen Cream Recipe
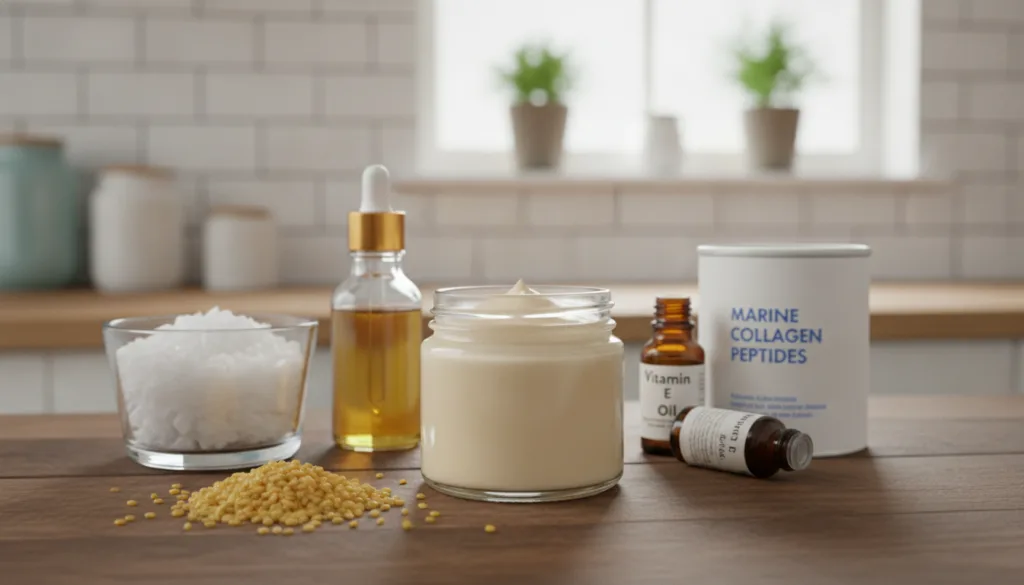
What You’ll Need:
- ¼ cup Organic Coconut Oil
- ¼ cup Sweet Almond Oil
- 1 tablespoon Beeswax Pellets
- 1 teaspoon Vitamin E Oil
- 1 tablespoon Marine Collagen Powder (hydrolyzed)
- 5-10 drops of your favorite essential oil (e.g., Lavender or Frankincense, optional)
- Double boiler or a heat-safe bowl over a pot of simmering water
- Clean glass jar for storage
- Hand mixer or whisk (optional, for a creamier texture)
Step-by-Step Instructions:
- Melt Ingredients: In your double boiler (or heat-safe bowl over simmering water), combine the coconut oil, sweet almond oil, and beeswax pellets. Heat gently, stirring occasionally, until all ingredients are completely melted and well combined.
- Cool Slightly: Remove the bowl from the heat and let the mixture cool for about 10-15 minutes. It should still be liquid but no longer hot to the touch.
- Add Remaining Ingredients: Stir in the vitamin E oil and marine collagen powder. If using essential oils, add them now.
- Whip (Optional for Creamier Texture): For a light and fluffy cream, you can let the mixture cool further (until it starts to solidify around the edges but is still soft). Then, use a hand mixer or whisk to whip it for a few minutes until it reaches a creamy, lotion-like consistency. If you prefer a balm-like texture, you can skip this step.
- Transfer and Store: Carefully pour the cream into your clean glass jar. Allow it to cool completely and solidify before placing the lid on.
- Store: Keep your homemade collagen cream in a cool, dark place. It should last for several months.
How to Use Your DIY Collagen Cream
Apply a small amount of the cream to clean skin, focusing on areas where you’d like to support a smoother, more supple appearance, such as your face, neck, and décolletage. Gently massage it in using upward motions until absorbed. This cream can be used morning and night as part of your regular skincare routine.
Important Tips for Best Results
- Patch Test First: Always perform a patch test on a small area of your skin (like your inner arm) before applying any new DIY product extensively, especially if you have sensitive skin or known allergies.
- Cleanliness is Key: Ensure all your tools, bowls, and storage jars are thoroughly clean and sterilized to prevent contamination and prolong the shelf life of your cream.
- Listen to Your Skin: If you experience any irritation, discontinue use.
This homemade collagen cream is a beautiful way to pamper your skin with natural ingredients, helping it feel hydrated and look radiant. While it won’t permanently remove wrinkles or reverse aging, it offers a nourishing approach to maintaining a healthy, youthful glow.
Give this recipe a try and let us know how your skin loves it!