There’s nothing quite as rewarding as watching tiny seeds transform into vibrant plants right in your own home. Starting your own seeds is a fantastic way to get a head start on the growing season, save money, and cultivate a wider variety of plants than you might find at your local nursery. Whether you dream of a bountiful vegetable patch or a colorful flower garden, seed starting can be a simple and joyful process!
Why Start Seeds Indoors?
Starting seeds indoors offers numerous benefits for gardeners of all levels:
- Extended Growing Season: Give your plants a head start, especially if you live in an area with a shorter growing season.
- Cost Savings: Seeds are significantly cheaper than purchasing mature plants or seedlings.
- Wider Variety: Access to an incredible array of plant varieties that might not be available at local garden centers.
- Control Over Conditions: You can provide optimal growing conditions from day one, ensuring stronger, healthier plants.
- Satisfaction: There’s a unique sense of accomplishment in nurturing a plant from seed to harvest.
DIY Seed Starting Mix for Strong Plant Growth
One of the most crucial elements for successful seed starting is the right growing medium. A good seed starting mix provides the perfect balance of moisture retention, drainage, and aeration that tiny seedlings need to thrive. While you can buy pre-made mixes, creating your own is simple and allows you to customize it to your plants’ needs. Here’s a basic recipe for a fantastic DIY seed starting mix:
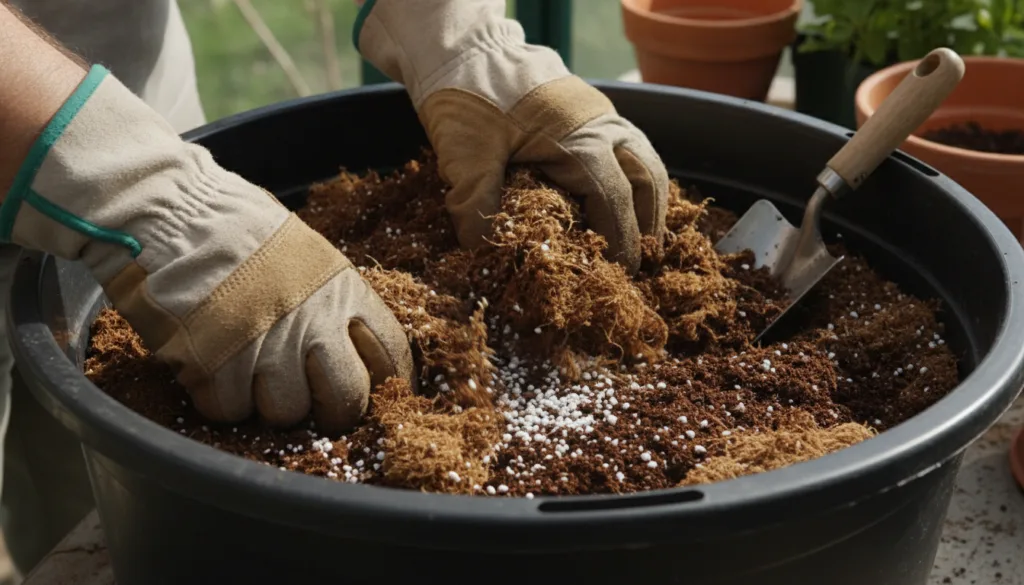
Ingredients:
- 2 parts Peat Moss or Coco Coir: These provide a light, airy base that retains moisture well. Peat moss is traditional, but coco coir is a more sustainable alternative.
- 1 part Perlite: This volcanic rock material improves drainage and aeration, preventing root rot.
- 1 part Vermiculite: Similar to perlite, vermiculite also aids in moisture retention and provides some trace minerals.
- 1/2 part Composted Material (Optional, but Recommended): A small amount of well-rotted compost or worm castings can add beneficial microorganisms and a gentle nutrient boost.
Instructions:
- Combine all ingredients in a large container or on a tarp.
- Mix thoroughly until the ingredients are evenly distributed.
- Lightly moisten the mix with water. It should feel damp, like a wrung-out sponge, but not soggy.
Essential Supplies for Seed Starting
Before you dive in, gather your tools:
- Seed Starting Trays or Containers: Cell packs, peat pots, or even recycled yogurt cups (with drainage holes!) work well.
- Dome or Plastic Wrap: To create a mini-greenhouse effect and maintain humidity.
- Heat Mat (Optional): Many seeds germinate faster with bottom heat.
- Grow Lights: Essential for strong, non-leggy seedlings, especially if you don’t have a very bright south-facing window.
- Spray Bottle: For gentle watering.
- Labels and Marker: To keep track of what you’ve planted.
How to Start Seeds Indoors: A Simple Guide
Follow these easy steps to get your seeds off to a great start:
- Fill Your Containers: Loosely fill your chosen seed starting containers with your DIY mix. Gently tap them to settle the soil, but don’t compact it too much.
- Plant Your Seeds: Refer to your seed packet for specific planting depth. Generally, plant seeds at a depth two to three times their diameter. Tiny seeds can often just be sprinkled on the surface and lightly covered.
- Water Gently: Use a spray bottle or water from the bottom (by placing trays in a shallow pan of water) to moisten the soil without disturbing the seeds.
- Provide Warmth and Humidity: Cover your trays with a clear plastic dome or plastic wrap to create a humid environment. If using a heat mat, place trays on top.
- Monitor for Germination: Keep an eye on your seeds! Once seedlings emerge, remove the plastic cover to allow for airflow.
Caring for Your Young Seedlings
Once your tiny plants sprout, they’ll need consistent care:
- Light: Provide plenty of light – 14-16 hours a day is ideal. Grow lights are often necessary to prevent leggy growth. Keep lights just a few inches above the seedlings.
- Water: Keep the soil consistently moist but never soggy. Water from the bottom if possible, or use a gentle stream to avoid dislodging delicate seedlings.
- Air Circulation: Good airflow helps prevent fungal diseases like damping-off. A small fan can be beneficial.
- Thinning: If you’ve planted multiple seeds per cell, thin them to the strongest one once they have their first set of true leaves.
- Hardening Off: Before transplanting outdoors, gradually expose your seedlings to outdoor conditions over 7-10 days. This process, called hardening off, helps them adapt to wind, sun, and temperature fluctuations.
Starting seeds at home is an incredibly rewarding part of the gardening journey. With a little preparation and care, you’ll be well on your way to enjoying fresh greens, beautiful blooms, and the satisfaction of growing your own plants from tiny beginnings. Happy gardening!