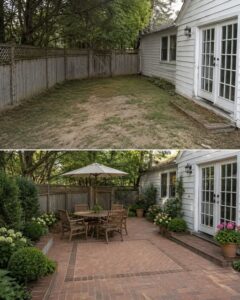
Do you look out at a neglected patch of grass in your yard and dream of something more? That underutilized space, perhaps struggling with patchy growth or awkward placement, holds incredible potential. Imagine it transformed into a charming brick patio – a defined outdoor room perfect for morning coffee, alfresco dining, or simply unwinding with a good book. Creating a dedicated outdoor living area isn’t just about hardscaping; it’s about extending your home’s usable space and deeply connecting with your garden. This guide will walk you through turning that vision into a tangible, beautiful reality, empowering you to create an inviting oasis right in your backyard.
The Power of a Purposeful Patio
A well-designed patio does more than just replace grass; it fundamentally changes how you interact with your outdoor environment. It creates a stable, level surface for furniture, fire pits, and play, making your yard more functional. Aesthetically, it acts as an anchor in your landscape, defining zones and pathways, and adding architectural interest that complements your home. From a gardening perspective, a patio can help manage water runoff, reduce lawn maintenance in tricky areas, and provide a perfect stage for container gardening, bringing your favorite plants right to your doorstep.
Planning Your Dream Brick Patio
Successful hardscaping begins with careful planning. Rushing this stage can lead to costly mistakes and a less-than-ideal outcome. Take your time to envision the space and gather your resources.
Site Selection and Design
- Sunlight and Shade: Observe how the sun moves across your chosen area throughout the day and year. Do you want a sunny breakfast spot or a shaded retreat for summer afternoons? Consider nearby trees or structures that might cast shade.
- Drainage: Ensure the site slopes slightly away from your house (typically 1/4 inch per foot) to prevent water from pooling against your foundation. Good drainage is critical for the longevity of your patio and your home.
- Proximity to Home: Patios are often extensions of living spaces, making access from a kitchen or family room highly desirable for outdoor dining and entertaining.
- Size and Shape: Sketch your patio design on graph paper. Consider how much furniture you want to accommodate and how people will move around it. A dining area for four needs about 10×10 feet, while a lounge area might require more.
- Utilities: Be aware of any buried utility lines (gas, water, electric) before you dig. Always call 811 (in the US) before starting excavation.
Essential Materials and Tools
Before you break ground, ensure you have the right supplies. For a brick patio, you’ll typically need:
- Bricks/Pavers: Choose a style and color that complements your home. Calculate the square footage of your patio and add 5-10% for cuts and breakage.
- Excavation Tools: Shovels, pickaxe (for tough soil), wheelbarrow.
- Measuring and Marking: Tape measure, string line, stakes, spray paint.
- Base Material: Crushed gravel or paver base (typically 4-6 inches deep).
- Leveling Sand: Coarse concrete sand or paver leveling sand (about 1 inch deep).
- Edging: Plastic or metal paver edging to hold the bricks in place.
- Geotextile Fabric: A landscape fabric placed between the excavated soil and the base layer to prevent shifting and weed growth.
- Compaction Tools: A hand tamper or a vibrating plate compactor (rentable) is crucial for a stable base.
- Screed Boards: Straight 2x4s or metal pipes to level the sand layer.
- Rubber Mallet: For gently tapping pavers into place.
- Safety Gear: Gloves, safety glasses, knee pads.
- Joint Sand: Polymeric sand (which hardens when watered) or regular sand for filling gaps between bricks.
Step-by-Step Patio Construction Guide
Building a brick patio is a rewarding DIY project that can be broken down into manageable steps. Precision in each stage ensures a long-lasting and beautiful result.
1. Preparing the Site
Begin by clearing the area of all grass, weeds, and debris. Use stakes and string to mark the exact perimeter of your patio. Excavate the area to the correct depth – typically 6 to 8 inches for a residential brick patio, accounting for the paver base, sand, and brick thickness. Remember to create that gentle 1/4 inch per foot slope away from your house for drainage. Once excavated, compact the subgrade soil thoroughly with a hand tamper or plate compactor.
2. Laying the Foundation
Unroll your geotextile fabric over the compacted soil, overlapping seams by at least 6 inches. This layer helps stabilize the base and prevents weeds. Next, spread your paver base material (crushed gravel) over the fabric to a depth of 4 to 6 inches. Using your compactor, compact this layer in 2-inch lifts until it is firm and even. This is the most crucial step for a stable, durable patio.
3. Installing Edge Restraints
Along the perimeter of your excavated area, install paver edge restraints. These plastic or metal strips are typically secured with long spikes driven into the compacted base. They prevent the bricks from shifting or spreading over time, maintaining the patio’s integrity and shape.
4. Spreading and Leveling Sand
Spread a layer of coarse sand, about 1 inch thick, over the compacted base. This