There’s nothing quite like the taste of fresh, homegrown potatoes – earthy, tender, and bursting with flavor. But what if you don’t have a large garden plot? No problem! Growing your own potatoes is surprisingly easy, even in small spaces, thanks to a variety of DIY container planting methods. Get ready to transform your balcony, patio, or backyard into a thriving potato patch with these creative and simple planter ideas!
Why Grow Potatoes in Containers?
- Space-Saving: Perfect for small gardens, patios, or balconies.
- Pest Control: Easier to monitor and protect plants from ground-dwelling pests.
- Better Drainage: Most containers offer excellent drainage, which potatoes love.
- Easy Harvesting: Simply tip the container over when it’s time to harvest!
- Soil Control: You get to choose and amend your soil mix for optimal growth.
Essential Tips for Successful Container Potato Growing
Before we dive into the DIY ideas, here are some universal tips for all container potato growers:
- Choose the Right Potatoes: Opt for certified seed potatoes to ensure disease-free plants and better yields. You can find them at local nurseries or online.
- Sunlight is Key: Potatoes need at least 6-8 hours of direct sunlight per day.
- Quality Potting Mix: Use a loose, well-draining potting mix. A good blend includes compost, coco coir or peat moss, and perlite or vermiculite. Avoid heavy garden soil, which can compact.
- Consistent Watering: Keep the soil consistently moist but not waterlogged. Containers dry out faster than garden beds.
- Hilling: As your potato plant grows, gradually add more soil or compost around the stems, leaving only the top leaves exposed. This process, called ‘hilling,’ encourages more potatoes to form along the buried stem.
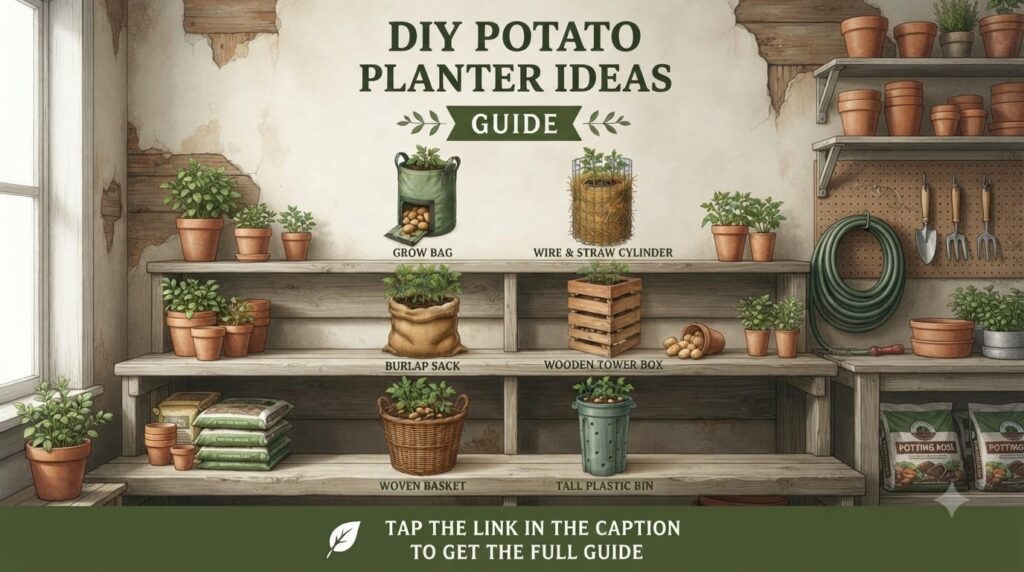
Six Easy DIY Potato Planter Ideas
1. The Classic Grow Bag
Grow bags are fantastic for potatoes. They are lightweight, durable, and their breathable fabric promotes air circulation, preventing root rot. They also make harvesting incredibly easy!
- How to Use: Fold down the sides of the grow bag. Add about 6 inches of potting mix. Place 2-3 seed potatoes. Cover with 3-4 inches of soil. As the plant grows, unfold the bag and add more soil/compost until it’s nearly full.
- Benefits: Excellent drainage, easy to move, simple harvesting.
2. Wire and Straw Cylinder
This creative method uses readily available materials to create a tall, breathable planter.
- How to Make: Form a cylinder with hardware cloth or chicken wire and secure it. Line the inside with a thick layer of straw or hay. Add a layer of potting mix, plant your seed potatoes, and cover. Continue to add layers of straw and soil/compost as the plant grows and you hill.
- Benefits: Great air circulation, good drainage, uses recycled materials.
3. The Versatile Burlap Sack
Burlap sacks (like those used for coffee beans or rice) are inexpensive, breathable, and biodegradable.
- How to Use: Roll down the top of the burlap sack. Add a 6-inch layer of potting mix. Plant your seed potatoes, cover with a few inches of soil. As the plant grows, unroll the sack and add more soil for hilling. Ensure the sack has drainage holes if it’s tightly woven.
- Benefits: Cost-effective, breathable, eco-friendly.
4. Wooden Tower Box
For a more permanent and aesthetically pleasing option, a wooden tower box can be built.
- How to Make: Construct a bottomless wooden box with removable or stackable sides. Start with a short box, plant your potatoes, and then add more boards to increase the height as you hill the plants. You can use untreated cedar or pine.
- Benefits: Durable, attractive, excellent for hilling by adding height.
5. Woven Basket
A large, sturdy woven basket can make a charming and functional potato planter, especially if you line it.
- How to Use: Choose a basket that is at least 15-20 inches deep and wide. Line the basket with landscape fabric or a few layers of newspaper to prevent soil from escaping. Fill with potting mix, plant your potatoes, and follow the hilling process. Ensure adequate drainage by poking holes in the liner if needed.
- Benefits: Decorative, good drainage (if lined properly), can be repurposed.
6. Tall Plastic Bin or Barrel
Repurpose old plastic bins, storage containers, or even food-grade barrels into potato planters.
- How to Use: Crucially, drill several drainage holes in the bottom of the container. Add a 6-inch layer of potting mix, plant your seed potatoes, and cover. As the potato plants grow, continue to add soil and compost for hilling until the bin is almost full.
- Benefits: Uses recycled materials, often readily available, good depth for potato growth.
Harvesting Your Homegrown Bounty
Most potato varieties are ready for harvest 70-120 days after planting. You’ll know they’re ready when the foliage begins to yellow and die back. For earlier ‘new potatoes,’ you can gently dig around the plant before it fully dies back, but for a full harvest, wait until the plant is mostly withered. Carefully tip your container onto a tarp or into a wheelbarrow and sift through the soil to uncover your delicious homegrown treasures!
Start Your Potato Patch Today!
Growing your own potatoes is a rewarding experience, providing fresh, healthy produce right from your home. With these easy DIY planter ideas, you’re well-equipped to start your very own potato patch, no matter how much space you have. Happy gardening!