Hello fellow gardeners! Do you love the fresh aroma of rosemary filling your kitchen or garden? Imagine having an endless supply of this versatile herb right at your fingertips! The good news is, growing rosemary from cuttings is incredibly simple, and water rooting is one of the easiest and most satisfying methods.
Rosemary (Rosmarinus officinalis) is not just a fragrant herb for cooking; it’s also a beautiful evergreen shrub that can add structure and beauty to your garden. Whether you’re looking to expand your herb garden, share with friends, or simply enjoy the propagation process, water rooting is a fantastic way to get started. Let’s dive into this easy guide to growing your own rosemary!
Why Water Rooting for Rosemary?
Water rooting is a popular choice for many plant enthusiasts because it allows you to visually track the root development. It’s a clean method that requires minimal tools and can be done indoors, making it a great project for any season. Plus, there’s something incredibly rewarding about watching new roots emerge!
What You’ll Need
- A healthy rosemary plant (for cuttings)
- Sharp pruning shears or scissors
- A clear glass jar or container
- Clean water (tap water is usually fine)
- Patience!
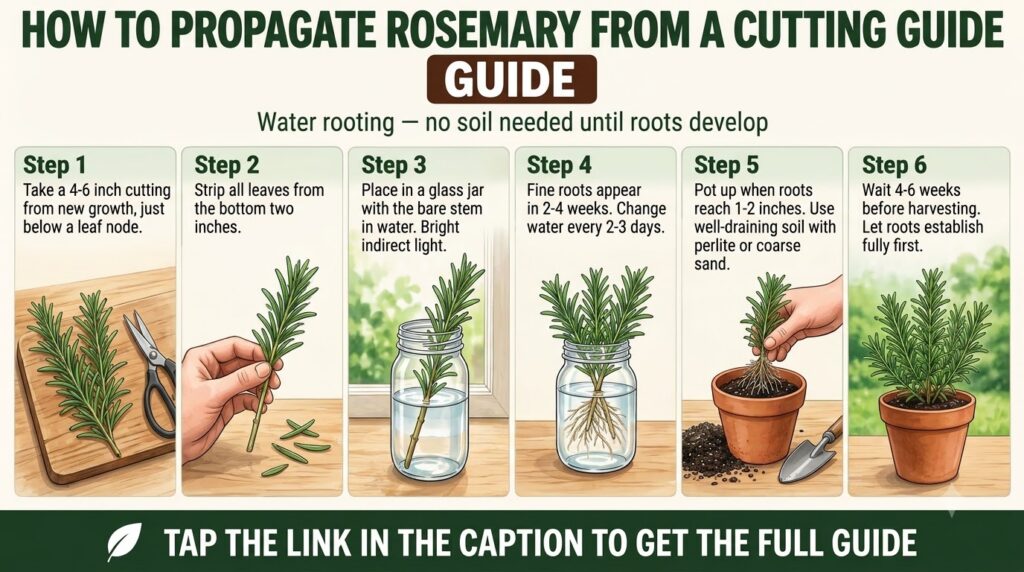
Step-by-Step Guide: Easy Water Rooting for Rosemary Cuttings
Step 1: Select and Prepare Your Cuttings
Choose healthy, non-flowering stems from an established rosemary plant. Look for stems that are about 4-6 inches long and have new, vibrant growth. Avoid stems that are too woody or too soft and new.
- Using sharp, clean shears or scissors, cut just below a leaf node (the point where leaves attach to the stem).
- Remove the leaves from the bottom 2-3 inches of the cutting. This exposes the nodes where roots will form and prevents submerged leaves from rotting in the water.
Step 2: Place Cuttings in Water
Fill your clear glass jar or container with clean water. Place the prepared rosemary cuttings into the water, ensuring that at least 2-3 inches of the stem, including the bare nodes, are submerged.
- Make sure no leaves are touching the water, as this can lead to rot.
- If you have multiple cuttings, you can place several in one jar, but don’t overcrowd them.
Step 3: Find the Right Spot
Place your jar in a bright location that receives indirect sunlight. A windowsill is often perfect, but avoid direct, harsh sun which can overheat the water.
- Maintain a consistent room temperature, ideally between 65-75°F (18-24°C).
Step 4: Change the Water Regularly
This is a crucial step! Change the water every 2-3 days, or whenever it starts to look cloudy. Fresh water provides oxygen and prevents the buildup of bacteria.
- You can gently rinse the stems as well if they feel slimy.
Step 5: Watch for Roots!
Patience is key! In about 3-6 weeks, you should start to see small, white roots emerging from the submerged nodes. The roots will initially be tiny, but they will grow longer and stronger over time.
- Wait until the roots are at least 1-2 inches long before considering potting. This ensures they are robust enough to survive the transition to soil.
Step 6: Potting Your Rooted Rosemary
Once your rosemary cuttings have developed a good root system, they are ready to be transferred to soil.
- Prepare a small pot (about 4-6 inches in diameter) with well-draining potting mix. A mix designed for herbs or cacti can work well.
- Make a small hole in the center of the soil.
- Carefully place the rooted cutting into the hole, ensuring the roots are spread out gently.
- Gently backfill with soil, lightly firming it around the base of the plant.
- Water thoroughly immediately after potting to help settle the soil and reduce transplant shock.
Aftercare for Your New Rosemary Plant
- Watering: Keep the soil consistently moist for the first few weeks after potting, but avoid overwatering. Once established, rosemary prefers slightly drier conditions, so let the top inch of soil dry out between waterings.
- Sunlight: Gradually introduce your new plant to more sunlight. Rosemary thrives in full sun (6-8 hours a day).
- Feeding: Rosemary is not a heavy feeder. You can use a balanced liquid fertilizer at half strength every 4-6 weeks during the growing season, but it’s often not necessary in good soil.
- Pruning: Pinch back new growth to encourage bushier plants.
Troubleshooting Common Issues
- No roots forming: Ensure your cuttings are healthy, the water is fresh, and they are in a warm, bright spot. Sometimes, it just takes a bit more time.
- Cuttings rotting: This is usually due to old water or leaves submerged in the water. Make sure to change water frequently and remove all bottom leaves.
- Leaves yellowing: Could be too much direct sun early on, or inconsistent watering after potting.
Growing rosemary from water cuttings is a rewarding experience that connects you even more deeply with your garden. Not only do you get to enjoy the propagation process, but you’ll also have a thriving, fragrant herb ready for all your culinary adventures and gardening joy.
Happy rooting!