Summer is synonymous with warm weather, outdoor gatherings, and enjoying your garden. However, it often brings an unwelcome guest: insects! Mosquitoes, flies, and other flying pests can quickly turn a pleasant afternoon into a frustrating experience, buzzing around your food and making outdoor relaxation a challenge. While commercial solutions exist, many people prefer a natural, budget-friendly, and easy-to-make alternative that uses ingredients they already have at home.
Imagine being able to enjoy your patio, backyard barbecue, or a quiet evening outdoors without constantly swatting away pests. This guide is for anyone looking for a simple yet effective way to reclaim their outdoor space from bothersome insects. Whether you’re a seasoned DIY enthusiast or a complete beginner, you’ll find these instructions straightforward and practical.
In this comprehensive guide, we’ll walk you through crafting your very own homemade insect trap. You’ll learn exactly what ingredients to use, the simple steps to assemble your trap, and expert tips to maximize its effectiveness. Get ready to enjoy a more comfortable, insect-free environment this summer!
Why You’ll Love This Guide
- Easy to prepare: Requires minimal effort and time.
- Uses common ingredients: Most items are probably already in your pantry.
- Budget-friendly: A cost-effective alternative to commercial traps.
- Beginner-friendly: Simple steps for anyone to follow.
- Eco-friendly: Repurposes plastic bottles and uses natural attractants.
- Effective: Designed to attract and trap a variety of flying insects.
- Great for outdoor spaces: Perfect for gardens, patios, and picnics.
Ingredients/Materials
- 1 large plastic soda bottle (2-liter or similar size)
- 1 cup warm water
- 1/4 cup sugar
- 1 teaspoon active dry yeast
- 1 tablespoon apple cider vinegar (optional, but enhances effectiveness for fruit flies)
- A few drops of dish soap (optional, helps break surface tension)
- String or wire (for hanging, optional)
Equipment Needed
- Sharp knife or scissors (for cutting the plastic bottle)
- Measuring cups and spoons
- Mixing bowl or pitcher
- Spoon or whisk (for mixing ingredients)
- Marker (optional, for marking the cut line)
- Stapler or strong tape (to secure the bottle parts)
Step-by-Step Instructions
1. Prepare Your Bottle (5 minutes)
Thoroughly wash and dry your plastic bottle. Then, use a marker to draw a line around the bottle, just below where the neck starts to narrow significantly. This will be roughly one-third of the way down from the top.
- Why it matters: A clean bottle ensures no residual liquids interfere with your trap’s effectiveness. Marking helps you cut straight.
- Helpful tips: Ensure the bottle is completely dry inside.
- Expected result: A clean, marked bottle ready for cutting.
2. Cut the Bottle (5-10 minutes)
Carefully cut the top section of the bottle along the line you marked. You will now have two pieces: the top (with the spout) and the bottom (the larger reservoir).
- Why it matters: Precision is key here. The top piece will be inverted and placed into the bottom piece, creating a funnel.
- Helpful tips: Use a sharp knife (be very careful!) or sturdy scissors. If starting with a knife, poke a small hole first, then use scissors.
- Expected result: Two separate, cleanly cut plastic bottle parts.
3. Prepare the Attractant Solution (5 minutes)
In a mixing bowl or pitcher, combine 1 cup of warm water and 1/4 cup of sugar. Stir until the sugar is completely dissolved.
- Why it matters: The sugar provides the food source for the yeast, which will produce carbon dioxide, a powerful insect attractant.
- Helpful tips: Warm water helps the sugar dissolve faster.
- Expected result: A clear, sweet water solution.
4. Activate the Yeast (2 minutes)
Add 1 teaspoon of active dry yeast to the sugar solution. Do not stir immediately. Allow it to sit for a minute or two.
- Why it matters: Giving the yeast a moment to hydrate before mixing helps activate it more effectively.
- Helpful tips: Make sure your yeast isn’t expired for best results.
- Expected result: The yeast will begin to foam slightly on the surface, indicating activation.
5. Add Optional Enhancers (1 minute)
Gently stir the yeast solution. If desired, add 1 tablespoon of apple cider vinegar (especially good for fruit flies) and a few drops of dish soap.
- Why it matters: Apple cider vinegar adds an extra scent that appeals to certain insects. Dish soap breaks the surface tension of the liquid, preventing insects from simply sitting on top and escaping.
- Helpful tips: Don’t add too much dish soap, a few drops are enough.
- Expected result: A mixed, slightly cloudy solution ready for the trap.
6. Assemble the Trap (5 minutes)
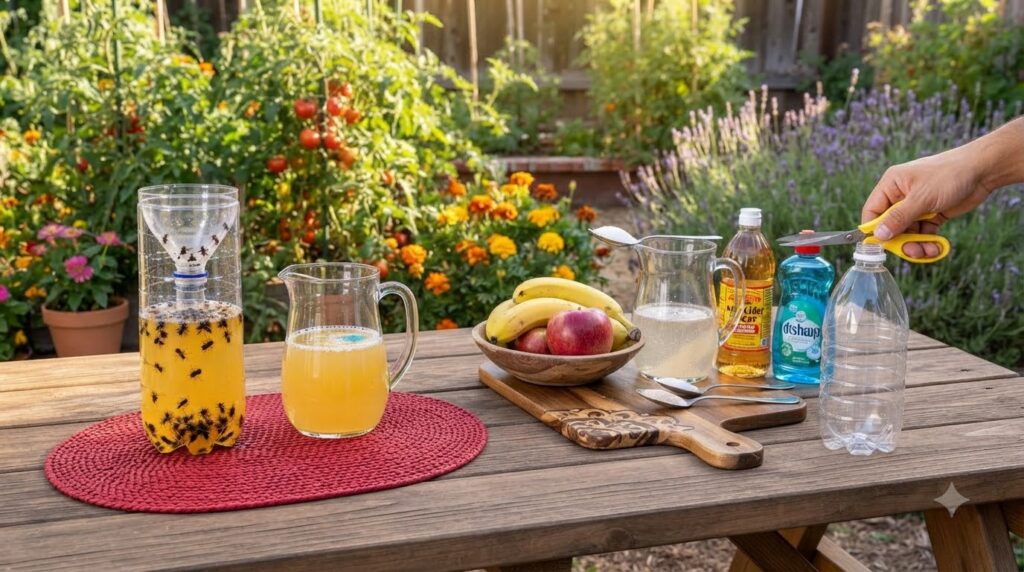
Pour the attractant solution into the larger bottom section of the plastic bottle. Then, invert the top section of the bottle (the part with the spout) and place it upside down into the bottom section, so the spout points downwards towards the liquid but doesn’t touch it.
- Why it matters: This creates a funnel effect. Insects fly into the opening, are attracted to the CO2 and sweetness, and then find it difficult to fly back out.
- Helpful tips: Adjust the height of the inverted top piece to ensure there’s a small gap between the spout and the liquid for insects to enter, but not too large that they can easily escape.
- Expected result: A complete insect trap with a funnel top.
7. Secure and Place Your Trap (5 minutes)
Secure the inverted top piece to the bottom piece using a stapler or strong tape around the rim where the two pieces meet. If you plan to hang the trap, poke two small holes on opposite sides near the top edge and thread string or wire through them.
- Why it matters: Securing the trap prevents it from falling apart and ensures the insects can’t escape easily. Hanging allows for optimal placement.
- Helpful tips: Place traps in shady areas, away from where people gather, but close enough to catch pests. Avoid direct sunlight as it can dry out the mixture too quickly.
- Expected result: A secure, ready-to-use insect trap, optionally hung.
Expert Tips
- Placement is key: Place traps about 10-20 feet away from your main gathering areas (patio, deck) to lure insects away from where you are. Place them in shady spots, as direct sunlight can overheat the solution and kill the yeast, stopping CO2 production.
- Refresh regularly: The solution will be most effective for about 1-2 weeks. After this time, the yeast activity will decrease, and the liquid might become stagnant. Empty, clean, and refill your traps for continuous protection.
- Multiple traps for larger areas: For bigger gardens or patios, consider making several traps and distributing them evenly around the perimeter.
- Target specific pests: While this trap works for many flying insects, adding apple cider vinegar specifically boosts its effectiveness against fruit flies and gnats. For wasps, adding a tiny piece of meat or fruit can make it more appealing.
- Safety first: When emptying the trap, be careful as it will contain many trapped insects. Dispose of the contents responsibly.
- Cleanliness matters: Regularly cleaning the bottle before refilling ensures no mold or bacteria build-up, which could deter insects or create unpleasant odors.
- Adjust sugar content: If you find the trap isn’t working as effectively, you can slightly increase the sugar content to boost yeast activity and CO2 production.
Variations
- Sweet Bait (for wasps/hornets): Instead of just sugar, you can add a small piece of ripe fruit (like banana peel or overripe berries) or a dab of jam/syrup to the bottom of the trap. This can make it more attractive to wasps and hornets.
- Citrus Boost: Add a few lemon or orange peels to the solution. The citrus scent can also attract certain flies and deter others from the area you want to protect, drawing them towards the trap.
- Stronger Soap: If you’re dealing with very persistent insects that seem to escape, ensure you’ve added dish soap. You can add an extra drop or two, but don’t overdo it, as too much soap can deter them.
- Visual Attractants: For some insects, a splash of bright color can be an attractant. While not strictly necessary for this design, some commercial traps use yellow or blue. You could tie a yellow ribbon around your trap’s neck, for instance.
Storage Instructions
Since this trap relies on active yeast and a fermenting solution, it’s not designed for long-term storage once assembled and filled.
- Shelf Life: The attractant solution is most effective for 1-2 weeks. After this period, the yeast activity will diminish, and the solution will become less potent.
- Disposal: When the trap is full or no longer effective, carefully empty the contents into a compost bin or outdoor waste bin. Rinse the bottle thoroughly before refilling.
- Empty Bottle Storage: If you’ve prepared extra cut bottles but haven’t filled them, store the clean, empty plastic parts in a dry place, ready to be assembled and filled when needed.
Safety Notes
- Sharp Objects: Exercise extreme caution when cutting the plastic bottle. Always cut away from your body and use a stable surface. Supervise children if they are assisting.
- Pest Disposal: Be mindful that the trap will contain live and dead insects. Handle it carefully when emptying to avoid stings from still-active wasps or bees (though the primary target is usually flies/mosquitoes).
- Ingredient Safety: All ingredients used are common household items and generally safe. However, the solution is not for human consumption. Keep out of reach of small children and pets to prevent accidental ingestion.
- Placement: Position the trap where it won’t be easily knocked over or disturbed by children or pets.
- No Mixing with Chemicals: Never add other cleaning products or hazardous chemicals to your homemade trap. The natural fermentation process is what makes it effective.
Frequently Asked Questions
- Q: How long does the DIY insect trap last?
- A: The effectiveness of the solution typically lasts for about 1 to 2 weeks, depending on temperature and insect activity. You’ll know it’s time to change the solution when fewer insects are caught, or the liquid appears stagnant.
- Q: Can I prepare the solution in advance?
- A: It’s best to prepare the solution fresh each time you fill the trap. The yeast needs to be active to produce carbon dioxide, and its activity will naturally decrease over time.
- Q: What types of insects does this trap attract?
- A: This trap is primarily effective against flying insects like mosquitoes, flies, gnats, and sometimes wasps, due to the CO2, sugar, and fermentation odors.
- Q: Is it safe for pets and children?
- A: The ingredients are non-toxic household items, but the solution is not intended for consumption. Place the trap in an area inaccessible to small children and pets to prevent accidental ingestion or spills.
- Q: Can I use a glass bottle instead of plastic?
- A: While possible in theory, plastic bottles are much easier to cut and manipulate for this specific design. Glass would be difficult and potentially dangerous to cut safely.
- Q: Does this trap work for all types of insects?
- A: No, it’s most effective for flying insects attracted to sweetness, fermentation, and CO2. It won’t work for crawling insects like ants or spiders, nor for biting insects like horseflies that aren’t attracted to this type of bait.
- Q: How do I know if the yeast is active?
- A: After adding the yeast to the warm sugar water and letting it sit for a minute, you should see a slight foam or small bubbles forming on the surface. This indicates the yeast is activating and producing CO2.
- Q: Can I reuse the plastic bottle parts?
- A: Yes, absolutely! Once you empty the trap, thoroughly clean the plastic bottle parts with soap and water, dry them, and they are ready to be refilled with a fresh solution. This makes it a sustainable solution.
Conclusion
Say goodbye to irritating insect invasions and hello to peaceful outdoor moments! Crafting your own DIY insect trap is a wonderfully simple, cost-effective, and environmentally friendly way to manage flying pests in your garden or patio. With just a few common household items and a little bit of time, you can create a powerful attractant that lures unwelcome guests away from your family and friends.
Remember, consistency is key: refresh your traps regularly and place them strategically for the best results. Embrace the satisfaction of a homemade solution and enjoy your outdoor living spaces to the fullest this summer. Give this DIY project a try, and you’ll be amazed at how effective a simple plastic bottle and a sweet solution can be in keeping your environment bug-free! Happy trapping!