Welcome back to BEAUTY 2, where we love exploring the natural wonders that can enhance our beauty routines! Today, we’re diving into the delightful world of herbal oil infusions. Imagine harnessing the power of aromatic botanicals to create a personalized elixir for your hair and skin right in your own kitchen. It’s simpler than you think and incredibly rewarding!
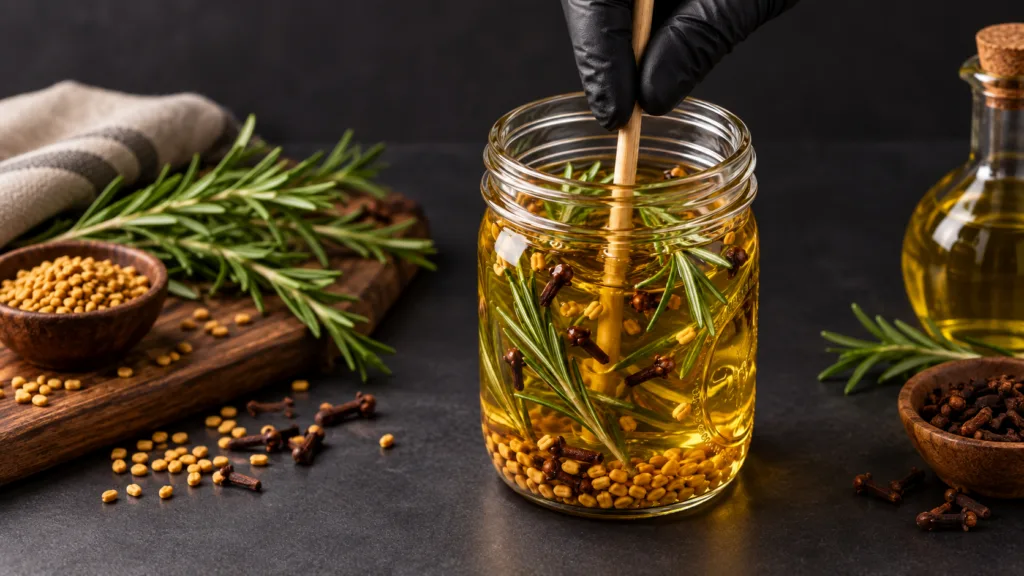
We’re going to guide you through crafting a potent and fragrant blend using three incredible ingredients: rosemary, cloves, and fenugreek. This golden alchemy of nature is perfect for those seeking a natural boost for their beauty rituals.
Why These Natural Powerhouses?
Each ingredient brings its own unique set of benefits to this aromatic oil, making the blend truly special for your hair and skin.
Rosemary: The Invigorator
- Scalp Stimulation: Rosemary is widely loved in DIY beauty for its potential to support a healthy scalp environment, which can contribute to the appearance of stronger, healthier-looking hair.
- Antioxidant Boost: It contains antioxidants that may help protect the skin and scalp from environmental stressors.
- Soothing Aroma: The fresh, herbaceous scent of rosemary is also known for its invigorating and clarifying properties.
Cloves: The Aromatic Protector
- Rich in Antioxidants: Cloves are packed with compounds that act as antioxidants, which can be beneficial for overall skin and scalp health.
- Soothing Sensation: They are often associated with providing a comforting and soothing feeling when applied topically.
- Warm, Spicy Scent: The distinct, warm aroma of cloves adds a lovely dimension to any homemade beauty product.
Fenugreek: The Nourisher
- Hair & Scalp Support: Fenugreek seeds are commonly used in traditional beauty routines, especially for hair care, as people believe they help nourish and strengthen hair, contributing to its shine and smoothness.
- Nutrient-Rich: These small seeds are full of beneficial compounds that can be great for skin and hair.
- Natural Conditioner: When infused, fenugreek can help make hair feel softer and look more manageable.
Choosing Your Carrier Oil
The carrier oil is the base of your infusion, and selecting the right one can make a big difference. Here are a few popular choices:
- Olive Oil: Rich in antioxidants and very moisturizing, great for dry skin and hair.
- Jojoba Oil: Closely mimics the skin’s natural sebum, making it excellent for all skin types, including oily or acne-prone.
- Sweet Almond Oil: Lightweight, nourishing, and easily absorbed, good for sensitive skin.
- Coconut Oil (Fractionated): Stays liquid, is non-greasy, and penetrates well, offering moisturizing benefits.
For this recipe, any of these will work beautifully. Choose one that aligns with your personal preferences and skin/hair needs.
Your Step-by-Step Guide to Crafting the Infusion
Ready to get started? Here’s how you can create your very own aromatic oil infusion:
What You’ll Need:
- Approximately 1/4 cup fresh rosemary sprigs (or 2 tablespoons dried rosemary)
- 2 tablespoons whole cloves
- 2 tablespoons fenugreek seeds
- 1 cup carrier oil of your choice (e.g., olive, jojoba, almond)
- A clean, dry glass jar with a tight-fitting lid (at least 1.5 cups capacity)
- Cheesecloth or a fine-mesh strainer
The Simple Process:
- Prepare Your Ingredients: If using fresh rosemary, gently rinse and pat it completely dry. For both fresh and dried herbs, you might want to lightly bruise or crush the rosemary leaves, cloves, and fenugreek seeds a little bit. This helps release their beneficial compounds more effectively into the oil. You can do this with a mortar and pestle or by gently rolling a rolling pin over them in a bag.
- Combine in the Jar: Place your prepared rosemary, cloves, and fenugreek seeds into your clean glass jar.
- Add Carrier Oil: Pour your chosen carrier oil over the herbs, ensuring they are completely submerged. You want to leave a little space at the top of the jar for easy stirring later.
- Choose Your Infusion Method:
- Solar Infusion (Traditional & Slow): Seal the jar tightly and place it in a sunny spot (like a windowsill) for 2-4 weeks. Give it a gentle shake every day or two. The warmth of the sun helps extract the plant compounds.
- Warm Bath Infusion (Faster): Place the open jar (or a heat-safe bowl with your ingredients) into a saucepan filled with a few inches of water (creating a double boiler). Heat the water gently over low heat for 1-3 hours. Ensure the water doesn’t boil vigorously. This method speeds up the infusion process. Important: Never heat oil directly over high heat.
- Strain Your Infusion: Once your infusion time is complete (longer for solar, shorter for warm bath), strain the oil. Line a fine-mesh strainer with cheesecloth and place it over a clean bowl. Pour the oil and herbs into the strainer, allowing the oil to drain through. Gather the cheesecloth and squeeze out any remaining oil from the herbs.
- Store Your Elixir: Pour the strained oil into a clean, dark glass bottle. Store it in a cool, dark place away from direct sunlight and heat. Properly stored, your infusion can last for several months.
How to Use Your Aromatic Infusion
This versatile oil can be incorporated into your routine in several ways:
- Scalp Massage: Gently massage a small amount into your scalp 30 minutes to an hour before shampooing. This popular beauty routine is believed to help nourish the scalp.
- Hair Mask: Apply generously to your hair, focusing on the ends, and leave it on for 30 minutes before washing.
- Body Oil: Use it as a luxurious post-shower body oil for smoother-looking skin and a wonderful aroma.
Important Tips Before You Try This
- Patch Test: Always perform a patch test on a small area of your skin (like your inner arm) 24 hours before applying the oil more broadly, especially if you have sensitive skin.
- Consistency is Key: Like many natural remedies, consistent, regular use is often recommended to see the best results.
- Patience is a Virtue: Herbal infusions take time. Don’t rush the process, and enjoy the journey of creating your own beauty products.
- No Medical Claims: While these ingredients are popular in traditional and DIY beauty, remember that this oil is not a medicine and cannot cure medical conditions or permanently reverse aging. It’s a wonderful way to support your skin and hair’s natural beauty.
Crafting your own aromatic oil infusion is a beautiful way to connect with nature and take a more hands-on approach to your beauty routine. We hope you enjoy the process and the radiant results!
Have you tried making your own herbal oils? Share your experiences and favorite ingredients in the comments below!