Do you ever find yourself struggling with bulky containers of powders, wishing for a more controlled way to dispense them? Whether it’s for cleaning, gardening, or even in the kitchen, a precise shaker can make a big difference. Instead of buying specialized shakers, why not repurpose an existing plastic lid into a custom dispenser tailored to your needs? This simple DIY hack uses a common kitchen utensil to create perfect holes, saving you money and reducing waste.
This trick is incredibly simple, requires minimal tools, and allows you to create a perfectly sized shaker for anything from baking soda for scrubbing to a homemade laundry booster. It’s a quick, practical solution for everyday household challenges.
What You’ll Need
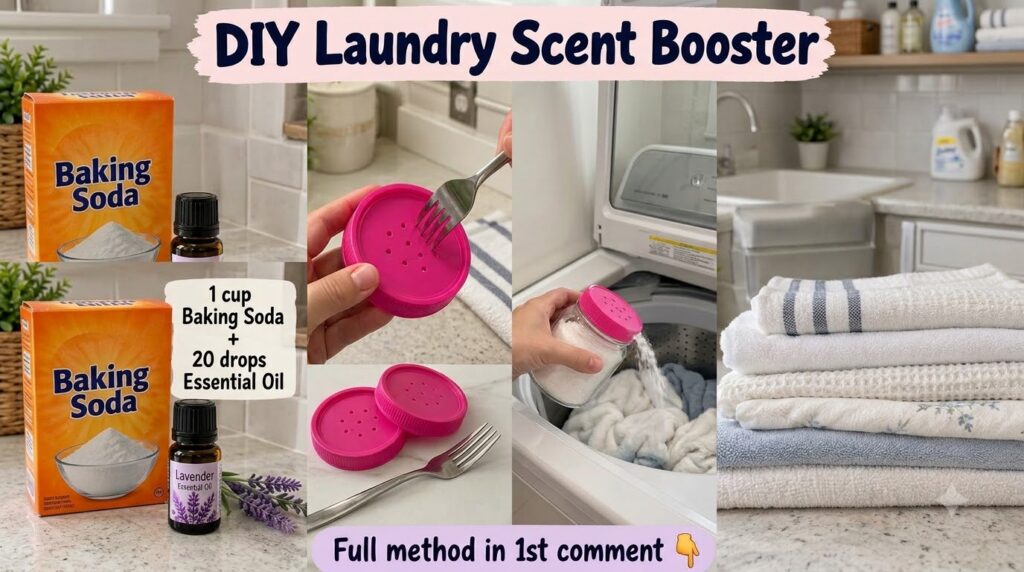
- A clean plastic lid (e.g., from a yogurt container, sour cream tub, or even a larger jar)
- A sturdy metal fork
- A cutting board or other protected work surface
Why This DIY Can Be Useful
This DIY offers a fantastic way to customize your storage and dispensing solutions. Store-bought shakers might have holes that are too big, too small, or simply not ideal for the specific powder you’re using. By creating your own, you control the size and number of holes, ensuring a perfect sprinkle every time. It’s especially useful for things like:
- Cleaning Powders: Precisely sprinkle baking soda on carpets, grout, or surfaces for scrubbing.
- Laundry Boosters: Add a measured amount of oxygen cleaner or homemade laundry powder to your wash.
- Pest Control: Dust diatomaceous earth or other natural repellents in specific areas.
- Gardening: Lightly dust plant leaves with natural pest deterrents or fertilizers.
It also promotes repurposing containers, reducing plastic waste and saving you money on specialized products.
How to Make It
Creating your custom shaker lid is straightforward. Follow these steps for the best results:
- Choose Your Lid: Select a clean, sturdy plastic lid that fits the container you intend to use. Lids from yogurt, sour cream, or even larger tubs work well, depending on the desired container size.
- Prepare Your Workspace: Place the plastic lid on a cutting board or a similar protected surface. This will prevent damage to your countertop when you press down with the fork.
- Start Piercing: Take your metal fork and position the prongs on the lid where you want to create your first hole. Apply firm, steady pressure. You may need to twist the fork slightly to help the prongs pierce through the plastic.
- Create Your Pattern: Continue pressing and twisting the fork to create additional holes. Aim for an even pattern and consistent spacing across the center of the lid. The number and density of holes will depend on how much powder you want to dispense at once.
- Clean Up: Once you have enough holes, carefully examine the lid for any small plastic burrs or rough edges. You can gently scrape these away with the side of the fork or a small knife to ensure a smooth finish.
How to Use It
Once your custom shaker lid is ready, simply attach it to the clean, empty container it was sized for. Fill the container with your desired powdered substance – be it baking soda, a homemade carpet deodorizer, or a laundry additive. Secure the lid tightly and use it just as you would any store-bought shaker. Give it a gentle shake to dispense the powder evenly and with control.
What to Expect
You can expect a functional, custom-made shaker lid that provides controlled dispensing for various powders. The holes created by a fork might not be perfectly uniform like factory-made ones, but they will be effective and allow you to dispense products with much more precision than simply pouring. You’ll have a repurposed container that perfectly suits your specific needs.
Helpful Tips
- Vary Hole Sizes: Experiment with different sized forks or even other pointy objects (like a skewer) to create larger or smaller holes, depending on the coarseness of the powder you’ll be using.
- Heat the Fork (Carefully!): For stubborn or thicker plastic lids, you can carefully heat the tines of the fork over a flame for a few seconds. This will make it much easier to melt through the plastic. Always use caution and protective gloves if trying this method.
- Template for Uniformity: If you want perfectly uniform holes, you can draw a dot pattern on the lid with a marker before you start piercing.
- Patch Test: If you’re unsure about the plastic, test on a hidden part of the lid or a similar scrap piece first.
Important Notes / Safety
- Always exercise caution when piercing plastic with a fork or any sharp object. Keep your fingers clear of the piercing area.
- Ensure the plastic lid is thoroughly clean before use, especially if it previously held food products and you intend to use it for a different purpose.
- If you are heating the fork, do so in a well-ventilated area and be extremely careful not to burn yourself or the plastic excessively.
- Avoid using this method for lids that will be used with very hot liquids, as the plastic might not hold up.
- If the container will be used for food, ensure the plastic is food-safe and thoroughly cleaned before adding any edible contents.