Ah, the joys of having little artists at home! While their creativity knows no bounds, sometimes their canvases extend beyond paper to your freshly painted walls. Those vibrant crayon masterpieces can be a real headache, leaving parents wondering how to restore their walls without resorting to harsh chemicals or damaging the paint.
If you’re nodding along, you’re in the right place! We’ve all been there—discovering an unexpected splash of color on a pristine surface. The good news is, you don’t need a magic wand or expensive specialized cleaners. In fact, the solution might be sitting in your pantry and bathroom cabinet right now.
This guide is for anyone who wants a simple, effective, and non-toxic way to tackle crayon marks. Whether you’re a seasoned parent, a grandparent, or just dealing with an enthusiastic young guest, you’ll find this hack incredibly useful. Say goodbye to scrubbing endlessly and hello to sparkling clean walls!
Why You’ll Love This Guide
- Easy to prepare: Uses common household items you likely already have.
- Budget-friendly: No need to buy expensive, specialized cleaners.
- Non-toxic and gentle: Safe for your family and pets when used as directed.
- Beginner-friendly: Simple, clear steps anyone can follow.
- Effective: Watch those crayon marks disappear like magic.
- Restores walls beautifully: Leaves your walls looking fresh without damage.
Ingredients & Materials
For this effective crayon-removing solution, you’ll only need a couple of common items:
- White Non-Gel Toothpaste: 1 tablespoon (ensure it’s plain white paste, not gel or whitening formulations, as these can contain abrasives or bleaches that might damage your wall paint).
- Baking Soda: 1 teaspoon (a mild abrasive that helps lift the crayon wax).
- Water: A few drops, if needed, to achieve a paste consistency.
Equipment Needed
- Small Mixing Bowl: For combining your ingredients.
- Spoon or Stirring Stick: To mix the paste.
- Soft Cloth or Sponge: For applying the paste and gentle scrubbing.
- Clean, Damp Cloth: For wiping off residue.
- Dry Microfiber Cloth: For drying the area afterward.
Step-by-Step Instructions: Erasure Mission Accepted!
Ready to make those crayon marks vanish? Follow these simple steps for beautifully clean walls. The entire process should take about 5-15 minutes, depending on the size and number of marks.
-
Step 1: Prepare Your Cleaning Paste (Estimated Time: 1 minute)
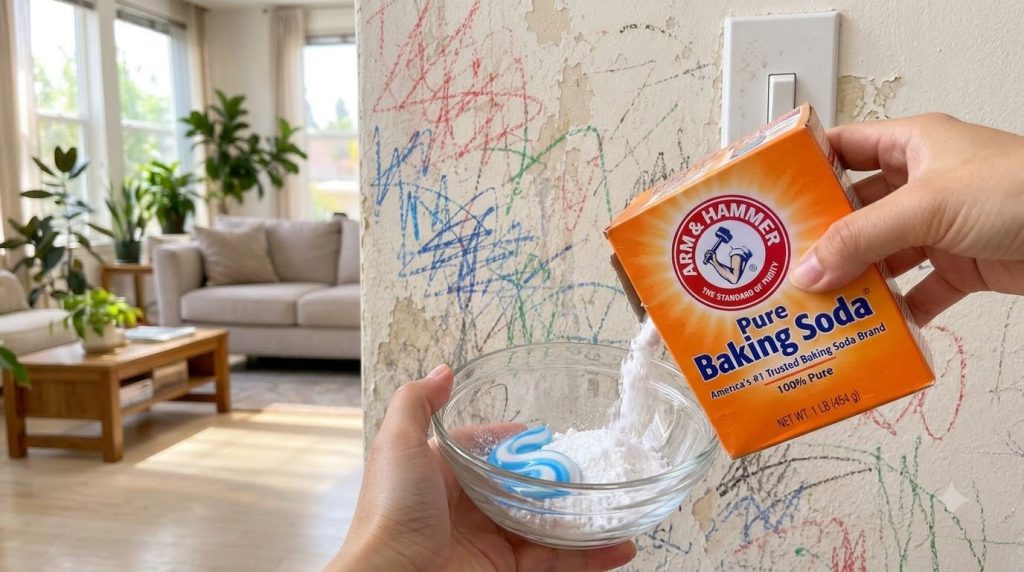
In your small mixing bowl, combine 1 tablespoon of white non-gel toothpaste and 1 teaspoon of baking soda. Stir them together until you form a consistent, slightly thick paste. If the mixture is too dry, add a few drops of water, but be careful not to make it too runny.
-
Step 2: “Patch Test” an Inconspicuous Area (Estimated Time: 2-5 minutes)
Before applying the paste to the crayon mark, always test it on a small, hidden part of your wall (like behind a picture frame or a piece of furniture). Apply a tiny bit of the paste, gently rub, and then wipe off. This step is crucial to ensure the paste doesn’t discolor or damage your paint. Wait a few minutes to see if there are any adverse reactions. If all looks good, proceed!
-
Step 3: Apply the Paste to the Crayon Mark (Estimated Time: 1-2 minutes)
Dab a small amount of the cleaning paste directly onto the crayon mark using your soft cloth or sponge. You don’t need a thick layer, just enough to cover the mark.
-
Step 4: Gently Scrub the Mark Away (Estimated Time: 2-5 minutes)
Using the same soft cloth or sponge, gently rub the paste over the crayon mark in small, circular motions. Apply light pressure—the goal is to slowly lift the wax, not to scrub off the paint. You’ll start to see the crayon color transferring to your cloth. If your cloth gets too dirty, switch to a clean section.
-
Step 5: Wipe and Rinse (Estimated Time: 1-2 minutes)
Once the crayon mark has disappeared or significantly faded, take your clean, damp cloth and gently wipe away all traces of the toothpaste and baking soda residue from the wall. Make sure to get it all, as dried paste can leave a dull film.
-
Step 6: Dry the Area (Estimated Time: 1 minute)
Finish by lightly blotting the cleaned area with a dry microfiber cloth. This prevents any water spots and helps the wall dry evenly. Step back and admire your beautifully restored wall!
Expert Tips
- Always Patch Test: This is the most important tip. Different paints react differently, so a quick test can save you a lot of trouble.
- Use White Toothpaste Only: Avoid gel, striped, or whitening toothpastes. They often contain dyes, abrasives, or bleaches that can stain or damage your wall paint.
- Gentle Pressure is Key: Don’t scrub vigorously. The mild abrasive action of baking soda and the gentle detergents in toothpaste do the work; too much pressure can remove paint.
- Work in Small Sections: If you have a large area of crayon marks, tackle it in small, manageable sections to prevent the paste from drying out.
- For Persistent Marks: For very stubborn marks, you might need to repeat the application and gentle scrubbing process a second time. Let the paste sit on the mark for a minute or two before scrubbing.
- Clean Up Promptly: The sooner you address crayon marks, the easier they are to remove.
- Consider Melamine Foam Erasers: For extremely tough marks that this method struggles with, a “magic eraser” (melamine foam) can sometimes work, but use with extreme caution and always patch test, as they are abrasive and can remove paint if used improperly.
Variations
- For Extra Stubborn Marks: If the initial paste isn’t quite cutting it, try adding a tiny bit more baking soda to increase the abrasive power. Always test this stronger mixture in an inconspicuous area first.
- Fragrance-Free Version: Most white toothpastes are flavored (mint being common). If you’re sensitive to smells, opt for a fragrance-free or unflavored white toothpaste, if available.
- Sensitive Surface Version: For very delicate paints or finishes, you might want to try using just plain white toothpaste first, without the baking soda. The toothpaste alone often has enough mild abrasive and detergent qualities to remove light marks.
Storage Instructions
This cleaning paste is best made fresh right before use. Since it uses common household ingredients, there’s no need to store it. Mixing a small batch ensures maximum effectiveness and prevents any ingredients from drying out or separating over time.
Safety Notes
- Patch Test is Non-Negotiable: As mentioned, always test on an inconspicuous area first. Different paints (flat, satin, semi-gloss) and wall types can react differently.
- Ventilation: While this solution is non-toxic, ensure good ventilation in the room, especially if you’re cleaning a large area.
- Children and Pets: Keep the cleaning paste and any cleaning supplies out of reach of children and pets. While the ingredients are common, they are not meant for ingestion in large quantities. Ensure all residue is completely wiped from the walls after cleaning.
- Avoid Eye Contact: In case of contact with eyes, rinse thoroughly with water.
- Do Not Mix with Other Cleaners: Never mix this DIY solution with commercial cleaning products, especially those containing bleach or ammonia, as this can create dangerous fumes.
Frequently Asked Questions
How long does this DIY crayon remover last once mixed?
It’s best to prepare this paste fresh right before you plan to use it. The ingredients work most effectively when just combined, and the paste can dry out if left sitting.
Can I use any type of toothpaste?
No, it’s crucial to use plain white, non-gel toothpaste. Gel, striped, or whitening toothpastes may contain ingredients like dyes, bleaches, or harsher abrasives that could potentially stain or damage your wall paint.
Does this method work on all types of wall paint?
It works best on washable paints like semi-gloss, satin, and some eggshell finishes. Always perform a patch test on an inconspicuous area first, especially with flat or matte paints, as they are more porous and delicate.
What if the crayon marks are old or deeply embedded?
Older or deeply embedded marks might require a bit more patience and perhaps a second application. Allow the paste to sit on the mark for a minute or two before gently scrubbing. If still stubborn, consider the “magic eraser” tip with extreme caution and patch testing.
Is this solution safe around children and pets?
The ingredients (toothpaste and baking soda) are generally safe household items. However, always ensure children and pets do not ingest the paste and that all residue is completely wiped off the walls after cleaning to prevent any accidental exposure.
Can I use this on wallpaper?
We do not recommend using this method on wallpaper. Wallpaper can be very delicate and may tear, discolor, or absorb moisture, leading to damage. For wallpaper, specialized wallpaper cleaners or professional advice is usually best.
Will it remove other types of marks, like pen or marker?
While this method is specifically for wax-based crayons, toothpaste alone can sometimes help with light pen marks due to its mild abrasive nature. However, it’s less effective on permanent markers. Always patch test before attempting on other stains.
How do I prevent future crayon marks?
Designate specific “art zones” with paper or whiteboards, encourage creativity on appropriate surfaces, and keep an eye on little artists during creative play. Having washable paints on your walls also makes cleanup much easier!
Conclusion
Dealing with crayon art on your walls doesn’t have to be a daunting task. With this simple, non-toxic DIY cleaning hack using common household ingredients like toothpaste and baking soda, you can effectively and safely erase those unwanted masterpieces.
Remember the golden rule of patch testing and using gentle pressure, and you’ll be amazed at how easily your walls can be restored to their former glory. So, next time your little one decides the wall is their canvas, don’t fret! You now have a secret weapon in your cleaning arsenal. Give it a try and enjoy a beautifully clean home!