Are you tired of battling stubborn grime, hard water stains, and lingering odors in your home? Do expensive, chemical-laden cleaners leave you underwhelmed and reaching for more? It’s time to unlock the secret to a truly spotless home with a simple, yet incredibly powerful, DIY cleaning solution!
This homemade concoction uses common household ingredients to tackle even the toughest messes, especially in your bathroom. Get ready to transform your cleaning routine and achieve sparkling results with ease, all while saving money and reducing your exposure to harsh chemicals.
The Secret Weapon: Your DIY Heavy-Duty Cleaner
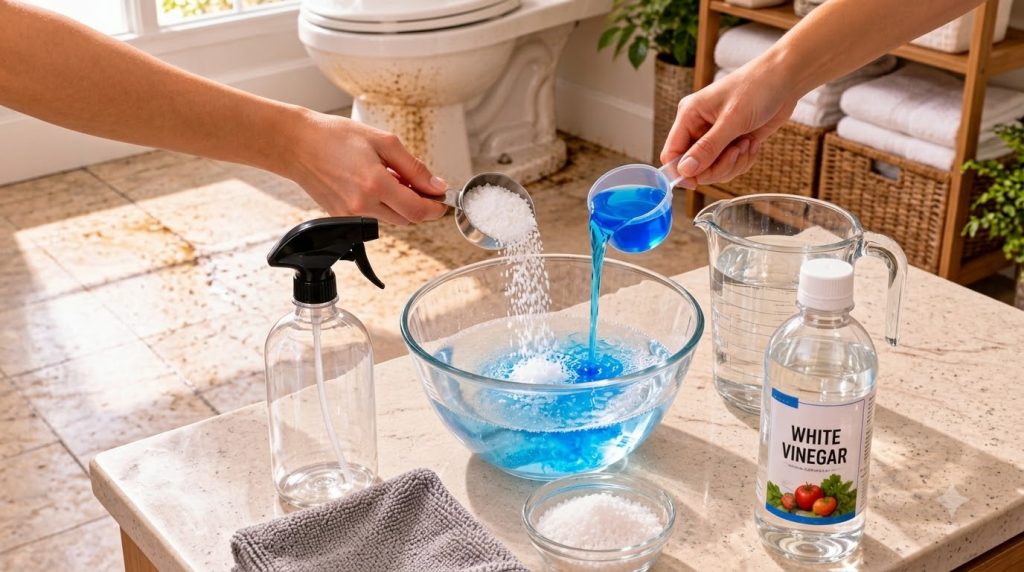
Our star solution combines the power of salt, blue laundry detergent, white vinegar, and water to create a formidable cleaning agent. This isn’t just a surface wipe-down; this is for those moments when you need to bring out the big guns to restore shine and cleanliness to the most challenging areas of your home.
Why These Ingredients Work Wonders
- Salt (Sodium Chloride): More than just a seasoning, salt acts as a gentle yet effective abrasive. Its crystalline structure helps to physically scrub away stuck-on grime, soap scum, and mineral deposits without scratching most surfaces. It also has mild disinfectant properties.
- Blue Laundry Detergent: The surfactants in laundry detergent are excellent at breaking down grease, oils, and general dirt. It helps to lift and emulsify grime, making it easier to rinse away. The ‘blue’ often signifies added brightening agents, but for cleaning surfaces, its primary role is powerful detergency.
- White Vinegar (Acetic Acid): This pantry staple is a cleaning powerhouse. Its acetic acid content dissolves hard water stains, rust, soap scum, and other mineral buildups. It’s also a natural deodorizer and has antimicrobial properties, making it fantastic for disinfecting and eliminating unpleasant odors.
- Water: The universal solvent, water helps to dilute the concentrated ingredients, making them safer and easier to apply, while also serving as the carrier for the cleaning action.
What You’ll Need (Ingredients & Tools)
Ingredients:
- ½ cup coarse salt (such as Kosher or sea salt)
- ¼ cup blue liquid laundry detergent
- ½ cup white vinegar
- 2 cups warm water
Tools:
- Large mixing bowl
- Spoon or whisk for mixing
- Empty spray bottle (optional, for general application)
- Stiff-bristled scrub brush or sponge
- Rubber gloves (highly recommended)
- Microfiber cloths or old rags
Step-by-Step: Mixing Your Powerful Cleaner
- Combine Detergent and Salt: In your large mixing bowl, pour in the ½ cup of coarse salt and ¼ cup of blue liquid laundry detergent.
- Mix Thoroughly: Stir the salt and detergent together with your spoon or whisk until they are well combined into a thick paste.
- Add Water: Slowly add the 2 cups of warm water to the mixture, stirring constantly to help dissolve the salt and integrate the detergent.
- Introduce Vinegar: Finally, pour in the ½ cup of white vinegar. Be aware that the vinegar might react slightly with the detergent, causing a bit of fizzing. This is normal. Stir until the solution is uniform.
- Transfer (Optional): For easier application on larger surfaces, you can carefully pour the mixed solution into an empty spray bottle. For direct scrubbing, keep it in the bowl.
How to Unleash Its Cleaning Power (Application Guide)
For Heavily Soiled Toilets, Tubs, and Showers:
- Apply Liberally: For very soiled areas like a toilet bowl, pour a generous amount of the solution directly into the bowl, ensuring it coats the sides. For tubs and showers, use a sponge to spread a thick layer over the dirty surfaces.
- Let it Sit: Allow the solution to sit for at least 15-30 minutes. For extremely stubborn stains, you can let it sit for an hour or even overnight. This gives the ingredients time to break down grime and mineral deposits.
- Scrub: Donning your rubber gloves, use a stiff-bristled brush or abrasive sponge to scrub the treated areas vigorously. The salt will provide the necessary abrasive action, while the detergent and vinegar work to lift and dissolve the dirt.
- Rinse Thoroughly: Flush the toilet or rinse tubs and showers thoroughly with fresh water until all traces of the solution and grime are gone. Admire the sparkle!
For General Bathroom Surfaces, Tiles, and Grout:
- Spray or Apply: If using a spray bottle, mist the solution onto tiled walls, sinks, or grout lines. If using the bowl, dampen a sponge with the solution and wipe it onto the surface.
- Dwell Time: Let it sit for 5-10 minutes to allow the solution to penetrate the dirt.
- Wipe and Scrub: For tiles and sinks, wipe with a damp microfiber cloth. For grout, a small scrub brush (like an old toothbrush) works wonders.
- Rinse and Dry: Wipe down with a clean, damp cloth to remove any residue, then buff dry with a clean, dry cloth for a streak-free shine.
Best Uses for This Versatile Solution
- Toilet Bowls: Eradicate tough rings, stains, and odors.
- Bathtubs & Showers: Remove soap scum, hard water stains, and mildew buildup.
- Sinks: Restore shine to porcelain or stainless steel sinks.
- Tiled Walls & Floors: Clean dirty tiles and brighten discolored grout.
- Stubborn Floor Stains: Tackle specific tough spots on linoleum or sealed tile floors.
Important Safety Notes & Precautions
- Ventilation is Key: Always ensure good ventilation when cleaning, especially when using vinegar, as its fumes can be strong.
- Wear Gloves: Prolonged contact with cleaning solutions, even natural ones, can irritate skin. Protect your hands with rubber gloves.
- Patch Test: Before applying to a large or delicate area, always perform a patch test in an inconspicuous spot to ensure no discoloration or damage occurs. This is especially important for colored grout or painted surfaces.
- Avoid Natural Stone: Due to the acidic nature of vinegar, avoid using this solution on natural stone surfaces like marble, granite, or travertine, as it can etch and damage them.
- Store Safely: Store any leftover solution in a clearly labeled bottle, out of reach of children and pets.
With this simple yet powerful DIY cleaning solution, you’re equipped to tackle the toughest grime and achieve a sparkling clean home without breaking the bank or relying on harsh chemicals. Give it a try and see the amazing results for yourself!
What’s your go-to DIY cleaning hack? Share your tips and tricks in the comments below!