White sneakers are a fashion staple, effortlessly pairing with almost any outfit. From casual jeans to a chic dress, they add a touch of fresh style. But let’s be honest, keeping them pristine can feel like a full-time job. One wrong step into a puddle, a splash of coffee, or just the wear and tear of everyday life can quickly turn your dazzling whites into dingy grays.
If your favorite white kicks have lost their sparkle and are looking a little worse for wear, don’t despair! You don’t need expensive specialty cleaners or harsh chemicals to restore their former glory. This complete DIY guide will show you how to revive your white sneakers using simple, budget-friendly household ingredients you likely already have on hand.
This guide is perfect for anyone who loves their white sneakers but dreads the thought of cleaning them, or for those looking for an effective, natural alternative to commercial products. Whether your shoes are canvas, synthetic leather, or a mix, we’ll walk you through a tried-and-true method that will leave them looking fresh and new.
By the end of this article, you’ll know exactly how to tackle common sneaker stains, maintain their brightness, and keep them looking impeccable with minimal effort. Get ready to step out in confidence with sneakers that shine as bright as your style!
Quick Summary
- Preparation Time: 10-15 minutes
- Application Time: 30-45 minutes (active cleaning)
- Difficulty Level: Easy
- Best Uses: Restoring white canvas, synthetic leather, and rubber sneaker components
- Suitable Surfaces: Canvas, synthetic leather, rubber soles, plastic parts
- Storage Time: Cleaning solution should be used immediately.
Why You’ll Love This DIY Solution
- Easy to Make: Uses common household items you probably already own.
- Budget-Friendly: Save money on expensive commercial sneaker cleaners.
- Effective: Tackles dirt, grime, and many common stains to restore brightness.
- Beginner-Friendly: Step-by-step instructions make it simple for anyone to follow.
- Gentle on Materials: Less abrasive than harsh chemical cleaners.
- Multipurpose: Some ingredients can be used for various other cleaning tasks.
- Quick to Prepare: Mixes up in just a few minutes.
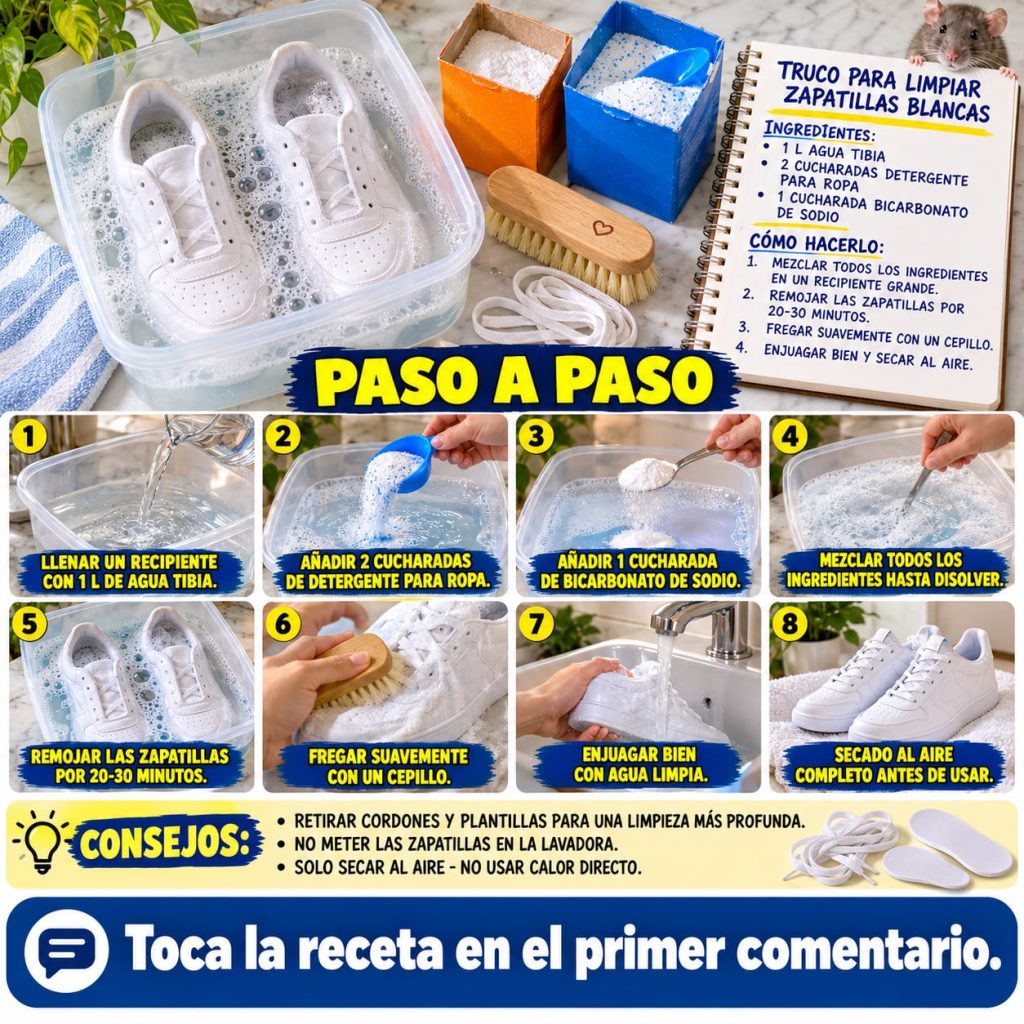 Easily bring your white sneakers back to life with these simple steps.
Ingredients / Materials
- 1/2 cup liquid laundry detergent (mild, bleach-free)
- 1/4 cup baking soda
- 1 gallon warm water (approximately)
- 2-3 drops dish soap (optional, for extra degreasing)
Equipment Needed
- Large basin or tub (big enough to submerge sneakers)
- Stiff-bristled brush (an old toothbrush works well for details)
- Microfiber cloth or old towel
- Small bowl for mixing paste (optional)
- Gloves (optional, but recommended for sensitive skin)
- Old newspapers or paper towels (for drying)
Step-by-Step Instructions
Step 1: Prepare Your Workspace (5 minutes)
Find a well-ventilated area, preferably outdoors or in a utility room, to avoid making a mess indoors. Lay down an old towel or newspaper to protect your surface. Gather all your ingredients and equipment.
Step 2: Remove Laces and Insoles (2 minutes)
For a thorough clean, remove the laces and insoles from your sneakers. This allows you to clean every part of the shoe and ensures the laces get properly cleaned too. You can wash the laces separately by hand or in a mesh bag with a regular laundry cycle.
Step 3: Pre-Rinse and Remove Loose Dirt (3 minutes)
Give your sneakers a quick rinse under running water to remove any loose dirt, mud, or debris. Use your hands or a soft brush to gently rub off surface grime. This prevents dirt from just spreading around during the deep clean.
Step 4: Prepare the Soaking Solution (2 minutes)
In your large basin or tub, pour in about 1 gallon of warm water. Add 1/2 cup of liquid laundry detergent and 1/4 cup of baking soda. If your sneakers have particularly greasy stains, add 2-3 drops of dish soap. Stir well until the baking soda is mostly dissolved and the solution is bubbly.
Step 5: Soak Your Sneakers (30 minutes)
Submerge your white sneakers completely in the prepared cleaning solution. Ensure they are fully saturated. Let them soak for at least 30 minutes. For heavily soiled shoes, you can let them soak for up to an hour. This helps to loosen tough dirt and stains.
Step 6: Scrub Away Stains (15-20 minutes)
After soaking, take one sneaker out of the solution. Dip your stiff-bristled brush into the solution and begin scrubbing the fabric, synthetic leather, and rubber soles. Pay extra attention to stained areas and the rubber edges. Use an old toothbrush for intricate areas like eyelets and seams. Work in small circular motions to lift the dirt. Re-dip your brush as needed.
Step 7: Rinse Thoroughly (5 minutes)
Once you’ve scrubbed both sneakers to your satisfaction, rinse them thoroughly under cool, running water. Make sure to remove all traces of the cleaning solution and any remaining dirt. Squeeze the shoes gently to remove excess water. The water should run clear.
Step 8: Air Dry (24-48 hours)
This is a crucial step! Stuff your sneakers with old newspapers or paper towels to help them retain their shape and absorb moisture from the inside. Do not use heat sources like radiators or direct sunlight, as this can yellow the fabric or damage adhesives. Place them in a well-ventilated area, away from direct heat, to air dry completely. This can take 24-48 hours, depending on humidity. Flip them periodically for even drying.
Best Uses
This DIY cleaning solution is ideal for:
- Canvas Sneakers: Excellent for lifting dirt and stains from fabric uppers.
- Synthetic Leather Sneakers: Safe for cleaning the surfaces without causing damage.
- Rubber Soles and Toe Caps: Highly effective at removing scuffs and restoring the bright white of rubber components.
- Shoe Laces: The soaking solution can also be used to clean dirty white laces.
Surface Limitations: While generally safe for most common sneaker materials, it’s always best to test on a small, inconspicuous area first, especially for shoes with delicate embellishments, dyed suede, or genuine leather. Avoid using this solution on genuine suede or nubuck, as water can stain these materials. For these, specialized dry cleaning methods are recommended.
Safety Notes
- Test First: Always test the cleaning solution on a small, hidden area of your shoe to ensure it doesn’t cause discoloration or damage.
- Ventilation: Work in a well-ventilated area, especially when scrubbing, to ensure fresh air circulation.
- Gloves: If you have sensitive skin, consider wearing gloves to protect your hands from prolonged contact with the cleaning solution.
- Keep Away from Children and Pets: Store all cleaning ingredients safely out of reach of children and pets.
- No Bleach: This recipe does not use bleach. Never mix bleach with other household cleaners unless you are certain of their compatibility, as it can create dangerous fumes. For stubborn yellowing that this method doesn’t address, specific whitening products (often oxygen-based) might be considered, but always follow product instructions carefully.
Expert Tips
- Don’t Forget the Details: Use an old toothbrush or a small detailing brush to get into all the nooks and crannies, including eyelets, seams, and the texture of the rubber soles.
- Address Stains Immediately: The sooner you treat a fresh stain, the easier it will be to remove. Don’t let dirt sit and set into the fabric.
- Regular Maintenance: For long-term brightness, clean your white sneakers regularly, even if they don’t look heavily soiled. A quick wipe-down after each wear can make a big difference.
- Protect After Cleaning: Once your sneakers are completely dry, consider applying a stain and water repellent spray designed for footwear. This can help prevent future stains and make cleaning easier.
- Sole Edge Cleaning: For extra stubborn scuffs on rubber soles, a magic eraser (melamine foam) can work wonders, but use it gently as it can be abrasive.
- Lace Cleaning Hack: If your laces are extremely dirty, try soaking them in a small bowl with the same detergent and baking soda solution while you clean your shoes. Then rinse and air dry.
- Avoid Washing Machine: While tempting, putting sneakers in a washing machine can damage their structure, adhesives, and even cause parts to become unglued. Hand cleaning is always the safest and most effective method for maintaining shoe integrity.
Storage Instructions
The cleaning solution created for this guide is meant for immediate use. Do not store leftover solution, as its effectiveness can diminish over time, and its ingredients may separate. It’s best to prepare a fresh batch each time you clean your sneakers.
For storing your clean sneakers:
- Location: Store them in a cool, dry place away from direct sunlight to prevent yellowing or material degradation.
- Container: If storing for an extended period, consider breathable shoe bags or boxes to protect them from dust and dirt.
- Signs to Discard: The cleaning solution should be discarded immediately after use. If any ingredients like baking soda or detergent show signs of spoilage or clumping, replace them with fresh products.
Frequently Asked Questions
Can I use this solution on colored sneakers?
While the ingredients are generally mild, baking soda and detergent could potentially lighten or fade some delicate dyes. It’s always best to test on an inconspicuous area first, or stick to this method primarily for white sneakers.
How often should I clean my white sneakers?
It depends on how frequently you wear them and how dirty they get. For everyday wear, a light cleaning every 1-2 weeks is good for maintenance, with a deep clean once a month or as needed.
What if my sneakers are extremely yellowed?
This solution is great for dirt and grime. For deep yellowing, especially on rubber, you might need a specialized whitening agent or a dedicated product designed to reverse yellowing, often containing oxygen bleaches. Always follow product instructions carefully.
Can I put my sneakers in the dryer?
No, absolutely avoid putting sneakers in the dryer. The high heat can damage the adhesives, shrink materials, or cause parts of the shoe to warp. Always air dry them.
Is this method safe for leather sneakers?
This method is generally safe for synthetic leather. For genuine leather, use a very minimal amount of moisture and a dedicated leather cleaner, as excessive water can dry out or crack real leather. Always test first.
Can I use a magic eraser for scuffs?
Yes, a magic eraser (melamine foam) can be very effective for removing stubborn scuffs from rubber soles and toe caps. Use it gently, as it works by acting as a very fine abrasive.
Conclusion
Bringing your favorite white sneakers back to life doesn’t have to be a chore or an expensive endeavor. With just a few common household ingredients and a little bit of time, you can effectively remove dirt, grime, and stains, restoring that crisp, clean look you love. This DIY method is not only practical and budget-friendly but also gentle on your shoes, helping to extend their lifespan.
Remember, consistency is key! Regular cleaning and proper drying will keep your white sneakers looking fresh and fabulous, ready to complement any outfit. So, go ahead, gather your supplies, and give your sneakers the spa day they deserve. You’ll be amazed at the transformation and the confidence that comes with stepping out in sparkling white shoes once more. Happy cleaning!