Are you looking for a creative, sustainable, and budget-friendly way to upgrade your chicken coop? Look no further! This DIY Repurposed Tire Nesting Wall is the perfect project for any backyard chicken enthusiast. Not only does it provide a comfortable and private space for your hens to lay their eggs, but it also gives old tires a new lease on life, contributing to a greener planet.
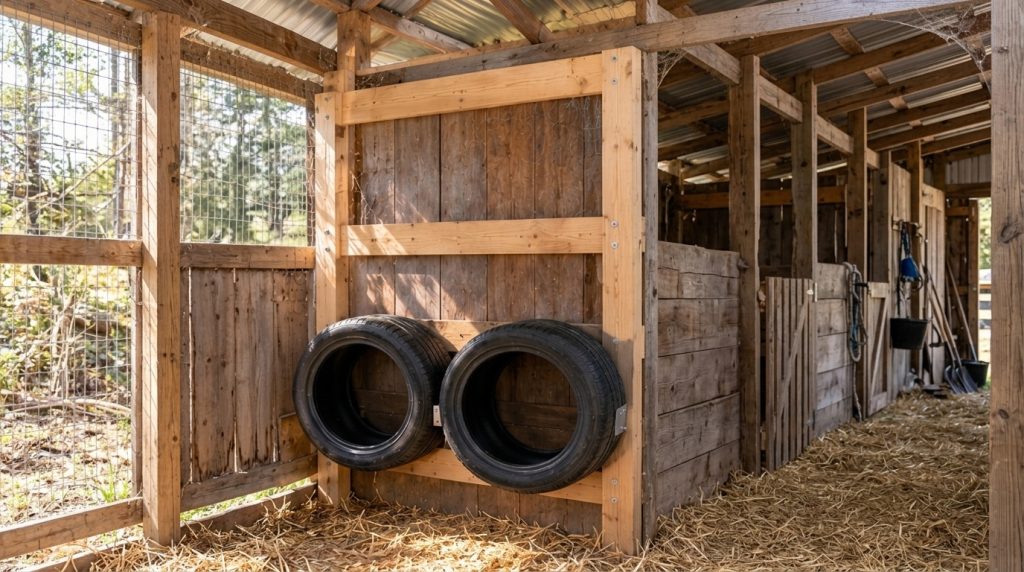
Why Choose a Tire Nesting Wall?
Using old tires for nesting boxes offers several fantastic benefits:
- Sustainability: Repurposing tires reduces waste and gives them a second life.
- Durability: Tires are incredibly sturdy and can withstand various weather conditions, making them long-lasting nesting solutions.
- Insulation: The rubber material provides natural insulation, keeping your hens’ nesting spots cooler in summer and warmer in winter.
- Easy to Clean: Rubber is non-porous and easy to wipe down, helping maintain a hygienic environment for your flock.
- Customizable: You can paint the tires any color you like to match your garden aesthetic or add a pop of fun to your coop.
- Comfort for Hens: The circular shape offers a cozy, secure feeling for hens, encouraging them to lay their eggs there.
Materials You’ll Need
Gathering your materials before you start will make the process smooth and enjoyable!
- Old tires (the number depends on how many nesting boxes you want)
- Exterior-grade paint (non-toxic, animal-safe) and brushes
- Drill with large bit (for drainage holes)
- Utility knife or jigsaw (for cutting tires, if desired)
- Strong adhesive or bolts/screws (for securing tires, if stacking)
- Hay, straw, or wood shavings (for nesting material)
- Measuring tape and marker
Step-by-Step Guide to Building Your Tire Nesting Wall
Step 1: Gather and Clean Your Tires
Start by collecting old tires. Car tires work well, but you might even find larger ones for bigger breeds. Thoroughly clean them inside and out to remove any dirt, oil, or debris. A good scrub with soap and water, followed by a rinse, is recommended. Let them dry completely.
Step 2: Prepare for Drainage
To prevent moisture buildup and ensure a healthy environment for your hens, drill several drainage holes in the bottom of each tire that will be in contact with the ground or another tire. This is crucial if water ever gets inside or if you need to clean them out.
Step 3: Customize (Optional)
If you wish to make an opening for easier access or a slightly different shape, you can carefully cut a section of the tire using a utility knife or jigsaw. Be very cautious, as cutting tires can be difficult and dangerous. Wear appropriate safety gear.
Step 4: Paint for Personality and Protection
This is where the fun begins! Choose vibrant, non-toxic, exterior-grade paints to decorate your tires. Bright colors can make your coop more cheerful and visually appealing. Allow the paint to dry completely according to the manufacturer’s instructions, possibly applying a second coat if needed.
Step 5: Assemble Your Nesting Wall
Decide on the layout of your nesting wall. You can simply place tires side-by-side on the ground, or create a multi-level structure by stacking them. If stacking, consider securing them with strong outdoor adhesive or by drilling holes and using bolts or screws to prevent them from shifting. Ensure the structure is stable and won’t tip over.
Step 6: Add Nesting Material
Once your tire wall is assembled and dry, fill each tire ‘nest’ with a generous layer of clean, soft nesting material like hay, straw, or wood shavings. This provides comfort for your hens and helps keep the eggs clean.
Tips for Happy Hens and a Durable Nesting Wall
- Location is Key: Place your nesting wall in a quiet, somewhat secluded area of the coop where hens feel safe and undisturbed.
- Clean Regularly: Even with drainage, it’s important to regularly check and replace nesting material to maintain hygiene and prevent pests.
- Provide Enough Nests: A general rule of thumb is one nesting box for every 4-5 hens. Adjust the number of tires accordingly.
- Observe Your Flock: Watch how your hens use the new nests. If they seem hesitant, you might need to adjust the location or add more inviting material.
Building a DIY tire chicken nesting wall is a rewarding project that combines sustainability with practicality. Your hens will love their new, cozy spots, and you’ll love the colorful, upcycled addition to your garden and homestead. Happy gardening, and happy hens!