Tackling tough kitchen grime can feel like an endless battle. From burnt-on food spills to sticky grease and stubborn stains, keeping your kitchen sparkling clean often seems to require an arsenal of harsh chemicals. But what if we told you that the secret to a spotless kitchen could be found right in your pantry?
Welcome to the Handy Home Lab, where we believe in the power of simple, natural ingredients to conquer even the most daunting household messes. Today, we’re unlocking the potential of everyday items to create a super-powered DIY kitchen cleaner that will leave your cooking space gleaming without the need for expensive, chemical-laden products.
The Problem: Stubborn Kitchen Grime
Kitchens are high-traffic zones, and they bear the brunt of our daily cooking adventures. Grease splatters from frying, sticky food residue, mineral deposits from hard water, and burnt-on messes on stovetop grates can quickly build up. These types of grime often resist a quick wipe-down, requiring serious elbow grease and specialized cleaners.
However, many commercial cleaners contain harsh fumes and chemicals that can be irritating to skin and respiratory systems. Our goal is to achieve the same sparkling results using ingredients that are safe, effective, and readily available.
Your All-Natural Arsenal: The Ingredients and Why They Work
Our powerful DIY kitchen cleaner harnesses the unique properties of several common household staples. Together, they create a formidable force against dirt and grease.
Baking Soda (Sodium Bicarbonate)
- What it does: A mild abrasive that gently scrubs away grime without scratching surfaces. It’s also a natural deodorizer and has alkaline properties that help break down acidic grease and dirt.
Salt (Sodium Chloride)
- What it does: Acts as an additional gentle abrasive, enhancing the scrubbing power of baking soda. Its granular texture helps lift away dried-on food and residue.
Blue Dish Soap
- What it does: A powerful degreaser that breaks down oily residues. Dish soap acts as a surfactant, reducing the surface tension of water and allowing the other ingredients to penetrate and lift dirt more effectively.
White Vinegar (Acetic Acid)
- What it does: An excellent natural disinfectant and deodorizer. Its acetic acid content cuts through grease, dissolves mineral deposits (like limescale), and helps break down tough stains. When combined with baking soda, it creates a fizzing action that physically helps loosen dirt.
Hot Water
- What it does: Helps to dissolve and activate the ingredients, making them more effective. Hot water also aids in loosening and melting grease, making it easier to wipe away.
Lime
- What it does: Fresh lime adds a pleasant citrus scent and provides additional acidic power (citric acid) to cut through grease. A cut lime half can also serve as a natural scrubbing tool for targeted messes.
Crafting Your Super-Powered Cleaner: Step-by-Step Guide
Get ready to mix up your own batch of kitchen magic! This recipe is perfect for tackling everything from greasy stovetop grates to stained countertops.
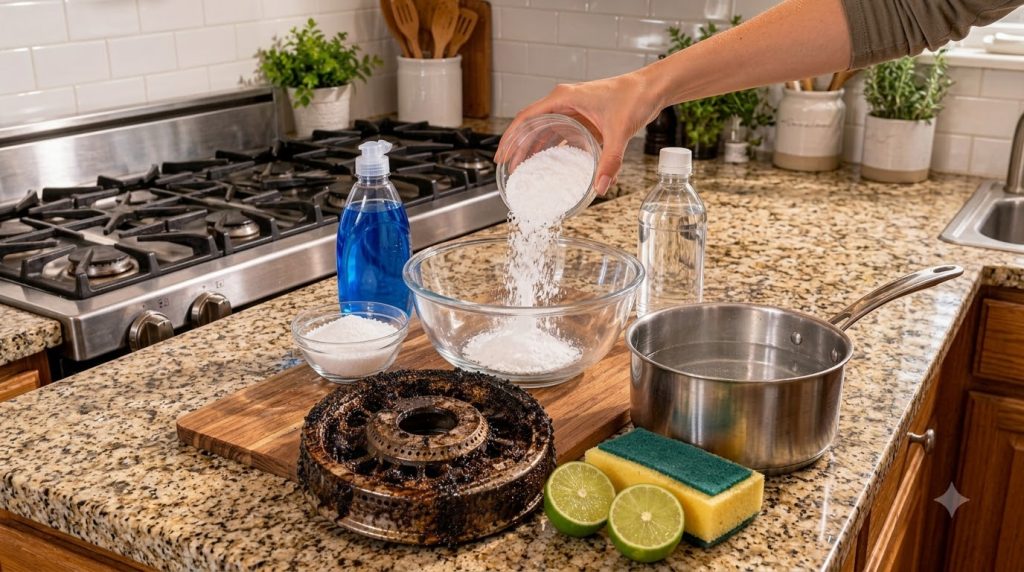
What You’ll Need:
- ½ cup baking soda
- ¼ cup salt
- 2 tablespoons blue dish soap
- ¼ cup white vinegar
- ½ cup hot water (or as needed)
- 1 fresh lime, cut in half
- Large mixing bowl
- Sponge or scrub brush
- Microfiber cloths
Instructions:
- Combine Dry Ingredients: In your large mixing bowl, combine the baking soda and salt. Mix them well to ensure they are evenly distributed.
- Add Dish Soap: Pour in the blue dish soap. This will start to create a thicker consistency.
- Introduce Vinegar: Slowly add the white vinegar. You’ll notice a fizzing reaction as the vinegar reacts with the baking soda. This is normal and helps to loosen grime. Stir gently.
- Adjust with Hot Water: Gradually add the hot water, stirring constantly, until you achieve a thick, workable paste or a slurry-like consistency. You want it thick enough to cling to surfaces but not too dry.
- Prepare the Lime: Cut your fresh lime in half. These halves will be your natural scrubbing tools, especially for tougher spots.
How to Apply and Get Sparkling Results
This cleaner is particularly effective on tough, greasy kitchen surfaces. Here’s how to put it to work:
For Stovetop Grates and Burners:
- Pre-Soak (Optional but Recommended): For heavily soiled grates, remove them and place them in a large sink or basin. Fill with very hot water and a squirt of dish soap, letting them soak for 15-30 minutes to loosen some of the initial grime.
- Apply the Paste: Take your DIY cleaner paste and generously apply it all over the grates and any other greasy stovetop areas. Ensure tough spots are well-covered.
- Let it Dwell: Allow the cleaner to sit for at least 15-30 minutes for moderate grime, or up to several hours (or even overnight) for extremely stubborn, baked-on messes. The longer it sits, the more it can penetrate and break down the grime.
- Scrub Away: Use one of your cut lime halves to scrub the grates. The natural acids in the lime, combined with its texture, make it an excellent scrubber. For intricate areas, use a scrub brush or a rough sponge.
- Rinse Thoroughly: Rinse the grates and other treated areas with hot water. You’ll see the grime washing away.
- Wipe and Polish: Wipe all surfaces dry with a clean microfiber cloth for a streak-free shine.
For Countertops and Sinks:
- Apply a thinner layer of the paste, scrub gently with a sponge or lime, then rinse and wipe clean. Always test on an inconspicuous area first, especially on delicate or porous surfaces.
Beyond the Grates: More Uses for Your Natural Kitchen Cleaner
This versatile solution isn’t just for your stovetop! Once you have a batch mixed, consider these other applications:
- Greasy Backsplashes: Effortlessly cut through cooking grease.
- Stainless Steel Sinks: Polish and remove water spots, leaving a brilliant shine.
- Cutting Boards: Helps to clean and deodorize wooden or plastic cutting boards.
- Oven Interior: For light grease, apply, let sit, and scrub. For heavy oven cleaning, you might need a stronger overnight baking soda paste.
Important Safety Tips and Considerations
- Test First: Always test the cleaner on a small, inconspicuous area of any new surface to ensure no discoloration or damage occurs, especially on natural stone countertops (like marble or granite) where vinegar can be too acidic.
- Ventilate: While these ingredients are natural, ensuring good ventilation when cleaning is always a good practice.
- Gloves: If you have sensitive skin, consider wearing gloves to protect your hands, especially during extended scrubbing.
- Do Not Mix with Bleach: Never mix vinegar with bleach. This combination creates toxic chlorine gas. While bleach isn’t in this recipe, it’s a crucial safety reminder for any home cleaning.
Embrace the power of your pantry and transform your cleaning routine. With these simple, natural ingredients, you can achieve a truly sparkling clean kitchen without compromise. Give this DIY cleaner a try and rediscover the joy of a naturally fresh home!

