Hey gorgeous! Dreaming of a luscious, plump pout but want to steer clear of expensive treatments or harsh chemicals? What if I told you that achieving fuller lips could be as simple as raiding your pantry? Yes, you heard that right! Today, your beauty bestie is sharing a super easy, all-natural DIY lip plumper recipe that will give you noticeable results in just 5 minutes, and for next to nothing!
Forget the fillers; nature has its own magic, and we’re about to tap into it. This simple hack uses everyday ingredients to give you that irresistible pucker you’ve been longing for. Ready to pucker up?
Why Go Natural for Fuller Lips?
In a world full of beauty products, choosing natural remedies for your lips offers a ton of benefits. Not only are you avoiding potentially irritating synthetic ingredients, but you’re also embracing affordability and sustainability. Plus, there’s something incredibly satisfying about whipping up your own beauty potions at home!
- Gentle on your lips: Natural ingredients often mean less irritation, especially for sensitive skin.
- Budget-friendly: You’re likely to have most of these items in your kitchen already!
- No nasty chemicals: You know exactly what’s going into your DIY creation.
- Instant gratification: This recipe promises quick results, perfect for a last-minute boost!
The Magic Behind Your Plump Pout
So, what makes this DIY magic work? It’s all about two key players:
Cinnamon Power
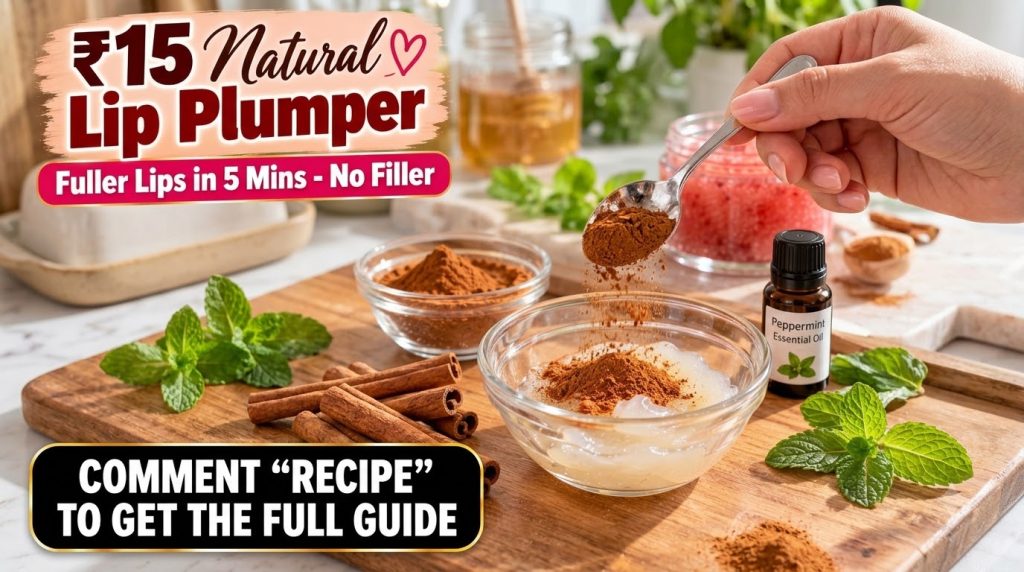
Cinnamon isn’t just for cozy lattes! When applied topically, ground cinnamon acts as a mild irritant. Don’t worry, it’s a good kind of irritation! It gently stimulates blood flow to your lips, causing them to temporarily swell and appear fuller and rosier. You’ll feel a slight tingling sensation, which means it’s working its magic.
The Creamy, Hydrating Base
To carry the cinnamon and keep your lips soft and moisturized, we need a creamy base. This also helps to dilute the cinnamon, making it safe for your delicate lip skin. Great options include:
- Petroleum Jelly (like Vaseline): A classic for lip hydration and protection.
- Coconut Oil: Super moisturizing and has natural anti-inflammatory properties.
- Shea Butter: Rich in vitamins and fatty acids, perfect for nourishing dry lips.
- Honey: A natural humectant that draws moisture to your lips, keeping them supple.
For an extra kick, you can also add a drop of Peppermint Essential Oil, as seen in our inspiration image! Peppermint oil also has a stimulating effect, increasing circulation and giving a refreshing, cool tingle while enhancing the plumping effect.
Your 5-Minute DIY Lip Plumper Recipe
Ready to get started? This is seriously simple!
What You’ll Need:
- 1/2 teaspoon ground cinnamon (make sure it’s fresh!)
- 1 teaspoon of your chosen creamy base (Petroleum jelly, coconut oil, shea butter, or honey)
- Optional: 1 drop of peppermint essential oil
- Small clean container for mixing
- Applicator (a clean finger, cotton swab, or lip brush)
Step-by-Step Instructions:
- Mix Your Base: In your small clean container, add your chosen creamy base.
- Add Cinnamon: Sprinkle in the 1/2 teaspoon of ground cinnamon.
- Optional Peppermint: If using, add 1 drop of peppermint essential oil.
- Stir Well: Mix all ingredients thoroughly until you have a smooth, consistent paste.
- Apply & Plump: Your DIY lip plumper is ready!
How to Apply for Best Results
Here’s how to use your new natural plumper safely and effectively:
- Patch Test First: Before applying to your entire lips, dab a tiny bit of the mixture on a small, inconspicuous part of your lip or inner arm. Wait a few minutes to ensure you don’t have an adverse reaction. A slight tingling is normal, but strong burning or redness means you should wash it off immediately.
- Apply Gently: Using a clean finger, cotton swab, or lip brush, apply a thin, even layer of the plumper over your clean, dry lips.
- Let it Work: You’ll start to feel a tingling sensation almost immediately. Leave the plumper on for about 3-5 minutes.
- Wipe Off: After 5 minutes, gently wipe off the excess mixture with a tissue or damp cloth. Don’t leave it on for too long, as excessive exposure to cinnamon can be irritating.
- Moisturize: Follow up with your favorite hydrating lip balm to lock in moisture and soothe your freshly plumped pout.
Important Tips & Precautions
- Don’t Overdo It: While the results are tempting, use this plumper sparingly – perhaps once or twice a week, or for special occasions.
- Listen to Your Lips: If the tingling becomes uncomfortable or turns into a burning sensation, remove the plumper immediately. Everyone’s skin sensitivity is different.
- Avoid Broken Skin: Never apply this mixture to chapped, cracked, or broken lips. This could cause significant irritation.
- Storage: Store your DIY lip plumper in a cool, dark place. For best freshness, make small batches and use them within a week.
Beyond the Plump: Complete Lip Care
Achieving a beautiful pout isn’t just about plumping; it’s about overall lip health! For consistently soft, smooth, and healthy lips, remember to:
- Exfoliate Regularly: Gently scrub your lips once a week to remove dead skin cells. You can even make a simple sugar scrub at home!
- Hydrate from Within: Drink plenty of water throughout the day to keep your entire body, including your lips, hydrated.
- Protect from the Sun: Use a lip balm with SPF to shield your lips from harmful UV rays.
- Moisturize Daily: Apply a good quality lip balm several times a day, especially before bed.
Ready for Your Perfect Pout?
There you have it, beauty! A simple, natural, and super affordable way to get those fuller, luscious lips you’ve been dreaming of, all in just 5 minutes. Give this DIY lip plumper a try and watch the magic happen. Your beauty bestie can’t wait to hear how it works for you!
Share your results in the comments below, and let’s spread the natural beauty love!