Is your oven looking less-than-sparkling? Baked-on food and grease can make even the thought of cleaning it daunting. But before you reach for harsh chemicals, consider a simple, homemade cleaning paste that can tackle tough grime and leave your oven looking almost new. This DIY method is not only effective but also uses common household ingredients, making it a practical and affordable solution for a gleaming kitchen.
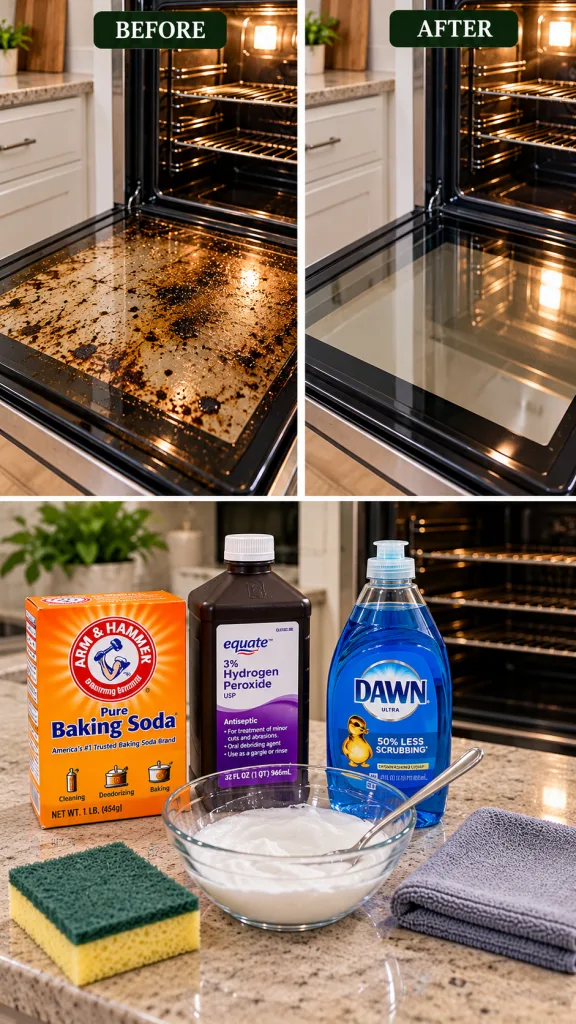 Turn a grimy oven into a sparkling clean one with this simple, effective DIY paste.
What You’ll Need
Gathering your materials is the first step to a cleaner oven. Here’s what you’ll need for this effective DIY solution:
- Ingredients:1/2 to 1 cup Baking Soda
- 3% Hydrogen Peroxide
- 1-2 squirts Dishwashing Liquid (e.g., Dawn Ultra)
- Tools:Mixing bowl
- Spoon
- Scrub sponge
- Microfiber cleaning cloth
- Gloves (recommended for sensitive skin)
Why This DIY Can Be Useful
The combination of these simple ingredients creates a powerful cleaning agent:
- Baking Soda: This acts as a mild abrasive, helping to scrub away stuck-on food without scratching surfaces. It’s also a natural deodorizer, helping to eliminate lingering smells.
- Hydrogen Peroxide: A gentle bleaching agent, hydrogen peroxide helps to lift and break down stubborn stains and discoloration from baked-on grease.
- Dishwashing Liquid: Known for its grease-cutting properties, dish soap helps to emulsify oily residue, making it easier to wipe away.
How to Make It
Creating your cleaning paste is quick and easy:
- Pour 1/2 to 1 cup of baking soda into your mixing bowl.
- Add a few splashes of 3% hydrogen peroxide to the baking soda. Start with a small amount and add more as needed.
- Squeeze in 1-2 squirts of dishwashing liquid.
- Stir with the spoon until a thick, spreadable paste forms. The consistency should be similar to toothpaste. If it’s too thin, add more baking soda; if too thick, add a bit more hydrogen peroxide.
How to Use It
Applying the paste properly is key to achieving the best results:
- First, remove any loose crumbs or large pieces of food from your oven. You can use a spatula or paper towel for this.
- Using your spoon or gloved hands, generously spread the paste over all the soiled interior surfaces of your oven, including the glass door. Pay extra attention to areas with heavy build-up. Avoid direct contact with heating elements or fan vents.
- Allow the paste to sit and work its magic for at least 4-6 hours, or ideally, overnight. The longer it sits, the more effectively it will break down the grime.
- After the waiting period, put on your gloves and use the scrub sponge to gently scrub the treated surfaces. You’ll notice the grime starting to loosen and lift.
- Once scrubbing is complete, use a damp microfiber cloth to wipe away the paste and loosened dirt. Rinse your cloth frequently and continue wiping until all residue is gone and the surfaces are clean.
- For any particularly stubborn spots, you can apply a small amount of fresh paste and let it sit for another hour before scrubbing and wiping again.
What to Expect
With this DIY cleaning paste, you can expect a significant improvement in the cleanliness of your oven. Heavily soiled areas will likely require some scrubbing effort, but the paste will help loosen and break down baked-on grease and food, making the job much easier. The glass door should become clear and sparkling, and the oven interior noticeably brighter. While it might not instantly erase years of neglect, consistent use can maintain a pristine oven.
Helpful Tips
- Pre-Scrape: Before applying the paste, use a plastic scraper or old credit card to gently remove any large, hardened bits of food.
- Wear Gloves: Although the ingredients are common household items, wearing gloves will protect your hands, especially if you have sensitive skin or plan to scrub for an extended period.
- Ventilation: While this DIY uses milder ingredients than commercial oven cleaners, it’s always good practice to ensure good ventilation when cleaning your oven.
- Regular Maintenance: For easier cleaning in the future, try to wipe up spills as they happen or give your oven a quick clean with this paste every few months.
Important Notes / Safety
- Always ensure your oven is completely cool before applying any cleaning solutions.
- Avoid getting the paste into any electrical components, vents, or the pilot light (if applicable).
- Rinse thoroughly. Any leftover residue could potentially smoke when the oven is next heated.
- Store any leftover paste in an airtight container for a short period, although it’s best to make a fresh batch for optimal effectiveness.