Craving the satisfying taste of a cheeseburger but looking for a lighter, low-carb option? These Bacon Cheeseburger Cabbage Cups are your answer! Imagine all the savory, cheesy goodness of your favorite burger, complete with crispy bacon, nestled inside tender, vibrant cabbage leaves. It’s a genius twist that’s packed with flavor, incredibly satisfying, and surprisingly easy to make.
This dish takes classic comfort food flavors and transforms them into a wholesome, family-friendly meal perfect for a weeknight dinner or even meal prep. The cabbage leaves provide a fresh, slightly sweet counterpoint to the rich, savory beef and salty bacon, while the melted cheese ties it all together beautifully. It’s a fun and flavorful way to enjoy a guilt-free burger experience!
Why You’ll Love These Bacon Cheeseburger Cabbage Cups
- Low-Carb & Keto-Friendly: A fantastic alternative to traditional burgers, ditching the bun for nutrient-rich cabbage.
- Packed with Flavor: All the iconic tastes of a bacon cheeseburger are here – savory beef, smoky bacon, sharp cheese, and classic condiments.
- Satisfying & Filling: Despite being low-carb, the protein and healthy fats will keep you feeling full and energized.
- Easy to Make: With straightforward steps, even beginner cooks can create this impressive dish.
- Great for Meal Prep: Cook a batch on the weekend, and enjoy delicious, healthy lunches or dinners throughout the week.
- Family Favorite: A fun and unique way to serve familiar flavors that even picky eaters might enjoy.
Ingredients for Bacon Cheeseburger Cabbage Cups
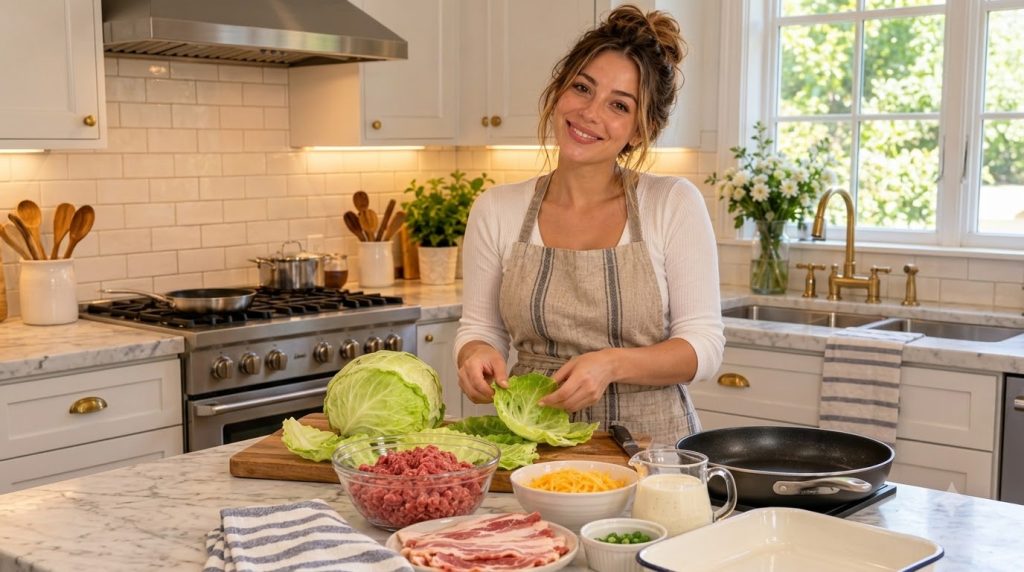
For the Cabbage Cups:
- 1 large head green cabbage (about 2-3 lbs / 1-1.4 kg)
- 1 tbsp (15 ml) olive oil
For the Filling:
- 1 lb (450 g) lean ground beef (80/20 recommended)
- 6 slices bacon, cooked crispy and crumbled
- 1 medium yellow onion, finely diced
- 2 cloves garlic, minced
- 1 cup (110 g) shredded sharp cheddar cheese, plus more for topping
- 2 tbsp (30 ml) unsweetened ketchup (or low-sugar alternative)
- 1 tbsp (15 ml) yellow mustard
- 1 tsp (5 ml) Worcestershire sauce (optional, but adds depth)
- ½ tsp (2.5 ml) garlic powder
- ½ tsp (2.5 ml) onion powder
- Salt and freshly ground black pepper to taste
For Garnish (Optional):
- Dill pickle slices, chopped
- Fresh parsley or chives, chopped
- Sesame seeds
Ingredient Notes
- Cabbage: Choose a large, firm head of green cabbage. Napa cabbage can also work, but may be more delicate to handle.
- Ground Beef: Lean ground beef (80/20) offers great flavor without being overly greasy. You can use leaner beef, but it might require a touch more oil when browning.
- Bacon: Cook your bacon until it’s perfectly crispy, then crumble it. This adds a fantastic smoky, salty crunch to the filling.
- Cheese: Sharp cheddar is classic for cheeseburgers, but feel free to use a Colby Jack, Monterey Jack, or even a mild cheddar.
- Ketchup & Mustard: Using unsweetened or low-sugar versions helps keep the carb count down. Adjust amounts to your taste preference.
Equipment You’ll Need
- Large pot for boiling cabbage
- Large skillet or Dutch oven
- 9×13 inch (23×33 cm) baking dish
- Cutting board and sharp knife
- Mixing bowls
How to Make Bacon Cheeseburger Cabbage Cups
Step 1: Prepare the Cabbage Leaves
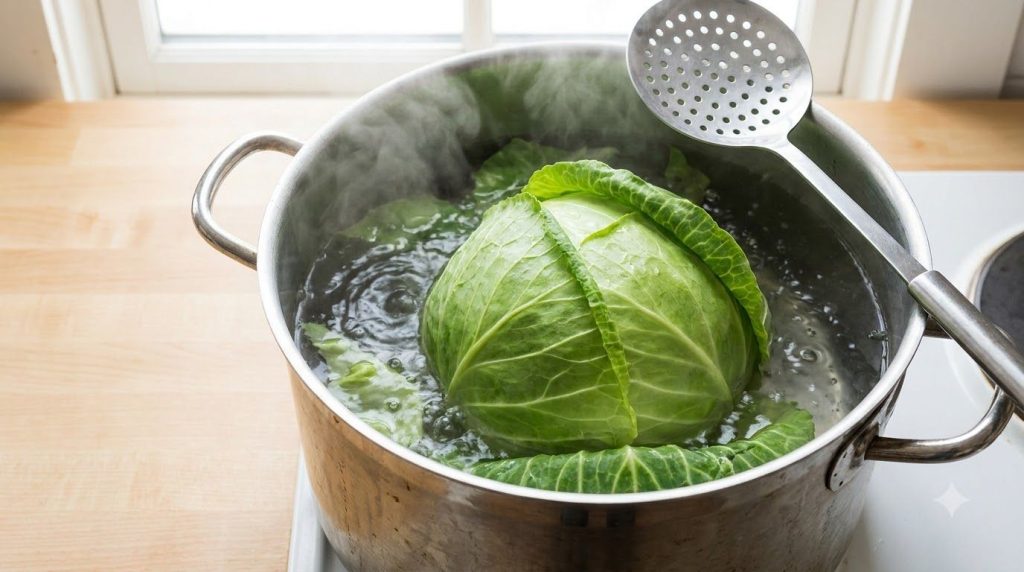
- Core the Cabbage: Carefully remove the core from the bottom of the cabbage head using a sharp knife.
- Blanch the Cabbage: Bring a large pot of salted water to a rolling boil. Carefully place the whole cored cabbage head into the boiling water. Cook for 5-7 minutes, or until the outer leaves soften enough to be peeled off.
- Separate Leaves: Using tongs, carefully remove the softened outer leaves one by one as they become pliable. Place them on a cutting board or plate to cool slightly. Continue blanching and peeling until you have about 12-16 good-sized leaves.
- Trim Thick Ribs: Once cool enough to handle, use a paring knife to carefully shave down the thick central rib of each cabbage leaf, making it easier to roll or fold.
Step 2: Cook the Bacon and Prepare the Beef Filling
- Cook Bacon: In a large skillet or Dutch oven, cook the bacon over medium heat until crispy. Remove the bacon with a slotted spoon, place it on a paper towel-lined plate to drain, and once cool, crumble it. Reserve about 1 tablespoon of the bacon grease in the skillet, draining any excess.
- Brown Beef: Add the olive oil (or additional bacon grease if preferred) to the skillet. Add the ground beef and diced onion. Cook over medium-high heat, breaking up the beef with a spoon, until the beef is fully browned and the onion is softened, about 7-10 minutes.
- Drain Fat: Carefully drain off any excess fat from the skillet.
- Add Aromatics and Seasonings: Stir in the minced garlic, garlic powder, onion powder, Worcestershire sauce, salt, and pepper. Cook for another 1-2 minutes until fragrant.
- Combine Filling: Remove the skillet from the heat. Stir in the crumbled crispy bacon, shredded cheddar cheese (reserving some for topping), ketchup, and mustard. Mix everything until well combined.
Step 3: Assemble the Cabbage Cups
- Preheat Oven: Preheat your oven to 375°F (190°C).
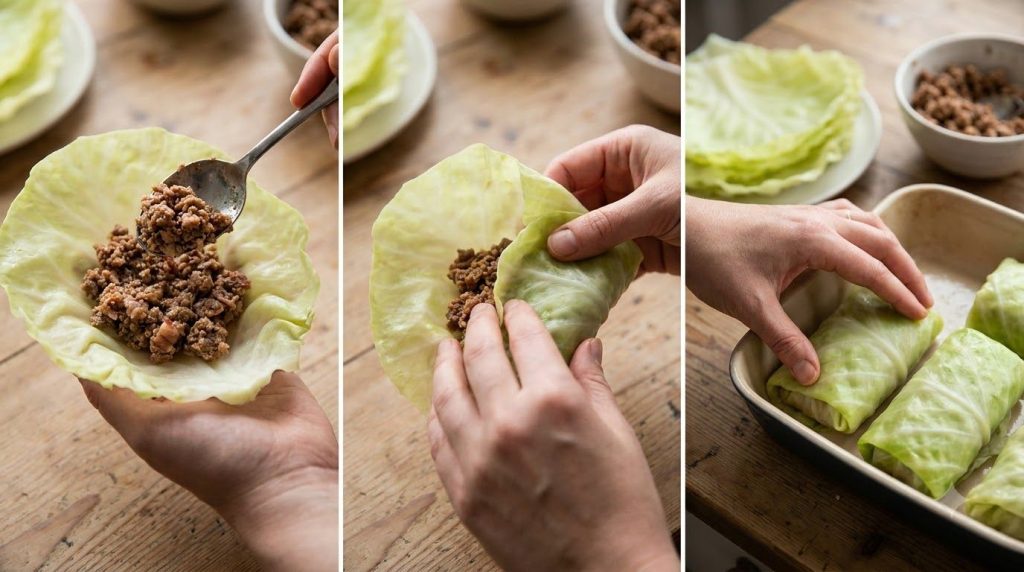
- Fill Cabbage Leaves: Lay a blanched cabbage leaf flat on your work surface. Place about ¼ to ⅓ cup of the beef filling near the stem end of the leaf. Fold the short sides of the leaf over the filling, then roll it up tightly from the stem end to create a neat parcel or cup.
- Arrange in Baking Dish: Place the assembled cabbage cups seam-side down in a 9×13 inch (23×33 cm) baking dish. You may need to overlap them slightly.
Step 4: Bake and Serve
- Bake: Cover the baking dish tightly with aluminum foil. Bake for 20-25 minutes, or until the cabbage is very tender and the filling is heated through.
- Add Cheese Topping: Remove the foil. Sprinkle the remaining shredded cheddar cheese over the top of the cabbage cups. Return to the oven, uncovered, for another 5-10 minutes, or until the cheese is melted and bubbly.
- Garnish and Serve: Let the cabbage cups rest for a few minutes before serving. Garnish with chopped dill pickles, fresh parsley or chives, and a sprinkle of sesame seeds if desired.
Pro Tips for the Best Results
- Blanch Cabbage Properly: Don’t undercook the cabbage leaves; they need to be pliable enough to roll without tearing. Overcooking can make them too flimsy.
- Season Generously: Taste your beef filling before rolling. Cabbage itself is mild, so the filling needs to be well-seasoned to carry the flavor.
- Don’t Overfill: Avoid stuffing the cabbage leaves too much, as this can make them difficult to roll and prone to bursting during baking.
- Use Good Quality Beef: A slightly higher fat content (like 80/20) will provide more flavor and moisture to your filling.
- Drain Excess Fat: After browning the beef, draining the fat is crucial to prevent the filling from becoming greasy.
- Cabbage Size Matters: Use the largest outer leaves for rolling. Smaller, inner leaves can be finely chopped and added to the beef mixture for extra veggie power.
Common Mistakes to Avoid
- Tearing Cabbage Leaves: This usually happens if the leaves aren’t blanched long enough. Ensure they are soft and flexible before attempting to roll.
- Greasy Filling: Not draining the fat from the ground beef after browning can lead to an oily filling and final dish.
- Bland Flavor: If the filling isn’t seasoned adequately, the final dish can taste underwhelming. Don’t be shy with salt, pepper, and your cheeseburger seasonings.
- Under-Baked Cabbage: If the cabbage isn’t cooked long enough, it can be tough. The final dish should have very tender cabbage.
Variations & Substitutions
- Spice It Up: Add a pinch of red pepper flakes to the beef mixture for a little heat.
- Different Cheese: Experiment with other cheese varieties like provolone, smoked gouda, or even a spicy pepper jack.
- Vegetarian Option: Substitute the ground beef with plant-based ground meat or a mixture of finely chopped mushrooms and lentils for a meatless version.
- Extra Veggies: Finely dice carrots or bell peppers and sauté them with the onion for added nutrients and color.
- Sauce It Up: Instead of baking dry, you can pour a can of diced tomatoes or a light marinara sauce over the bottom of the baking dish before adding the cabbage rolls for a saucier dish.
Serving Suggestions
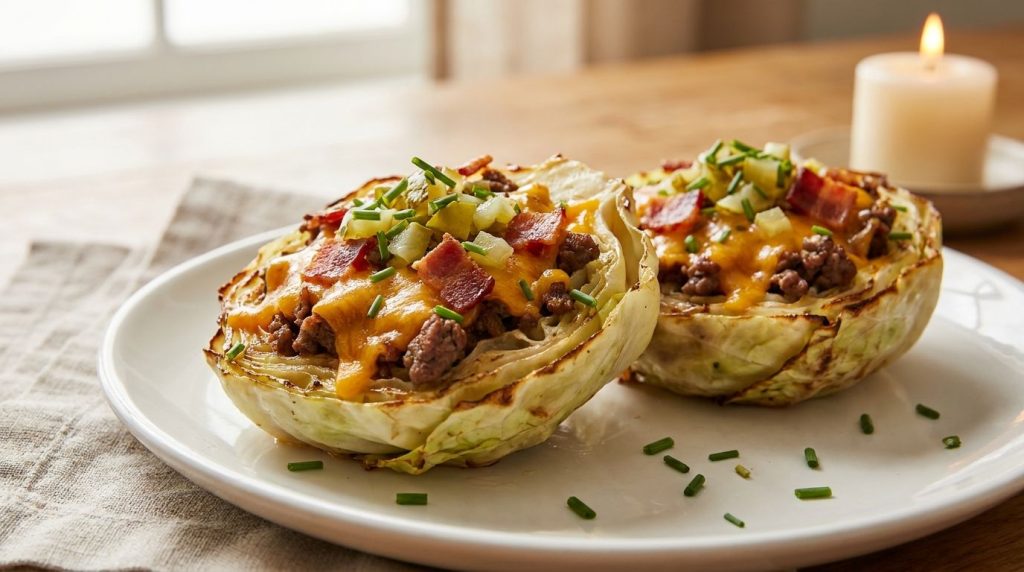
These Bacon Cheeseburger Cabbage Cups are a meal in themselves, but they pair wonderfully with a simple side salad for a complete, fresh meal. You can also serve them with extra dill pickle slices, a side of sugar-free coleslaw, or even a small dollop of sour cream or Greek yogurt for a creamy finish. For a truly authentic burger experience, offer extra ketchup and mustard on the side!
Storage & Reheating
- Refrigerator: Leftover Bacon Cheeseburger Cabbage Cups can be stored in an airtight container in the refrigerator for up to 3-4 days.
- Freezer: These cabbage cups freeze wonderfully! Once completely cooled, place them in a freezer-safe container or freezer bags, separated by parchment paper if stacking, for up to 2-3 months. Thaw overnight in the refrigerator before reheating.
- Reheating: For best results, reheat in the oven at 350°F (175°C) for 15-20 minutes, or until heated through. You can also microwave individual portions until warm, though the texture might be slightly softer.
FAQ
Can I make these Bacon Cheeseburger Cabbage Cups ahead of time?
Yes, absolutely! You can assemble the cabbage cups up to a day in advance and store them, covered, in the refrigerator. Bake just before serving. This makes them perfect for meal prep.
What if I don’t want to use bacon?
If you prefer to omit bacon, you can simply leave it out. The dish will still be delicious with just the cheeseburger-seasoned ground beef. You could also use a vegetarian bacon substitute if desired.
My cabbage leaves are tearing. What am I doing wrong?
This usually means your cabbage leaves weren’t blanched long enough to become truly pliable. Return them to the boiling water for a few more minutes until they are very tender and flexible. Also, be sure to shave down the thick central rib.
Can I use a different type of ground meat?
Yes, you can substitute ground turkey or ground chicken for the ground beef. Just be aware that leaner meats may require a bit more oil to prevent sticking and may result in a slightly drier filling, so adjust accordingly.
How do I know when the cabbage cups are done baking?
The cabbage cups are done when the cabbage leaves are very tender to the touch (you can easily pierce them with a fork) and the filling is thoroughly heated through. The cheese on top should be melted and bubbly.
***
Recipe Card
Bacon Cheeseburger Cabbage Cups
A delicious, low-carb twist on a classic cheeseburger, featuring savory ground beef, crispy bacon, and melted cheese all wrapped in tender cabbage leaves.
- Prep Time: 30 minutes
- Cook Time: 30-35 minutes
- Total Time: 1 hour 5 minutes
- Servings: 4-6 servings
- Course: Main Course
- Cuisine: American
- Cooking Method: Baking, Sautéing
Ingredients:
- For the Cabbage Cups:
- 1 large head green cabbage (about 2-3 lbs / 1-1.4 kg)
- 1 tbsp (15 ml) olive oil
- For the Filling:
- 1 lb (450 g) lean ground beef (80/20 recommended)
- 6 slices bacon, cooked crispy and crumbled
- 1 medium yellow onion, finely diced
- 2 cloves garlic, minced
- 1 cup (110 g) shredded sharp cheddar cheese, plus more for topping
- 2 tbsp (30 ml) unsweetened ketchup (or low-sugar alternative)
- 1 tbsp (15 ml) yellow mustard
- 1 tsp (5 ml) Worcestershire sauce (optional)
- ½ tsp (2.5 ml) garlic powder
- ½ tsp (2.5 ml) onion powder
- Salt and freshly ground black pepper to taste
- For Garnish (Optional):
- Dill pickle slices, chopped
- Fresh parsley or chives, chopped
- Sesame seeds
Instructions:
- Prepare Cabbage: Carefully remove the core from the cabbage. Bring a large pot of salted water to a boil. Place cabbage in water and cook for 5-7 minutes, peeling off softened outer leaves with tongs as they become pliable (aim for 12-16 leaves). Trim thick ribs from leaves.
- Cook Bacon: In a large skillet, cook bacon over medium heat until crispy. Remove, drain on paper towels, and crumble. Reserve 1 tbsp bacon grease in skillet.
- Cook Beef & Onion: Add ground beef and diced onion to the skillet. Cook over medium-high heat, breaking up beef, until browned and onion is softened (7-10 minutes). Drain excess fat.
- Season Filling: Stir in minced garlic, garlic powder, onion powder, Worcestershire sauce (if using), salt, and pepper. Cook for 1-2 minutes until fragrant. Remove from heat.
- Combine Filling: Stir in crumbled bacon, 1 cup shredded cheddar cheese, ketchup, and mustard until well combined.
- Assemble Cups: Preheat oven to 375°F (190°C). Lay a cabbage leaf flat, place ¼-⅓ cup filling near the stem end. Fold short sides over, then roll tightly. Place seam-side down in a 9×13 inch baking dish.
- Bake: Cover dish tightly with foil. Bake for 20-25 minutes, until cabbage is tender and filling is hot.
- Finish with Cheese: Remove foil, sprinkle remaining cheese over cups. Bake uncovered for another 5-10 minutes, until cheese is melted and bubbly.
- Serve: Let rest a few minutes. Garnish with chopped pickles, parsley/chives, or sesame seeds if desired.
Notes:
For best results, ensure cabbage leaves are fully softened before rolling to prevent tearing. Adjust seasonings to your personal taste, especially the ketchup and mustard for that classic burger flavor. Draining the beef fat is key for a non-greasy filling.
Storage:
Store leftovers in an airtight container in the refrigerator for 3-4 days. Freeze cooked and cooled cups for up to 2-3 months. Reheat in the oven or microwave.
Nutrition:
Nutrition information is an estimate and may vary depending on the ingredients and brands used.