Imagine biting into a warm, savory bagel, fresh from your oven, without waiting hours for yeast to rise. Our Garlic Herb Bagels recipe makes that dream a reality! These incredibly easy bagels boast a soft, slightly chewy texture and are infused with aromatic garlic and fragrant herbs, making them a perfect addition to any meal.
Using a clever no-yeast dough, these bagels come together in a flash, allowing you to enjoy homemade goodness in significantly less time than traditional methods. The inclusion of oats, as hinted in the original recipe notes, helps create a wonderfully fluffy crumb that will surprise you with its delightful chewiness. They’re ideal for a quick, satisfying breakfast, a savory snack, or a flavorful side dish.
Whether you’re a seasoned baker or a complete beginner, this recipe simplifies the bagel-making process, bringing the joy of warm, herby bread right to your kitchen counter. Get ready to discover your new favorite quick bake!
Why You’ll Love This Recipe
- Super Fast: No yeast means no long proofing times, significantly cutting down on your waiting. You can bake these in about 20 minutes!
- Simple Ingredients: Made with everyday pantry staples, making it accessible for everyone.
- Delicious Savory Flavor: The potent combination of garlic and herbs creates an irresistible aroma and taste.
- Customizable: Easily swap herbs or add other seasonings to match your preferences.
- Great Texture: Despite being yeast-free, these bagels achieve a pleasing soft and slightly chewy consistency, enhanced by the oat flour.
- Healthier Option: Greek yogurt adds protein and helps create a tender dough without excessive fat.
Ingredients
To create these delightful Garlic Herb Bagels, you’ll need the following:
- 2 cups (240g) self-rising flour, plus more for dusting
- ½ cup (60g) oat flour (or fine-ground rolled oats)
- 1 cup (240g) plain full-fat Greek yogurt
- 2 teaspoons garlic powder, divided
- 2 teaspoons dried Italian seasoning blend (or dried parsley, oregano, or chives), divided
- ½ teaspoon salt (omit if your self-rising flour is already salty)
- 1 large egg, beaten with 1 tablespoon water (for egg wash)
Ingredient Notes
- Self-Rising Flour: This is key to the quick rise without yeast. If you don’t have it, you can make your own by combining 2 cups (240g) all-purpose flour with 3 teaspoons baking powder and ½ teaspoon salt.
- Oat Flour: Adds a lovely subtle flavor and helps create that tender, fluffy texture. You can easily make your own by grinding rolled oats finely in a food processor or coffee grinder.
- Plain Greek Yogurt: Full-fat Greek yogurt yields the best texture and moisture. Avoid non-fat or flavored yogurts, as they can affect the dough’s consistency and flavor.
- Garlic Powder & Dried Herbs: We use these for convenience and even distribution. Feel free to use your favorite dried herbs or a combination. Fresh minced garlic or herbs can also be added but might require slight adjustments to the dough’s moisture.
Equipment You’ll Need
- Large mixing bowl
- Measuring cups and spoons
- Baking sheet
- Parchment paper
- Pastry brush (optional, for egg wash)
How to Make Garlic Herb Bagels
Follow these simple steps to create your own batch of delicious homemade bagels:
- Prepare Your Baking Sheet: Preheat your oven to 400°F (200°C). Line a large baking sheet with parchment paper.
- Combine Dry Ingredients: In a large mixing bowl, whisk together the self-rising flour, oat flour, 1 teaspoon of garlic powder, 1 teaspoon of dried Italian seasoning, and salt (if using). Make sure everything is well combined.
- Add Yogurt: Add the plain Greek yogurt to the dry ingredients. Use a sturdy spoon or spatula to mix until a shaggy dough forms.
- Knead the Dough: Lightly flour a clean work surface. Turn the dough out onto the surface and knead gently for about 5-7 minutes. The dough should become smooth and less sticky. If it’s too sticky, add a tiny bit more self-rising flour, one tablespoon at a time. Be careful not to over-knead.
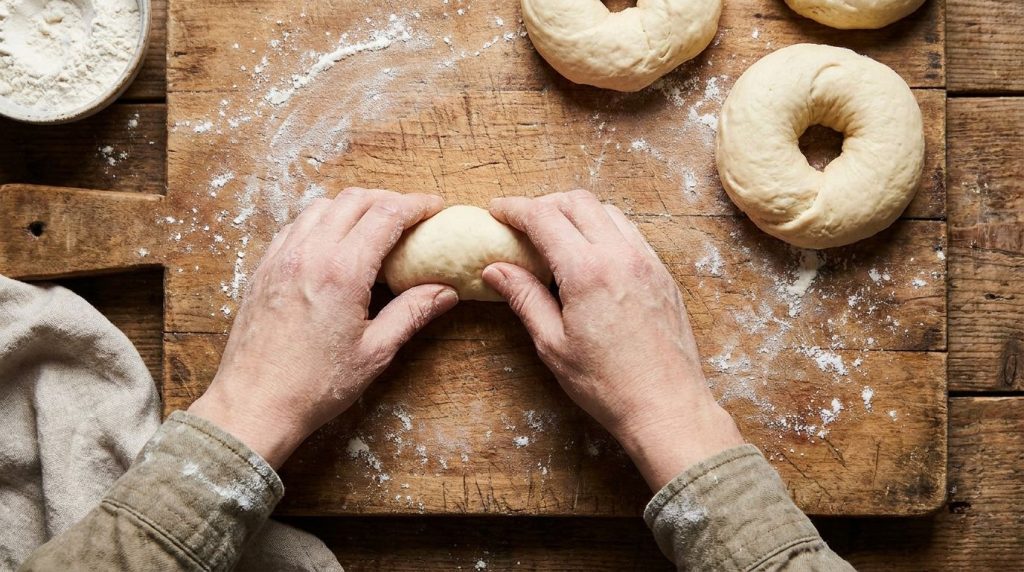
- Shape the Bagels: Divide the dough into 4 or 6 equal portions (4 for larger bagels, 6 for smaller ones). Roll each portion into a log, then connect the ends to form a bagel shape, or press your thumb through the center of a ball of dough and gently stretch to create the hole. Ensure the hole is fairly wide, as it will shrink during baking.
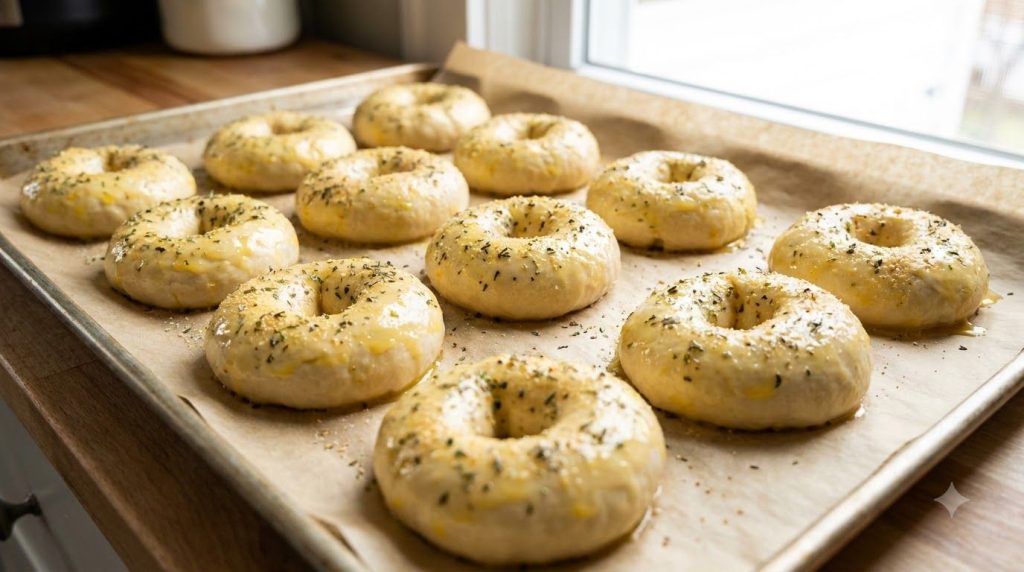
- Prepare for Baking: Place the shaped bagels on your prepared baking sheet, ensuring they have a little space between them. In a small bowl, whisk the egg with 1 tablespoon of water to create an egg wash.
- Egg Wash & Top: Brush the tops and sides of each bagel generously with the egg wash. In a small dish, mix the remaining 1 teaspoon of garlic powder and 1 teaspoon of dried Italian seasoning. Sprinkle this mixture evenly over the tops of the egg-washed bagels.
- Bake: Bake in the preheated oven for 15-20 minutes, or until the bagels are golden brown and cooked through. The exact time may vary slightly depending on your oven and the size of your bagels.
- Cool and Serve: Once baked, transfer the bagels to a wire rack to cool slightly before serving. Enjoy warm!
Pro Tips for the Best Results
- Don’t Overmix: Overmixing the dough can lead to tough bagels. Mix just until combined and then knead gently until smooth.
- Use Full-Fat Greek Yogurt: This provides the best moisture and richness to the dough, resulting in a more tender bagel.
- Flour Your Hands Lightly: If the dough is a bit sticky during shaping, a light dusting of flour on your hands will help prevent it from sticking without making the dough dry.
- Widen the Hole: Make the hole in the center of your bagel a bit larger than you think you need. It will shrink during baking, and you want to ensure it remains a distinct hole.
- Don’t Skip the Egg Wash: The egg wash gives the bagels a beautiful golden sheen and helps the toppings adhere perfectly.
- Customize Your Herbs: Feel free to experiment with different dried herbs like dill, rosemary, or a blend of your favorites.
- Bake Until Golden: Ensure the bagels are deeply golden brown for the best flavor and texture. Pale bagels might still taste doughy.
Common Mistakes to Avoid
- Adding Too Much Flour: Resist the urge to add excessive flour if the dough is a little sticky. Too much flour will result in dry, dense bagels. A lightly floured surface and hands are usually sufficient.
- Over-Kneading the Dough: While a little kneading is good for texture, over-kneading this type of dough can make the bagels tough. Keep it to the recommended 5-7 minutes.
- Not Preheating the Oven: Baking in a cold oven will prevent the bagels from rising properly and achieving that characteristic texture. Always ensure your oven is fully preheated.
- Inconsistent Bagel Size: Try to make your bagels roughly the same size so they bake evenly.
Variations & Substitutions
- Everything Bagel: Instead of garlic and herbs, top your egg-washed bagels with a generous sprinkle of everything bagel seasoning.
- Cheese Bagels: Incorporate ½ cup (60g) shredded cheddar or mozzarella cheese into the dough and sprinkle more on top before baking.
- Sweet Cinnamon Raisin Bagels: Omit the garlic and savory herbs. Add 2 tablespoons sugar or maple syrup, 1 teaspoon cinnamon, and ½ cup (70g) raisins to the dough. Top with a cinnamon-sugar mixture before baking.
- Air Fryer Method: For even faster cooking, air fry your bagels! Preheat your air fryer to 350°F (175°C). Cook for 10-14 minutes, flipping halfway through, or until golden brown. Adjust time based on your air fryer model.
- Gluten-Free Option: You can experiment with a 1:1 gluten-free baking flour blend (that contains xanthan gum) as a substitute for self-rising flour. Results may vary slightly.
Serving Suggestions
These savory Garlic Herb Bagels are incredibly versatile and pair well with a variety of toppings and sides:
- Cream Cheese: A classic choice! Plain, chive, or garlic-infused cream cheese would be delicious.
- Avocado Toast Style: Slice open, toast, and top with mashed avocado, a sprinkle of red pepper flakes, and a squeeze of lime.
- Breakfast Sandwiches: Use them as the base for egg, cheese, and bacon or sausage breakfast sandwiches.
- Soup Dippers: Serve alongside a hearty bowl of tomato soup or chicken noodle soup for a comforting meal.
- Charcuterie Boards: Cut into smaller pieces and serve with dips, cheeses, and cured meats.
Storage & Reheating
- Refrigerator: Store leftover bagels in an airtight container or bag at room temperature for up to 2 days, or in the refrigerator for up to 4 days.
- Freezer: For longer storage, allow the bagels to cool completely, then place them in a freezer-safe bag or container. They can be frozen for up to 2-3 months.
- Reheating: To reheat, slice the bagel in half and toast it in a toaster oven or regular toaster until warm and slightly crispy. If reheating from frozen, you may need to toast for a bit longer or thaw them briefly beforehand.
FAQ
Can I make these Garlic Herb Bagels ahead of time?
You can prepare the dough a few hours ahead and keep it covered in the refrigerator. However, for the best texture, we recommend baking these bagels fresh, as the leavening action of the self-rising flour is best when fresh.
Can I freeze these bagels?
Yes, these bagels freeze very well! Once completely cooled, place them in a freezer-safe bag or container and freeze for up to 2-3 months. Thaw at room temperature or toast directly from frozen.
Why are my bagels dense?
Dense bagels can result from adding too much flour, over-kneading the dough, or using low-fat yogurt. Ensure you measure your flour accurately, knead gently, and use full-fat Greek yogurt for the best results.
What if I don’t have self-rising flour?
No problem! You can easily make your own by whisking together 2 cups (240g) all-purpose flour with 3 teaspoons baking powder and ½ teaspoon salt. Use this mixture exactly as you would self-rising flour in the recipe.
Can I use regular yogurt instead of Greek yogurt?
It’s not recommended. Regular yogurt has a much higher water content and thinner consistency, which will drastically change the dough’s texture and likely make it too sticky or wet to handle. Greek yogurt’s thickness is essential for this recipe.
How do I know when the bagels are done?
The bagels are done when they are deeply golden brown all over and sound hollow when tapped on the bottom. If they’re still pale, they may be undercooked inside.
Garlic Herb Bagels in 20 Minutes!
Whip up these incredibly easy and delicious garlic herb bagels using just a few simple ingredients! Perfect for a quick breakfast or a savory snack. Made with a no-yeast Greek yogurt dough, you can enjoy warm, homemade bagels with amazing flavor and a soft, chewy texture in about 30 minutes total, with just 20 minutes of baking.
Prep Time: 10 minutes
Cook Time: 15-20 minutes
Total Time: 25-30 minutes
Servings: 4-6 bagels
Course: Breakfast, Snack
Cuisine: American
Cooking Method: Baking
Ingredients:
- 2 cups (240g) self-rising flour, plus more for dusting
- ½ cup (60g) oat flour (or fine-ground rolled oats)
- 1 cup (240g) plain full-fat Greek yogurt
- 2 teaspoons garlic powder, divided
- 2 teaspoons dried Italian seasoning blend (or dried parsley, oregano, or chives), divided
- ½ teaspoon salt (omit if your self-rising flour is already salty)
- 1 large egg, beaten with 1 tablespoon water (for egg wash)
Instructions:
- Prepare Your Baking Sheet: Preheat your oven to 400°F (200°C). Line a large baking sheet with parchment paper.
- Combine Dry Ingredients: In a large mixing bowl, whisk together the self-rising flour, oat flour, 1 teaspoon of garlic powder, 1 teaspoon of dried Italian seasoning, and salt (if using). Make sure everything is well combined.
- Add Yogurt: Add the plain Greek yogurt to the dry ingredients. Use a sturdy spoon or spatula to mix until a shaggy dough forms.
- Knead the Dough: Lightly flour a clean work surface. Turn the dough out onto the surface and knead gently for about 5-7 minutes. The dough should become smooth and less sticky. If it’s too sticky, add a tiny bit more self-rising flour, one tablespoon at a time. Be careful not to over-knead.
- Shape the Bagels: Divide the dough into 4 or 6 equal portions (4 for larger bagels, 6 for smaller ones). Roll each portion into a log, then connect the ends to form a bagel shape, or press your thumb through the center of a ball of dough and gently stretch to create the hole. Ensure the hole is fairly wide, as it will shrink during baking.
- Prepare for Baking: Place the shaped bagels on your prepared baking sheet, ensuring they have a little space between them. In a small bowl, whisk the egg with 1 tablespoon of water to create an egg wash.
- Egg Wash & Top: Brush the tops and sides of each bagel generously with the egg wash. In a small dish, mix the remaining 1 teaspoon of garlic powder and 1 teaspoon of dried Italian seasoning. Sprinkle this mixture evenly over the tops of the egg-washed bagels.
- Bake: Bake in the preheated oven for 15-20 minutes, or until the bagels are golden brown and cooked through. The exact time may vary slightly depending on your oven and the size of your bagels.
- Cool and Serve: Once baked, transfer the bagels to a wire rack to cool slightly before serving. Enjoy warm!
Notes:
For best results, use full-fat plain Greek yogurt. If you don’t have self-rising flour, make your own by combining 2 cups all-purpose flour with 3 teaspoons baking powder and ½ teaspoon salt.
Storage:
Store leftover bagels in an airtight container at room temperature for up to 2 days, or in the refrigerator for up to 4 days. For longer storage, freeze in an airtight bag for up to 2-3 months. Reheat by toasting.
Nutrition:
Nutrition information is an estimate and may vary depending on the ingredients and brands used.