Fluffy Japanese Milk Cake: Your Guide to a Cloud-Like Dessert
Prepare to fall in love with the ethereal world of Fluffy Japanese Milk Cake. This isn’t just any cake; it’s a culinary experience renowned for its extraordinary lightness, delicate texture, and subtle, milky sweetness. Imagine biting into a cloud that melts in your mouth – that’s the magic of this beloved Japanese dessert.
This recipe will guide you through creating a dessert that’s both impressive and surprisingly approachable, even for novice bakers. With its incredibly soft crumb and gentle flavor, Japanese Milk Cake is perfect for elevating your afternoon tea, delighting guests at a dinner party, or simply treating yourself to a moment of pure, melt-in-your-mouth joy. Get ready to bake a dessert that feels like a sweet, edible dream.
Why You’ll Love This Fluffy Japanese Milk Cake Recipe
- Unforgettable Texture: Experience a cake so soft and airy, it truly feels like eating a cloud.
- Simple Ingredients: Made with common pantry staples, making it accessible for any home baker.
- Impressive Yet Easy: While it looks sophisticated, our step-by-step instructions make it straightforward to achieve perfect results.
- Versatile Delight: Perfect for any occasion, from a casual dessert to an elegant gathering.
- Comforting Flavor: Its subtle sweetness and rich milky notes offer a soothing, delightful taste.
- Satisfying Baking Project: There’s immense satisfaction in creating such a delicate and beautiful cake from scratch.
Ingredients
Here’s what you’ll need to make this delightful Fluffy Japanese Milk Cake:
Dry Ingredients:
- 1 cup (120 g) all-purpose flour
- 2 tablespoons (15 g) cornstarch
- 1 teaspoon (5 g) baking powder
- 1/4 teaspoon (1.5 g) salt
Wet Ingredients:
- 1/2 cup (120 ml) whole milk
- 1/4 cup (60 ml) neutral vegetable oil (like canola or grapeseed)
- 1 teaspoon (5 ml) vanilla extract
- 6 large eggs, separated (at room temperature)
- 3/4 cup (150 g) granulated sugar, divided
Ingredient Notes
- Flour: While all-purpose flour works beautifully, for an even finer and more tender crumb, you can substitute it with cake flour. If using cake flour, omit the cornstarch.
- Milk: Whole milk is recommended for the best flavor and richness, contributing to the cake’s tender texture.
- Eggs: Ensure your eggs are at room temperature. This helps the egg yolks emulsify better with the other wet ingredients and allows the egg whites to whip up into a more stable, voluminous meringue, which is crucial for the cake’s signature fluffiness.
- Neutral Oil: Choose an oil with a mild flavor so it doesn’t overpower the delicate taste of the cake.
- Cornstarch: This ingredient helps to tenderize the all-purpose flour, mimicking some of the properties of cake flour and preventing the cake from becoming too tough.
Equipment You’ll Need
- 8-inch (20 cm) round cake pan
- Parchment paper
- Large mixing bowls (at least two)
- Electric hand mixer or stand mixer with whisk attachment
- Fine-mesh sieve or sifter
- Rubber spatula
- Whisk
- Larger roasting pan or baking dish (for the water bath)
How to Make Fluffy Japanese Milk Cake
Follow these steps to bake your perfect, cloud-like cake:
- Prepare Your Pan and Oven: Preheat your oven to 325°F (160°C). Lightly grease an 8-inch round cake pan and line the bottom with a circle of parchment paper. Do not grease the sides; this allows the cake to climb up the pan as it bakes. Place a larger roasting pan or baking dish on the bottom rack of your oven.
- Sift Dry Ingredients: In a medium bowl, sift together the all-purpose flour, cornstarch, baking powder, and salt. Sifting helps to eliminate lumps and incorporate air, contributing to a lighter cake. Set aside.
- Combine Wet Ingredients (Yolk Mixture): In a large mixing bowl, whisk together the whole milk, vegetable oil, vanilla extract, and egg yolks until well combined and smooth.
- Gently Mix Batter: Gradually add the sifted dry ingredients into the yolk mixture, whisking gently until just combined. Be careful not to overmix; a few small lumps are acceptable. Overmixing can lead to a tough cake.
- Whip Egg Whites (Meringue): In a separate, clean, large mixing bowl, using an electric mixer, begin whipping the egg whites on medium speed. Once they become foamy, gradually add half of the granulated sugar (3/8 cup or 75 g) while continuing to whip. Increase speed to high and continue whipping until stiff peaks form. The meringue should be glossy and hold its shape when the whisk is lifted, but not dry or crumbly.
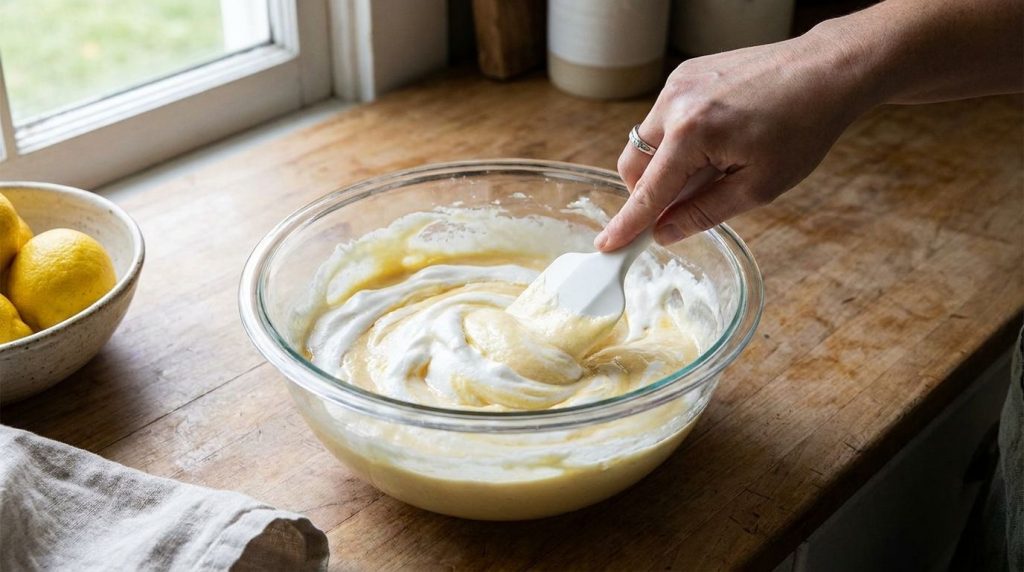
- Fold Meringue into Batter: Gently fold about one-third of the meringue into the yolk batter to lighten it. Then, add the remaining meringue, folding carefully with a rubber spatula using a circular motion, scraping the bottom and sides of the bowl, until no streaks of white remain. The goal is to incorporate the meringue without deflating the air you’ve built up.
- Pour and Bake: Pour the cake batter into your prepared cake pan. Carefully place the cake pan into the larger roasting pan in the oven. Pour hot water into the roasting pan until it reaches about halfway up the sides of the cake pan. This creates a water bath (bain-marie), which ensures even baking and a moist, tender crumb.
- Bake the Cake: Bake for 50-60 minutes, or until the top is golden brown and a wooden skewer inserted into the center comes out clean. The cake should feel springy to the touch.
- Cool Gradually: Once baked, turn off the oven and leave the cake inside with the oven door slightly ajar for about 10-15 minutes. This gradual cooling prevents the cake from shrinking too much.
- Final Cooling: Carefully remove the cake pan from the water bath and place it on a wire rack. Let it cool completely in the pan before inverting it onto the rack, removing the parchment paper, and serving.
Pro Tips for the Best Results
- Room Temperature Eggs Are Key: Always use room temperature eggs. They emulsify better in the batter and produce a more voluminous, stable meringue.
- Do Not Overmix: When combining wet and dry ingredients, mix just until combined. Overmixing develops gluten, leading to a tough, dense cake.
- Perfect Meringue: Whip your egg whites to stiff, glossy peaks – not dry and crumbly. Over-whipped meringue can be difficult to fold in and result in a dry cake.
- Gentle Folding Technique: When folding the meringue into the batter, use a light hand and a figure-eight motion. This technique incorporates the meringue without deflating the precious air.
- The Water Bath is Essential: Baking the cake in a water bath creates a humid environment in the oven, preventing the cake from drying out, cracking, and ensuring an incredibly moist and tender crumb.
- Cool Gradually: Don’t rush the cooling process. Letting the cake cool slowly in the oven with the door ajar, then in the pan, helps prevent it from shrinking or collapsing.
- Clean Bowl for Meringue: Ensure your mixing bowl and whisk are perfectly clean and free of any grease when whipping egg whites. Even a tiny bit of fat can prevent the whites from whipping properly.
Common Mistakes to Avoid
- Overmixing the Batter: This is the most common culprit for a dense, tough cake. Mix only until the ingredients are just combined.
- Deflating the Meringue: Being too aggressive when folding the meringue will knock out the air, leading to a flat cake. Be gentle and patient.
- Ignoring the Water Bath: Baking without a water bath can result in a dry cake with a cracked top and less tender texture.
- Opening the Oven Door Too Early: Resist the temptation to open the oven door during the first 40 minutes of baking, as sudden temperature changes can cause the cake to collapse.
- Not Using Room Temperature Eggs: Cold eggs won’t emulsify well and the meringue won’t reach its full potential fluffiness.
- Greasing the Sides of the Pan: For this type of cake, the batter needs to cling to the sides of the pan to rise properly. Greasing the sides will cause it to shrink dramatically.
Variations & Substitutions
While delicious on its own, this Fluffy Japanese Milk Cake can be customized to your taste:
- Matcha Milk Cake: Sift 1-2 tablespoons of high-quality matcha powder with the dry ingredients for a subtle earthy flavor and beautiful green hue.
- Chocolate Milk Cake: Incorporate 2-3 tablespoons of unsweetened cocoa powder with the dry ingredients. You might need to add a tiny splash more milk to maintain consistency.
- Citrus Zest: Add a teaspoon of finely grated lemon or orange zest to the yolk mixture for a bright, refreshing note.
- Different Toppings: Instead of just powdered sugar, consider a light cream cheese frosting, a berry compote, or fresh fruit and a dollop of whipped cream.
- Spice It Up: A pinch of cinnamon or cardamom can add a warm, cozy dimension to the cake.
Serving Suggestions
The beauty of Fluffy Japanese Milk Cake lies in its simplicity, making it versatile for many occasions:
- Classic Simple Serve: A light dusting of powdered sugar is often all it needs to shine.
- With Fresh Berries and Cream: Pair slices with a medley of fresh strawberries, blueberries, or raspberries and a dollop of freshly whipped cream.
- Afternoon Tea Treat: It’s a perfect companion to a warm cup of green tea, Earl Grey, or your favorite coffee.
- Light Dessert: Serve it as a light and elegant dessert after a rich meal, allowing its delicate flavors to cleanse the palate.
- Custard or Fruit Sauces: A drizzle of crème anglaise or a light fruit coulis can complement its mild sweetness.
Storage & Reheating
- Refrigerator Storage: Store any leftover Fluffy Japanese Milk Cake in an airtight container in the refrigerator for up to 3-4 days. The texture remains surprisingly soft, though it’s best enjoyed fresh.
- Freezer Suitability: While not ideal due to its delicate, airy texture, you can freeze individual slices in an airtight container or wrapped tightly in plastic wrap and then foil for up to 1 month. Thaw overnight in the refrigerator before serving.
- Reheating Method: This cake is best served at room temperature or slightly chilled. Reheating in a microwave can alter its delicate texture, making it slightly rubbery. If you prefer it warm, a few seconds in the microwave (5-10 seconds) might work, but be cautious not to overheat.
- Maintaining Texture: Always keep the cake covered to prevent it from drying out, whether at room temperature or in the refrigerator.
FAQ
What makes Japanese Milk Cake so incredibly fluffy?
The secret lies in the meringue (whipped egg whites) that is gently folded into the batter, incorporating a significant amount of air. Additionally, baking it in a water bath creates a steamy environment that promotes a tender, moist, and even bake, preventing the cake from drying out and ensuring that signature cloud-like texture.
Can I use a different size cake pan?
Yes, you can, but you may need to adjust the baking time. For a 6-inch pan, the cake will be taller and might require slightly longer baking. For a 9-inch pan, it will be shorter and likely bake faster. Always check for doneness with a skewer.
Why did my Japanese Milk Cake crack on top?
Cracking can occur if the oven temperature is too high, causing the cake to bake too quickly on the surface before the inside can catch up. Insufficient moisture during baking (e.g., if the water bath isn’t deep enough or dries out) can also contribute to cracking. Ensuring a consistent oven temperature and an adequate water bath can help prevent this.
Can I make this cake ahead of time?
Yes, you can. This cake is still delicious on the second and third day, especially when stored properly in an airtight container in the refrigerator. However, its absolute peak fluffiness and delicate texture are best enjoyed on the day it’s baked.
What is a neutral vegetable oil, and why is it used?
A neutral vegetable oil (like canola, grapeseed, or sunflower oil) is an oil with a very mild flavor that won’t interfere with the delicate taste of the cake. It’s used to provide moisture and tenderness without adding a strong oily flavor, which butter might impart. It also helps create a softer crumb structure compared to butter in certain cake types.
How do I know when the cake is done baking?
The cake is done when the top is golden brown, springs back lightly when gently touched, and a wooden skewer or toothpick inserted into the center comes out clean or with only a few moist crumbs attached.
Recipe Card: Fluffy Japanese Milk Cake
Learn to bake the most heavenly Fluffy Japanese Milk Cake at home! This easy recipe creates a light-as-a-cloud dessert that’s perfect for any occasion.
- Prep Time: 25 minutes
- Cook Time: 50-60 minutes
- Total Time: 1 hour 15 minutes – 1 hour 30 minutes
- Servings: 8-10 slices
- Course: Dessert
- Cuisine: Japanese
- Cooking Method: Baking (with water bath)
Ingredients:
- 1 cup (120 g) all-purpose flour
- 2 tablespoons (15 g) cornstarch
- 1 teaspoon (5 g) baking powder
- 1/4 teaspoon (1.5 g) salt
- 1/2 cup (120 ml) whole milk
- 1/4 cup (60 ml) neutral vegetable oil (like canola or grapeseed)
- 1 teaspoon (5 ml) vanilla extract
- 6 large eggs, separated (at room temperature)
- 3/4 cup (150 g) granulated sugar, divided
Instructions:
- Preheat oven to 325°F (160°C). Lightly grease an 8-inch (20 cm) round cake pan and line the bottom with parchment paper. Do not grease the sides. Place a larger roasting pan on the bottom rack of your oven.
- In a medium bowl, sift together all-purpose flour, cornstarch, baking powder, and salt. Set aside.
- In a large mixing bowl, whisk together whole milk, vegetable oil, vanilla extract, and egg yolks until smooth.
- Gradually add the sifted dry ingredients into the yolk mixture, whisking gently until just combined. Do not overmix.
- In a separate, clean, large mixing bowl, begin whipping egg whites on medium speed. Once foamy, gradually add 3/8 cup (75 g) of granulated sugar. Increase speed to high and whip until stiff, glossy peaks form.
- Gently fold about one-third of the meringue into the yolk batter to lighten it. Then, add the remaining meringue, folding carefully with a rubber spatula until no streaks of white remain.
- Pour the batter into the prepared cake pan. Carefully place the cake pan into the larger roasting pan in the oven. Pour hot water into the roasting pan until it reaches about halfway up the sides of the cake pan.
- Bake for 50-60 minutes, or until the top is golden brown and a wooden skewer inserted into the center comes out clean.
- Turn off the oven and leave the cake inside with the oven door slightly ajar for 10-15 minutes to cool gradually.
- Remove the cake from the water bath and place it on a wire rack. Let it cool completely in the pan before inverting, removing parchment, and serving.
Notes:
For the best texture, ensure eggs are at room temperature. Do not overmix the batter or over-whip the meringue. The water bath is crucial for a moist, fluffy cake. Cool the cake gradually to prevent shrinking.
Storage:
Store in an airtight container in the refrigerator for up to 3-4 days. Can be frozen for up to 1 month, but best enjoyed fresh.
Nutrition:
Nutrition information is an estimate and may vary depending on the ingredients and brands used.
